Atik Infinity Colour Camera - Software
Introduction | What Does the Atik Infinity Software? | Screenshots | The Most Important Steps in a Nutshell - Not a Replacement for the Manual | Image Settings | Image Stacking | Image Quality | Saving and Post-processing Images | Using FITS Recordings in Replay Mode and Optimizing Images Later | Suggestions for Improvement and More... | Preliminary Conclusions | Links
Archive
On this page, I present some experiences made with the software application (and perhaps some other software) for my Atik Infinity Colour* camera (received used on November 25, 2017). Possibly, these are useful for others who want to acquire this camera as well...
See also pages (Archive):
- Atik Infinity Colour Camera - Information
- Atik Infinity Colour Camera - First Experiences
- Atik Infinity Colour Camera - First Observation Sessions
- Atik Infinity Colour Camera - Further Experiences (Dry Runs) - Further Experiences (Nightly Tests)
- Atik Infinity Colour Camera - Software
- Atik Infinity Colour Camera - Field of View
- Atik Infinity Colour Camera - Photo Gallery
*) Usually, I would write "Color", because I try to use American English, but Atik is a company located in the UK, and therefore it's "Colour"...
Note: Over Christmas 2022, I sold my Atik Infinity camera (transferred on January 5, 2023). I therefore cannot report any further experiences with it here. |
Introduction
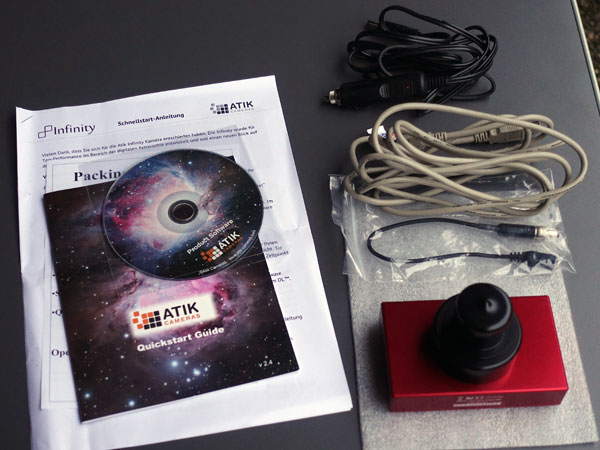
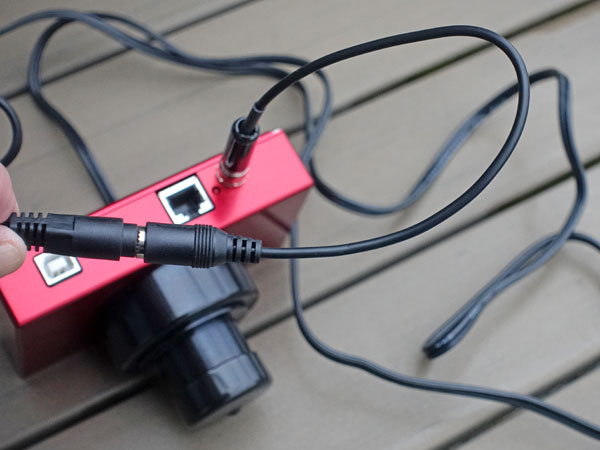
The Atik Infinity Colour camera is supplied with software (supplied on CD, see the top left photo), which is specially tailored to this camera and is intended to make the operation of this camera as easy as possible. It is available for Windows only!
 |
 |
 |
 |
 |
 |
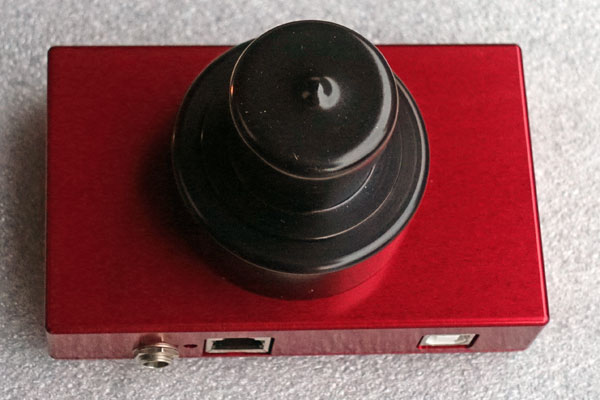
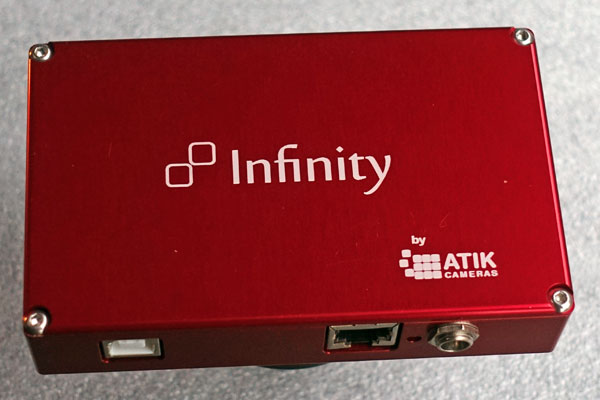
Photos: The scope of delivery for the camera including a software CD; the remaining photos just serve as a reminder of the camera's look...
I received a copy of the Quick Start Guide in German for my (used) camera, a general Quickstart Guide for Atik cameras, which also covers the Infinity software, and a PDF manual on CD. I did not even check the version of the software on the CD, but downloaded the latest software (version 1.5.0.4) from the Atik Website, as well as the PDF manual (version number 1.5, 2017). Early versions of the software contained quite a few bugs, and there were complaints about the lack of stability of the software. The version I used has been stable and error free up to now.
Question: Can I Run the Atik Infinity Software on an Apple Macintosh Computer?
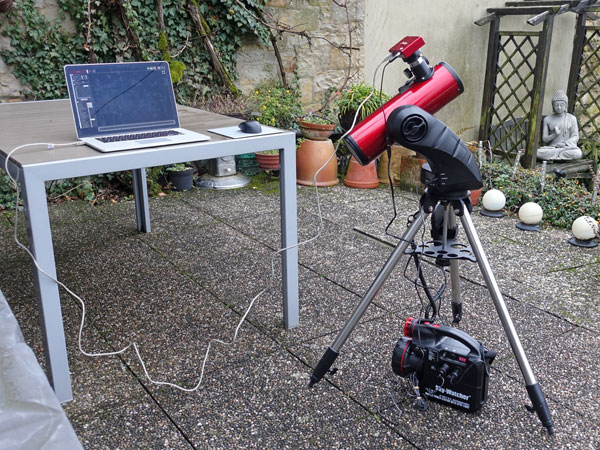
Of course, this was almost the most important question I faced before buying the camera, because I own an Apple MacBook Pro and run Windows using Parallels Desktop. I no longer remember whether I simply hoped that it would work when I placed the order, or whether I found an answer somewhere. Anyway, I can report that it works on my 2012 (and 2019) MacBook Pro using Windows 10 and Parallels Desktop.
About this Page
This page describes the Atik Infinity Software and my experiences with it. It is not intended as a replacement for the software manual, and I assume that readers have a basic knowledge of the software. At the end of this page, I offer a few suggestions for improving the software (I was a usability engineer before I retired).
What Does the Atik Infinity Software?
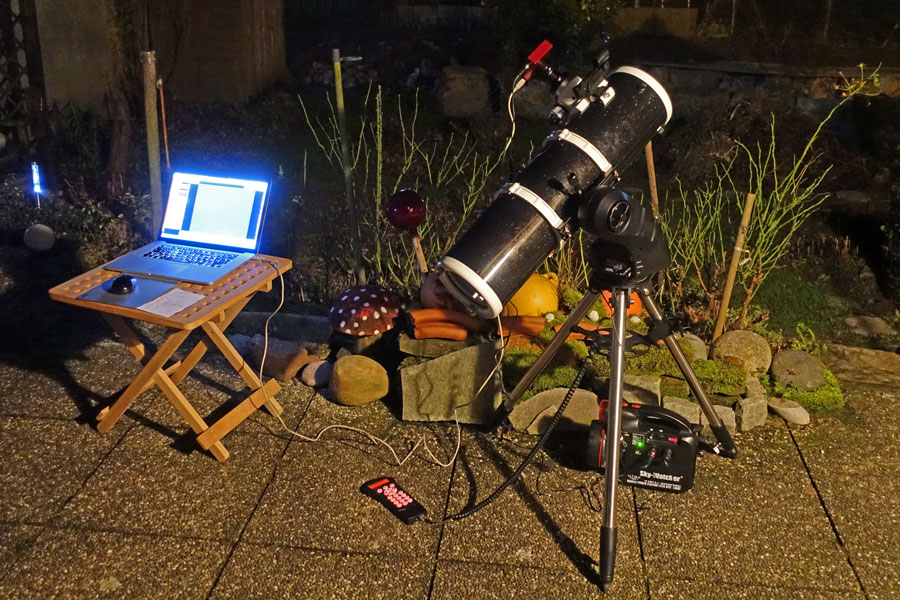
The Atik Infinity software is needed to operate the Atik Infinity, connected to a telescope on a motorized mount camera, with a laptop computer. In particular, it supports the following tasks:
- Finding sky objects and focusing the camera on these precisely
- Observing sky objects "near live" with the camera at the telescope (which
has to be on a motorized mount);
in doing so, it can cancel out the movement of sky objects and superimpose images step by step to create a smoother picture with less noise - Storing individual images and entire observation sessions or parts thereof
- Broadcasting observation sessions over certain public channels
- Playing back (Replaying) saved sessions later, with the ability to create new image stacks and to customize and optimize them for further processing.
To structure these tasks, the camera works in three main modes:
- Search mode (eye icon)
- Video mode (camera Icon)
- Replay mode (double arrow icon)
In replay mode, the appearance at the top of the application window changes slightly (see Screenshots below).
How to use the software is briefly described below in The Most Important Steps in a Nutshell.
Screenshots
The following screenshots provide an overview of the application window and the most important controls for the three modes listed above.
Screen Overview
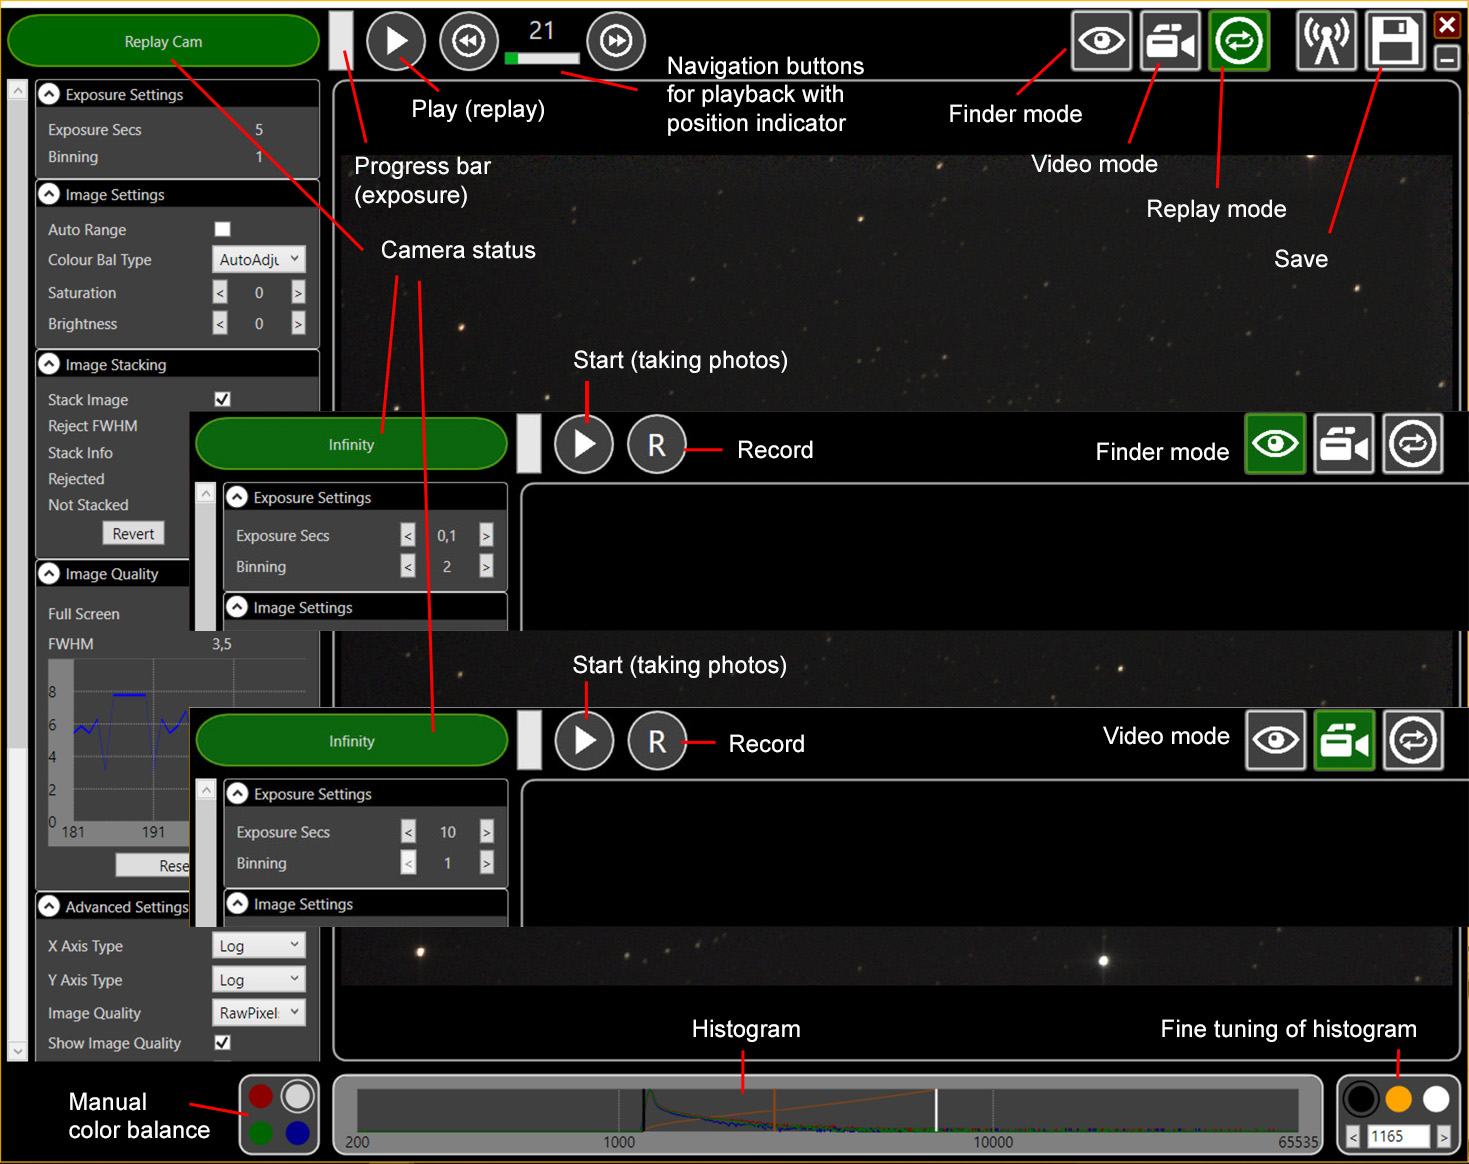
Screen in "Replay" mode with explanations. "Finder" and "Video" modes built into the screenshot. I will explain the settings at the left edge elsewhere or have to refer you to the manual.
Upper Screen Elements for Taking Photos (Finding, Focusing, Observation)

(1) Camera recognized, Finder mode activated (eye icon green, progress indicator, "Start" and "Record" button), the camera does not take photos (exposure time and binning are set to typical values for the Finder mode).

(2) Ditto, "Start" pressed - the camera takes photos (exposure time and binning are set to typical values for the Finder mode).

(3) Video mode activated (camera icon green, progress indicator, "Start" and "Record" button), the camera does not take photos (exposure time and binning are set to typical values for the Video mode).

(4) Ditto, "Start" pressed - the camera takes photos; the progress bar indicates the exposure state (exposure time and binning are set to typical values for the Video mode).
Upper Screen Elements for Replay

Replay mode (double arrow icon green) with navigation buttons and a position indicator
The Most Important Steps in a Nutshell - Not a Replacement for the Manual
Nevertheless, I repeat the most important steps to get you going.
(1) Start the software and connect the camera:
- Start the software. The field at the top left is dark red and shows "No
Camera":
 Status:
No camera recognized (Finder and Video modes)
Status:
No camera recognized (Finder and Video modes) - Connect the Atik Infinity camera to the power supply and to a computer
via USB. After a short while, the field at the top left changes its color.
It turns green and shows the text "Atik Infinity":
 Status: Infinity
camera recognized (Finder and Video modes)
Status: Infinity
camera recognized (Finder and Video modes)
(2) Focus the camera and begin the observation:
- Select the "Finder mode" button (eye icon, the leftmost button of the icon group in the top right corner).
- Press the "Start" button (right arrow icon, in the icon group in the top left corner) - the camera will now take pictures.
- Focus the camera with a medium bright star (short exposure time, binnning set to 2 x 2 or 4 x 4); if necessary use focusing aids.
(3) Observe live:
- Select the "Video mode" button (video camera icon, in the icon group on the top right), increase the exposure time (for example, to 5 s), set binning to 1 x 1 (normally).
- Press the "Play" button (right arrow icon, in the icon group in the top left corner) if not yet active - the camera will now take pictures.
- In the "Image Stacking" tab (left side), select "Stack Image" and thus enable stacking.
- In the histogram below, adjust the sliders to get an optimal picture (or let let the application adjust the picture automatically).
(4) Save the results:
- Record session: Click the "R" button (will flash red). Now images are recorded in the FITS format. They can be replayed later (use the button with two arrows). Click the button again to stop the recording.
- Save photo: Click the floppy disk icon to save the current state (that is, the complete stack) in JPG or other formats.
(5) Replay recordings afterwards:
- Click the button with the two arrows. The field at the top left will turn
green and show the text "Replay Cam":
 Status:
Replay mode
Status:
Replay mode - Clicking the "Replay Cam" button stops the replay, clicking it again, resumes replay.
- During replay, you can change the histogram controls or even save the current image (the complete stack), just as during the "near live" observation. But it is easier if you halt the replay for it ...
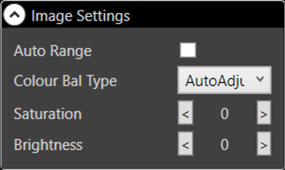
Image Settings
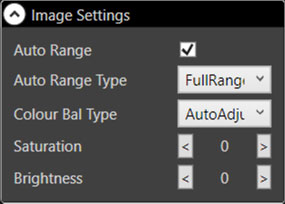
I only cover the levels settings here. This can be done automatically or manually using a histogram. As soon as you use the histogram, any automatic that was in effect will be switched off. The following screenshots show examples of possible settings.
 |
 |
 |
||
Manual levels setting via histogram |
Automatic levels setting - here using the complete tonal range |
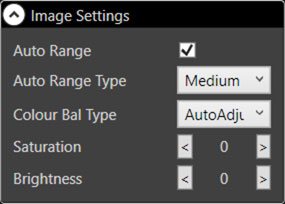
Automatic levels setting - Medium = medium stretch, versatile for a range of objects |
||
 |
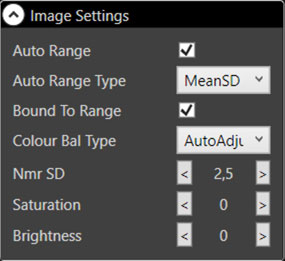 |
Automatic levels setting - MeanSD = average pixel value plus the number of standard deviations given in Nmr SD. "Bound To Range" ensures that the values will not go above or below the highest or lowest pixel values |
||
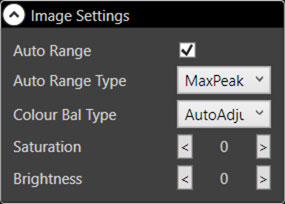
Automatic levels setting - MaxPeak = stretch based on highest peak |
See right next to the box |
Usually, I set the levels manually using the histogram. The settings "MaxPeak" and "MeanSD" seem to deliver quite useful "quick settings" and might be used as a starting point.
 |
||
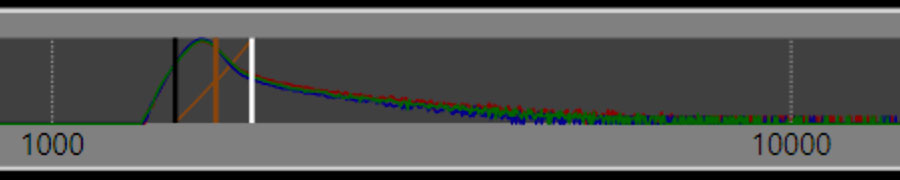
Histogram for setting levels manually |
||
 |
||
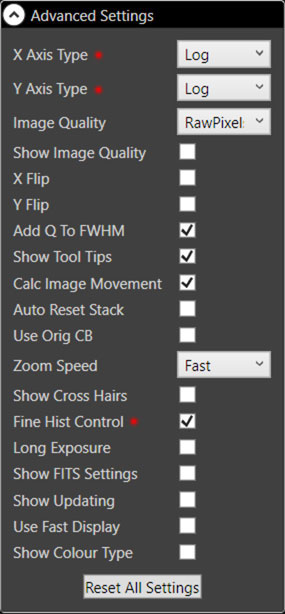
Section of the histogram. It shows curves for the three base colors as well as three sliders for the black, white, and gray levels (the gray level is shown in orange and is kind of a gamma slider). If you click the histogram background, the respective slider (white or black) will move to that point. I found this annoying because this often happened inadvertently when I tried to move the orange slider in the middle... The axes are logarithmic by default, but this can be changed in the "Advanced Settings" tab ("X Axis Type", "Y Axis Type"). The gray levels shown range between 200 and 655353 (16 bits). |
||
If you activate "Fine Hist Control" in tab "Advanced Settings," a fine tune option for the three sliders appears right next to the histogram. The level sliders can, however, still be used. |
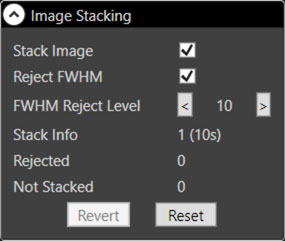
Image Stacking
Overlaying images, called "image stacking", reduces noise and step-by-step increases the quality of the resulting image. It is best to switch it on when the mount has settled after movements and the pictures show a consistent quality. In addition, you can enable that imaged of poor quality are not included in the stack. For this purpose, you can choose a threshold (a FWHM* value) above which images are rejected. You should not set the threshold too low, because otherwise too many pictures will be rejected.
*) FWHM = Full width at half maximum
 |
 |
 |
||
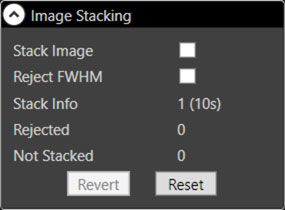
Image stacking "off" |
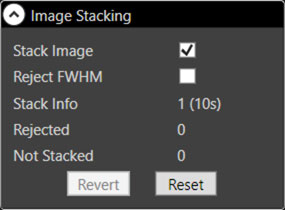
Image stacking "on" |
Image stacking "on", rejection of poor images activated (threshold set to 10) |
Since I have only more or less experimented so far, I did not activate images rejection during observations. Sometimes, I found that the FWHM values fluctuated so much that it would have been difficult for me to set a meaningful threshold.
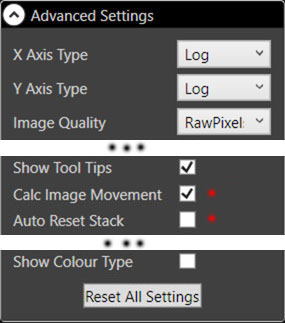 |
When image stacking is enabled, the "Calc Image Movement" function
(calculation of image movements) should also be enabled. This is usually
the case; it can be enabled or disabled in the "Advanced Settings" tab.
Note that this function puzzled me at first a bit. Even though the automatic
calculation of movements between images was enabled, I sometimes saw
quite large object movements. This was probably when image stacking was
not activated. I was amazed at how fast the movements were. Sometimes
they got smaller again, it often changed a lot.
My main point is here that the calculations, even though they are activated, are applied only when image stacking is enabled. I found this fact in the manual (and checked it thereafter), and it is not at all obvious. Why not cancel out the movements without image stacking as well? Anyway, even when the movements are cancelled out, there are sometimes slight movements visible. All the movements described here are probably caused by inaccuracies of my GoTo control. | |||
| The image stack can be reset automatically ("Auto Reset Stack" in
tab "Advanced Settings"). This is, however, disabled by default.
When enabled, an automatic reset is done, whenever objects have moved
too far away from their original position. If the function is deactivated,
the stack is kept, and the images will not be added to the stack, but
instead listed in the "Not Stacked" section.
You can reset the stack manually by clicking the "Reset" button in tab "Image Stacking". Then a new stack is started at the current position. By the way, button "Revert" removes the last image from the stack. | |
|||
Image Quality
 |
When you activate the option "Show Image Quality" in the "Advanced
Settings", the "Image Quality" tab will be displayed above
this tab. It shows a diagram of the the image quality history, measured
as FWHM value. In addition, the last, that is, current FWHM value
is displayed as a number.
The image quality in the form of a FWHM value is required on the one hand for finding the exact focus for the camera as well as for rejecting bad images when stacking images. Furthermore, there is a "Full Screen" pop-up menu, which determines whether and how the image quality should be displayed on the main screen:
The image quality display on the main screen is mainly used for focusing, which may require you to be farther away from the computer because you have to focus the telescope. Disabling "Show Image Quality" will cause the "Image Quality" tab to disappear, but the "Full Screen" setting will remain in effect, which seems a bit strange to me ... The item "Image Quality" in the tab "Advanced Settings" offers the user the choice between:
So far I have only used the "RawPixels" setting (default). |
Saving and Post-processing Images
The simplest way to preserve what you see on the laptop screen, and perhaps to improve it by post-processing, is to save an image from time to time by clicking on the floppy disk icon in the top right corner of the application window.
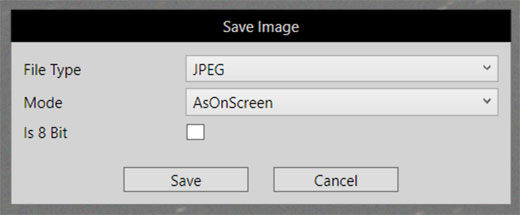
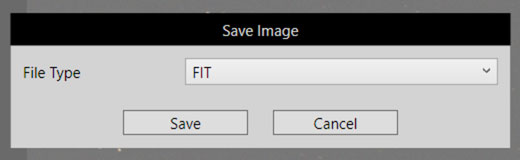
A dialog box (see above) will appear offering the following options:
- File Type: FIT, PNG, JPEG, and TIFF
- Mode: "Unprocessed" or "AsOnScreen"
- 16 bit or 8 bit (checkbox)
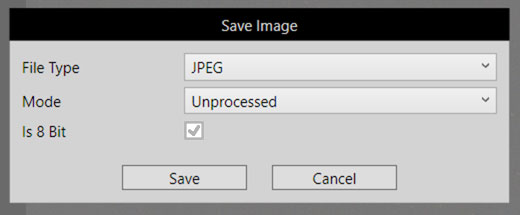
When you click"Save", you will be offered the last-used file name. In my view, this is a pretty nonsensical choice, because you always have to edit the file name. Since the file names start with "Image" by default, Atik could at least have increased the image number by one, and you would have to edit the name only in rare cases. In my opinion, this behavior of the program is completely incomprehensible and annoying!
Another thing that puzzled me for a while (because I had forgotten that JPG files have only 8 bit color) was that I believed that I had saved JPG images in 16 bit color, because I had not checked the "Is 8 Bit" checkbox. Both, the 8 bit and the 16 bit version were declared as being 8 bit by my image editing programs, and I was indeed not able to find any differences between the images. Finally, I looked at the file sizes - and they were identical. Then it fell from my eyes that there are no 16 bit JPG images.
Part of the issue is, however, that the "Save Image" dialog box suggests that you can save JPG images with 16 bits. A correct version would either discard the checkbox or disable it and gray it out as in my proposal below:
For the FIT files, on the other hand, the dialog box is correct and discards unneeded options:
I then checked for the PNG and TIFF format whether these are saved in 8 bit and in 16 bit color format. This is indeed the case, as the different file sizes and also my image editing programs indicate.
I also assumed that, with 16 bit images, the "Unprocessed" version could easily be transferred to the state of the "AsOnScreen" version in post-processing and that it, overall, would offer more latitude in post-processing. Admittedly, it is better suited to post-processing than the 8 bit version, but it looks to me as if it were more appropriate to use the histogram in the Infinity program to optimize the image manually and save the "AsOnScreen" version of the image. I suspect that it depends on the specific case, how far the unedited 16-bit version can be useful.
I also compared the "AsOnScreen" versions for the same picture. There was virtually no difference in post-processing between the 8 bit and 16 bit versions - unless you looked at the histograms. The image that I tested shows a globular star cluster that is washed out at the center in the "AsOnScreen" version (this cannot be recovered even with 16 bits). This is not the case for the "unprocessed" version. Maybe I can produce the "optimal" picture from both versions...
I still cannot judge the usefulness of the FIT version. I can only view it in color using FITS Preview application, where the tonal values are extremely difficult to set by hand. The result most closely corresponds to what I achieve with the "Unprocessed" 16 bit version (PNG or TIFF). But the 16 bit version leads to better results than I get with a JPEG version exported from FITS Preview. At the moment, I will not pursue this any further and will save 16-bit TIFF files ( for the same picture, sometimes the TIFF version is larger, sometimes the PNG version...).
I think that it makes more sense to record observation sessions as "FITS movies" and to edit these movies in the Infinity application in "Replay" mode (or with appropriate image stacking programs that process FITS images - but I was not able to understand these yet...).
Below I will report on my experiences with the processing of FITS movies in "Replay" mode.
Using FITS Recordings in Replay Mode and Optimizing Images Later
First of all, here are a few specifics of the "Replay" mode taken from the manual:
- Replay mode will automatically use the same exposure settings as were used in the original session.
- Histogram settings are not saved and remain fully adjustable throughout the replay.
- The progress bar shows you how far through the session you are, and shown above it is the number of the image currently on screen.
In addition, the FWHM values (quality values) are available (they are not stored in the FITS data as the screenshot below demonstrates).This allows you to reject images by activating the image rejection function and setting a corresponding FWHM threshold.
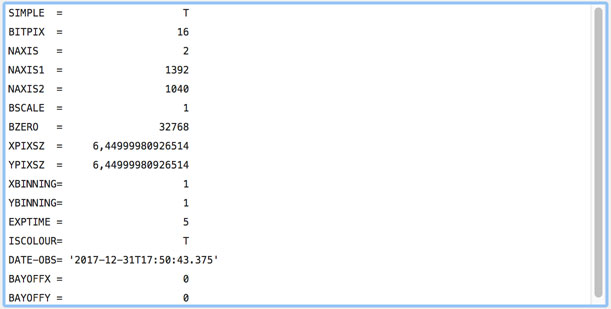 |
FITS meta data, presented by the FITS Preview application Obviously, the FWHM values are not stored, but instead are recreated during replay ("Replay" mode). |
An Experiment...
In order to test how useful the FITS recordings are in "Replay" mode for further post-processing, I made the following experiment: I stacked the first 23 images of the session, excluded the first image. however, and stored this stack, once as "AsOnScreen" and once as "Unprocessed", as a 16-bit TIFF file. Only the "AsOnScreen" version was usable in post-processing. I then tried to process the image in the way that I had it done once with an 8-bit JPG version of the image stack. I did, however, not manage to arrive at completely identical results. Nevertheless, the resulting images are more similar than I had expected - at least as long as you do not magnify the images more than 100%.
 |
 |
|
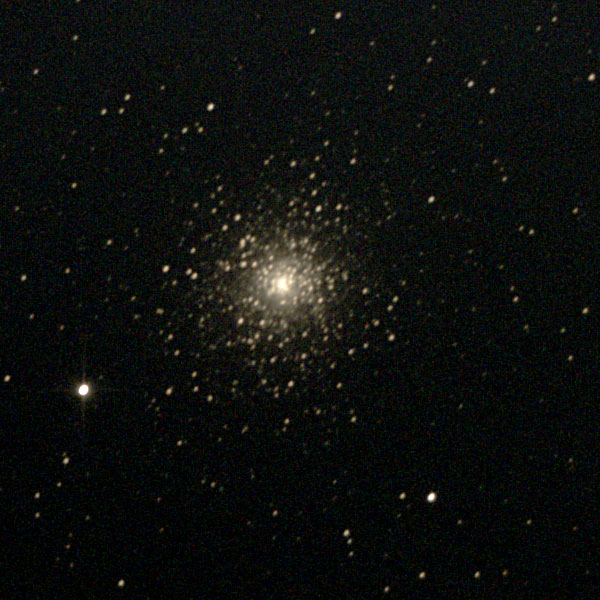
16 bit version stacked in "Replay" mode, saved "AsOnScreen", and post-processed later |
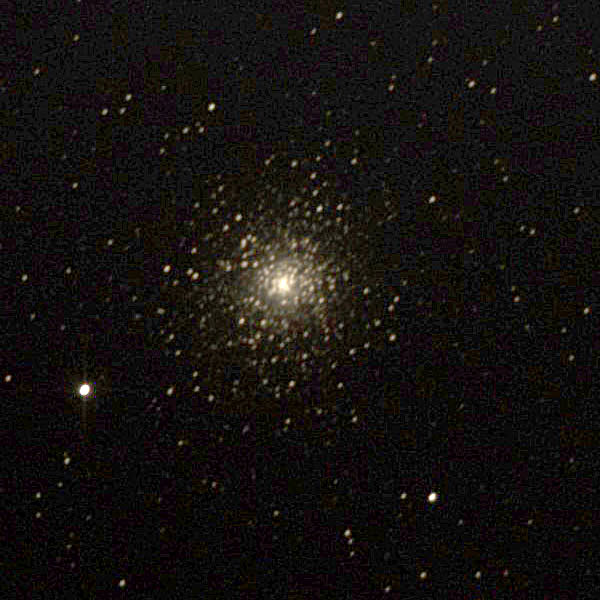
8-bit version saved during the observation "AsOnScreen", and post-processed later |
If you, however, enlarge the images, the 8-bit version shows much stronger and coarser artifacts than the 16-bit version:
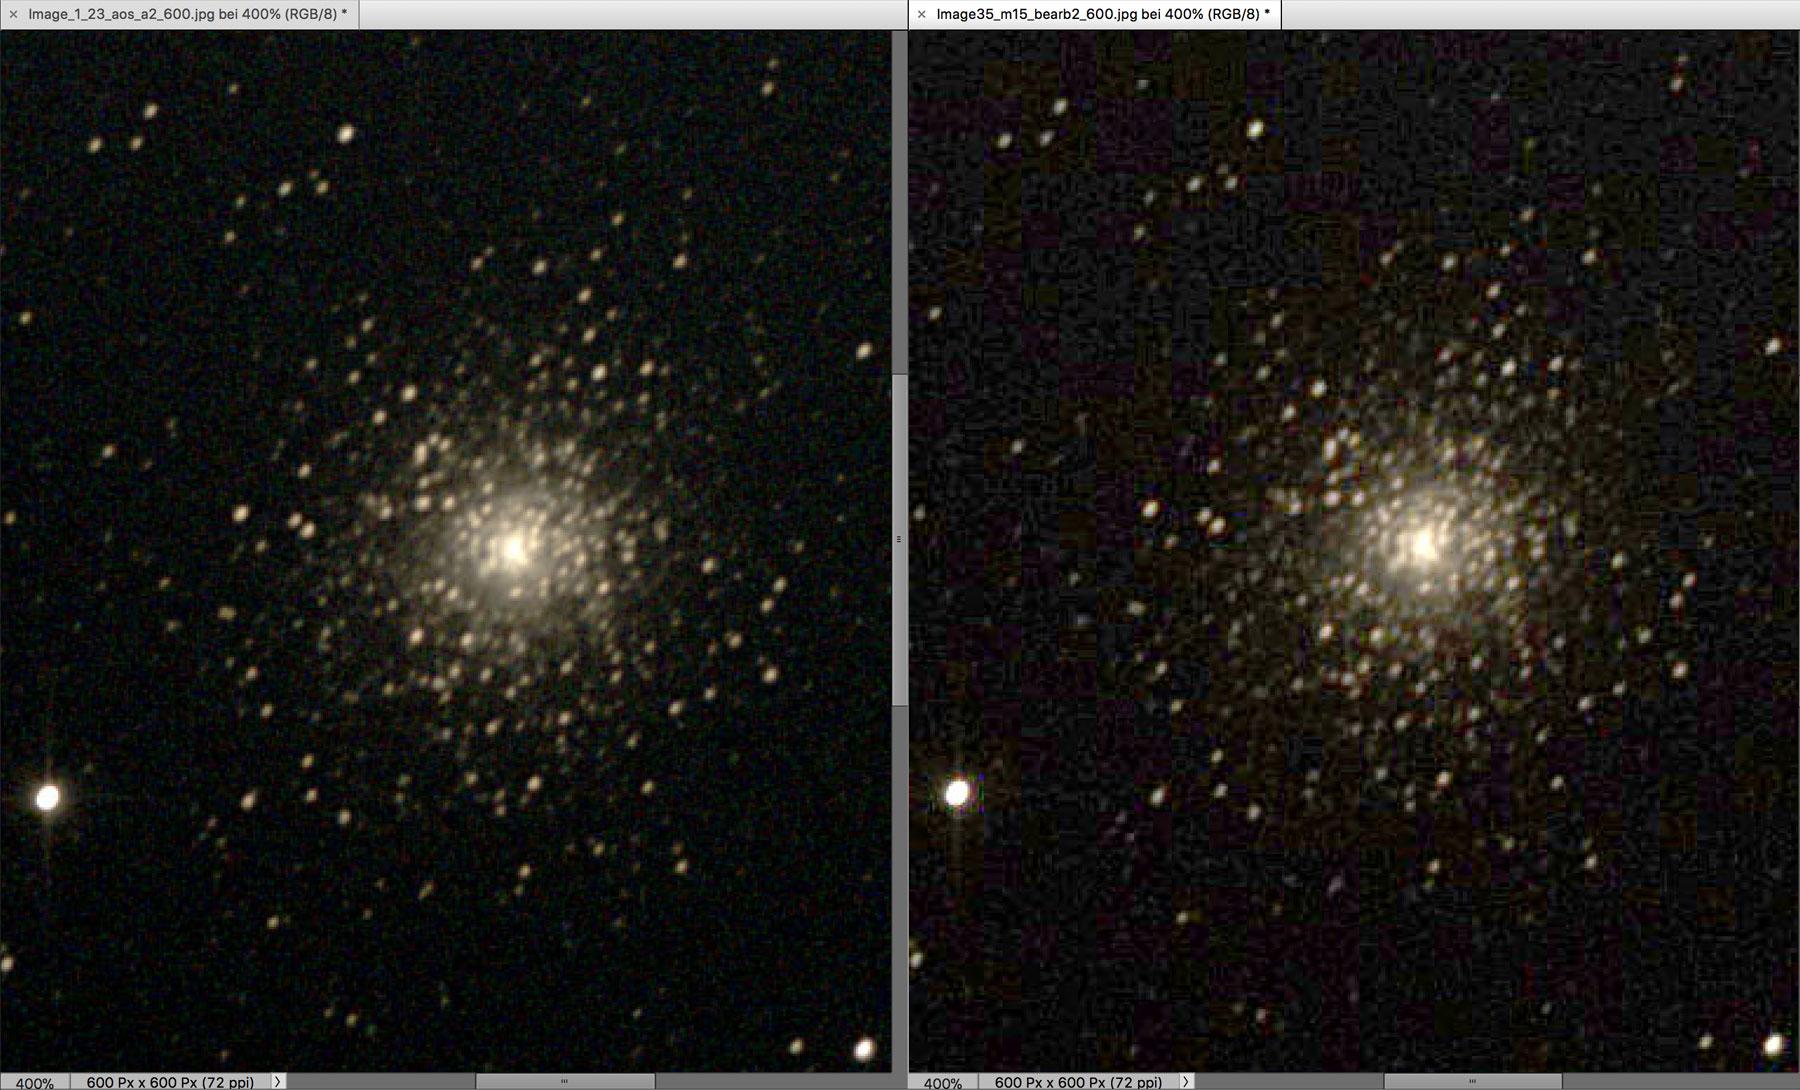
Left: The 16-bit version (400%) was created in "Replay" mode and post-processed afterwards; right: The 8-bit version was saved during the observation and post-processed afterwards (400%)
My conclusions from this experiment are:
- For 16-bit storage do not expect hugh increases in image quality if you set levels in both cases, but you will get less artifacts. I therefore think that it does make sense to follow Atik's recommendation in any case and save the images during the observation as 16 bit versions.
- It is still possible to save the images in 16 bit color in "Replay" mode, and to improve the stack quality by removing poor images from the stack if appropriate. I therefore recommend that you always record the observations (and delete the sessions later if you want to...).
Suggestions for Improvement and More...
As I worked as a usability engineer at SAP, a German software manufacturer, I cannot avoid to make a few suggestions for improving (from my point of view...) the Atik Infinity software. So, here comes a kind of "brief review" of the software...
Overall...
Overall, the software does what it is meant to do and is easy to understand and use. This is also reported on the Internet by many users. The software works rock-solid up to now, and the instability reports on the Internet definitely refer to early versions of the software. Nevertheless, there were a few things than annoyed or puzzled me, and this will be dealt with in the following. But note that not all of the things that I mention below are of that kind of issue. Some of the "issues" may only be noticed by a usability engineer...
Runs on Apple Macintosh - Using Parallels Desktop and Windows 10
I use the software on an Apple Macintosh, running Windows using Parallels Desktop, which works well. When I considered buying the camera, I regrettably was not able to find any comment on whether this would work. Why does Atik not include a note on their Website that this combination does work well? There are probably a lot of Mac owners who want to use Atik cameras, and the Atik Infinity in particular.
Icon Design...
I will start with a not so important item, because this does not affect the application's functionality, but I think that the icons should get an overhaul to make the software look more professionally. I know from SAP that developers love to draw icons, but they are much better at programming. What about hiring a design student for a modest redesign of the user interface (no fancy interface, please!)?
JPEG Save Dialog
I know that I should have known better (as the Beatles sing...) and that JPEG files are not 16 bits, but since the "Save" dialog offers a checkbox for 8 bits, I somehow expected my saved JPEG files to be 16 bits. My image editors, however, told me otherwise, which confused me for a while. I finally "gave in" and decided to use TIFF or PNG from now on, but I also (as a usability engineer...) have to blame Atik's "Save" dialog, which suggests that there might be such a thing as 16 bit JPEGs. While Atik left out the unnecessary options for the FIT(S) file type, they still include the 8 bit checkbox for the JPEG format. Why not leave it out or disable and gray it out so that one knows that the file will be 8 bits? This would probably confuse people less...
Here are the respective dialog boxes:
FIT dialog
Current JPEG dialog
My proposal (or leave the checkbox out...)
Cryptic Abbreviations and "Camelcase" (Developer-Style) Capitalization
Cryptic abbreviations are a common complaint at SAP. I found a few on the Atik Infinity interface as well - and this although there is often enough space for the complete words. I think the Atik developers may have a look at this on their own (and their own opinion on this as well…).
By the way, many terms on the user interface use "camelcase" (or developer-style) capitalization, for example "AsOnScreen" instead of "As on screen" in the dialog box above). While this saves space and may by nice for techno-geek (including the developers of the software), this is not recommended and particular easy to understand for ordinary users...
Behavior of the Histogram Sliders
I was really embarrassed at the behavior of the histogram sliders. Often, when I tried to move the orange gamma slider, I inadvertently clicked the histogram background and thus moved the black or white point to that position (and had to move it back...). Later, I read in the manual why that happened. I know that developers want to make things faster, but sometimes this assistance makes things even worse - at least to the uninitiated… I also know that I should read the manual first, but who does? And isn't software better that is intuitive in all aspects? Perhaps Atik can add a checkbox to the "Advanced Settings" to enable/disable this feature. But Atik developers, please disable it by default to make things "idiot proof."
Files Names
When image files are saved, these are called "Image" plus a number by default. This is fine for me, because I can change the names later, and I do not want to fiddle around with the keyboard in the dark. But whoever had the grand idea to offer the name that was used last in the dialog??? This means that you have to edit the file name (and fiddle around with the keyboard) each time you save a file. Why not just increment the number by one and all you have to do is hit the Enter/Return key?
Perhaps people just told Atik to do it the way it is and they had it the way that I suggest here. This back and forth is common in software development (and usability)…
On Screen Quick Start Guide
Atik might also place a "Help" or "Quick Start" button at the top of the window that displays a quick start guide* on the main screen. In order not to annoy practiced users by this beginners' function, Atik might provide a checkbox in the "Advanced Settings" tab that turns the display of the button "on" or "off" (as for the tool tips)...
*) A little bit shorter than my quick start guide above...

Quick Start icon at the center of the icon bar (the red dot is just an indicator, not part of the user interface). A different position, for example, right next to the diskette symbol (not shown) seems also OK.
Misleading Drop-Down List for the Image Quality Display

The FWHM values (that is, the image quality values) can be displayed on the main screen. The drop-down list "Full Screen" in the "Image Quality" tab allows you to select from a number of options: "Off", "Hybrid", "GraphOnly" und "NumberOnly" that were described above. "NumberOnly" is, however, a hybrid option, where large numbers are laid over the camera image (see image above). Actually, an option should be added that only displays the numbers (if that would make sense is another question ...), and then the options would be named and work like this:
- Off: The image quality is not displayed on the main screen.
- Hybrid (Graph) : Superimposes the image displayed on the main screen with the enlarged FWHM history graph so that you can see both from a distance.
- Graph only: Displays only the enlarged FWHM history graph on the main screen so that you can see it from a distance.
- Hybrid (Number): Superimposes the image displayed on the main screen with the current FWHM value in large numbers so that you can see the value from a distance (the current "NumberOnly").
- Number only: Displays only the enlarged current FWHM value in large numbers on the main screen so that you can see it from a distance.
This may be a bit picky, but this way it would be correct (camel case removed as well...).
Calculating Image Movements
According to the manual, the function "Calc Image Movement" cancels out movements only when "Image Stacking" is enabled. This fact should actually be reflected in the user interface. The way the function is currently presented in tab "Advanced Settings," one has to assume that movements can be canceled out without stacking. By the way, the same applies to the function "Auto Reset Stack" in the same tab (but here the name suggests that it is only active if there is also a stack), and for the function "Reject FWHM" in the tab "Image Stacking."
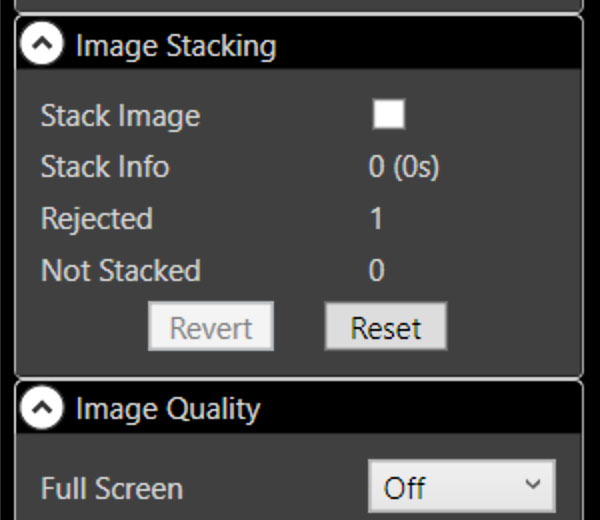
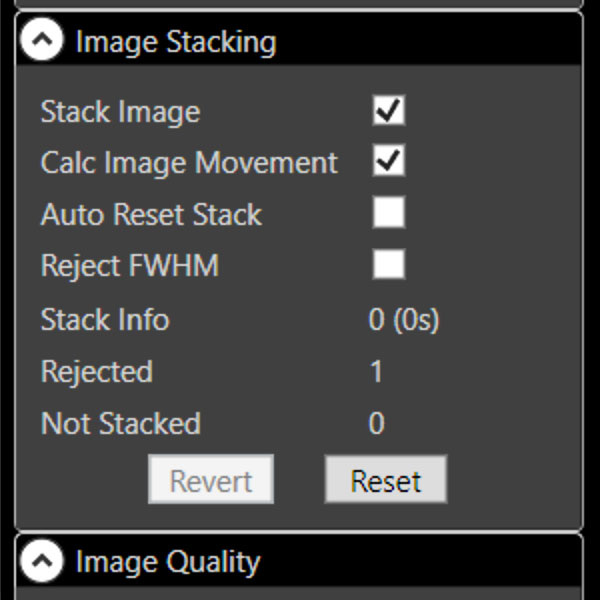
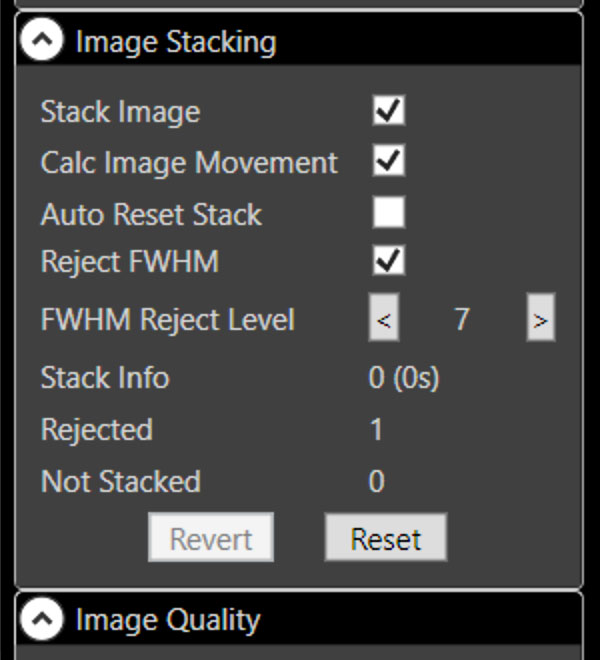
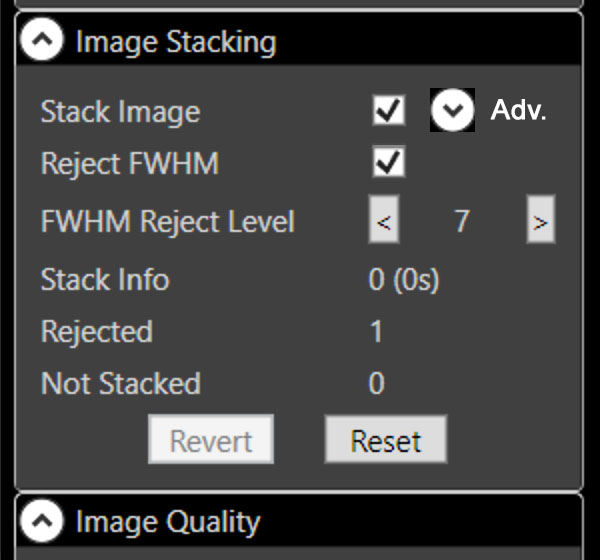
A convincing solution for reflecting these dependencies in the user interface does not seem easy to me. So here is a preliminary suggestion: just as the "Reject FWHM Level" only appears when the "FWHM Reject" checkbox is checked, the previous "Advanced" functions might instead appear in tab "Image Stacking" if " Image Stacking is enabled:
 |
 |
 |
||
"Stack Image" not activated |
"Stack Image" activated, the two advanced options "Calc Image Movement" and "Auto Reset Stack" appear in the tab as well as "Reject FWHM" |
"Reject FWHM" activated, now also "FWHM Reject Level" appears - the same behavior as currently shown |
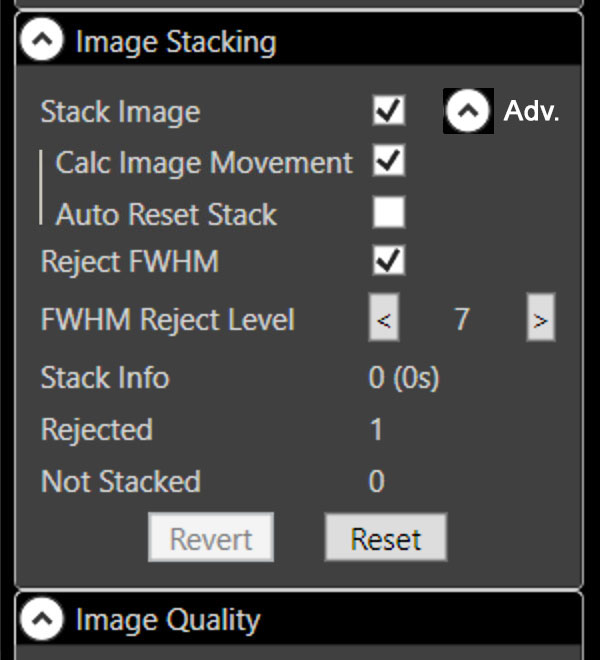
Here is a design alternative that breaks the principle of outsourcing additional options to the "Advanced Settings" tab. It shows the advanced options on the user's request in their context. This is implemented using a button that appears after "Stack Image" was activated and that hides or shows the additional options. The label "Adv." might also be omitted.
|
 |
 |
||
"Stack Image" not activated |
"Stack Image" activated, "Reject FWHM" appears in the tab (after activating it, the level appears as shown), as well as a button with a down arrow for opening the advanced options (with or without a label) |
Advanced options shown (indented); the button now shows an up arrow indicating that it closes the advanced options (the label might be omitted) |
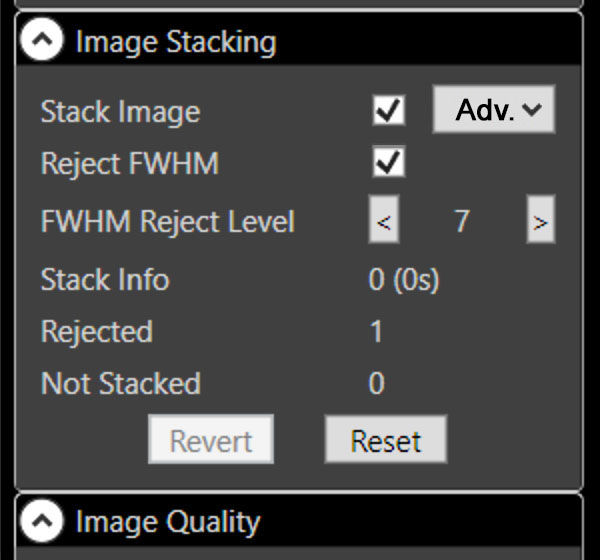
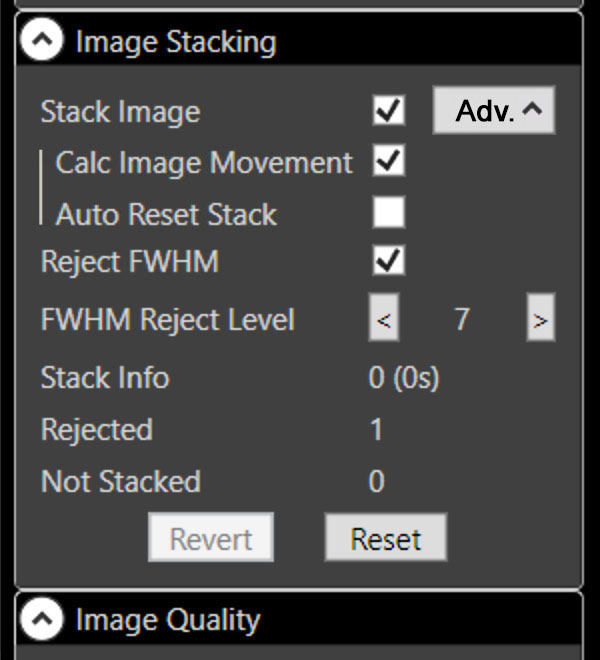
The above proposal does not convince me from a graphic design point of view, but I am not a graphic designer. Perhaps, a version with larger buttons is more convincing:
|
 |
 |
||
"Stack Image" not activated |
"Stack Image" activated, "Reject FWHM" appears in the tab (after activating it, the level appears as shown), as well as a button with a down arrow for opening the advanced options |
Advanced options shown (indented); the button now shows an up arrow indicating that it closes the advanced options |
Record-Button
The "Record" button ("R" icon) should be disabled in the "Search" and "Video" modes when no camera is detected (this is the case for the "Play" button). So it blinks and blinks, but (luckily) nothing is recorded...
Figure: Like the "Play" button, the "Record" (R)" button should be disabled as long as no camera is detected.
Preliminary Conclusions
As I wrote above, the Atik Infinity software does what it should and is easy to understand and use. This is confirmed by the statements of many users on the Internet. The software is so far absolutely stable on my computer configuration, and the instability reports on the Internet definitely refer to early versions of the software. Nonetheless, there were a few things that annoyed or confused me, which I note this on this page where appropriate, and at the end of this page, I put together a list of suggestions for improvement.
I sent an early version of this list to Atik on January 5, 2018 and on January 10, 2018 I received the answer that the proposals were forwarded to the development. I then sent Atik a link to the suggestions on this page to keep them up-to-date. I never ever heared from Atik again (and to my knowledge nothing of my suggestions has been implemented)...
Note: Over Christmas 2022, I sold my Atik Infinity camera (transferred on January 5, 2023). I therefore cannot report any further experiences with it here. |
Links
- Atik company Website, UK: www.atik-cameras.com
- Product page: www.atik-cameras.com/product/atik-infinity/
- Pages from German distributors for the Atik Infinity camera:
- Teleskop-Leasing (bought the camera here): www.teleskop-leasing.de/produkte/kameras/atik-infinity-farb-ccd-kamera- (in German)
- Teleskop-Spezialisten: www.teleskop-spezialisten.de/shop/Astrofotografie/Atik-Infinity-FARB-CCD-Kamera-11mm-Sensor-automatische-Aufnahmen::2166.html (in German) - www.teleskop-spezialisten.de/shop/Astrophotography/::2166.html (in English)
- Teleskop-Service/Express: www.teleskop-express.de/shop/product_info.php/info/p8213_Atik-Infinity-FARB-CCD-Kamera---Sensor-D-11-mm--vollautomatisch.html (in German) - www.teleskop-express.de/shop/product_info.php/info/p8212_Atik-Infinity-B-W-CCD-Camera---Sensor-D-11-mm--fully-automatic.html (in English)
- Astroshop: www.astroshop.de/kameras/atik-kamera-infinity-color/p,4831 (in German) - www.astroshop.eu/cameras/atik-camera-infinity-color/p,48316 (in English)
- Testing the 16 bit Atik Infinity camera with small telescopes (x-bit-astro-imaging, S.J. Wainwright): x-bit-astro-imaging.blogspot.de/2016/02/testing-16-bit-atik-infinity-camera.html
- ICX825 Based Astro-Video Camera Comparison (Jim Thompson): http://karmalimbo.com/aro/reports/Test%20Report%20-%20825%20Sensor%20Camera%20Comparison_07Oct2016.pdf
- Bis zur Unendlichkeit…. (Peter Oden, Peters Astroblog): videoastronomie.net/bis-zur-unendlichkeit
- Peter Oden: Videoastronomie: Der Himmel live und in Farbe. Sterne und Weltraum, Juni 2017. (in German)
- Electronically Assisted Astronomy with Atik Infinity (Fallenangel/Franz Müller): fallenangels2ndlife.dyndns.org/2017/03/01/electronically-assisted-astronomy-wit-atik-infinity/
- Einfach und schnell fotografieren mit der Atik Infinity (Bildbeispiele, Peter Weigel, Teleskope Weigel): www.zudensternen.de/Atik_Infinity.html
- Review of the Atik Infinity Color Video Astronomy Camera (astrojedi, Live Astronomy blog): videoastronomy.blogspot.de/2016/02/review-of-atik-infinity-color-video.html
- See also my page offering Astronomy Links.
|
made by |
| 27.03.2023 |