Astronomy | GXR · GR · RX100 M1 · RX100 M4 · RX10 M3/4 · TZ202 · X Vario · M240 · General | Photos | Conf. Places | Calendars | Art
Ricoh GXR: FAQ
Overview of Questions | Answers
Archive
On this page, I collect some questions regarding the Ricoh GXR and its units, except for the M-mount expansion unit, which is covered on an extra page. For the convenience of the readers, some questions may be redundant with items listed on my experience and characteristics pages.
Overview of Questions
General, Body
- How many camera units have been issued so far, how many have been announced, will there be third-party units?
- Are there different settings for the units and how can these be realized?
- Why do I have to re-enter date and time after removing and reinserting a battery / after switching the camera off and on again?
Firmware, Manuals, Number of Shots
- How can I check the firmware version?
- Where can I find firmware updates?
- Where can I find updates to the manual (including changes due to function enhancing firmware updates)?
- How can I check the number of shots (exposure count)?
- How can I determine the error history (including the exposure count) of my GXR?
Specialties
- How do you explain that the shutter count is less than the file number? How can I correct that?
- What about the 1/1000 sec shutter speed limitation at wide apertures?
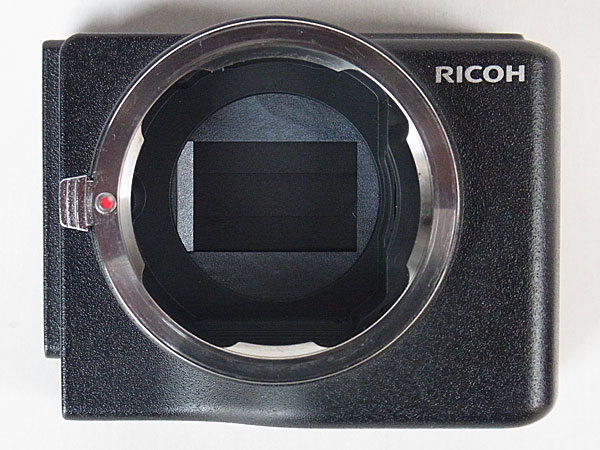
- Which camera units do the lens cap LC2, the adapter HA-3, and the two converters DW-6 and TC-1 fit?
- What do I have to care for when I set JPEG>RAW to Fn1 or Fn2?
- How can I get rid of silvery/sparkling outlines of people or buildings?
- As soon as I switch the camera on, the diaphragm keeps opening and stopping down as I move the camera around - is this normal?
Flash
- Where can I find the button for the flash settings?
- Why does the flash always pop up and no longer snaps in into the body?
Focusing
- What does snap focus mean and how does it work?
- How can I change the snap focus distance - and how can I do it easily?
- What does full press snap mean? How can I enable and disable it?
- How can I see that full press snap is enabled/activated?
- I cannot see the DOF indicators when using snap mode. What did I do wrong?
- What is focus assist and which focus assist modes are available for the Ricoh GXR?
- How can I activate focus assist?
- How is manual focusing supported on the GXR?
- How can I lock exposure? How can I lock focus? How can I lock both of them?
Exposure, ISO, Modes
- How can I lock exposure? How can I lock focus? How can I lock both of them?
- How can I take long exposure shots with the GXR?
- What happens when I set ISO to Auto/Auto-Hi in M (manual) mode?
- Is there an aperture priority mode for the GXR (with EV compensation) and if so, how does it work? Can I see the shutter speed in the viewfinder/on the LCD display?
- What does the function "Switch Shooting Mode" do?
- I cannot find item "Switch Shooting Mode" in the "Shooting" menu. What did I do wrong?
Display: Viewfinder, LCD Screen
- Does the VF-2 viewfinder show the same information as the LCD screen on the rear?
- Why has the sight of the VF-2 viewfinder a gray border around it on all sides?
- My P10 GXR Module no longer registers the scene on the LCD. All the other functions work, and it even sounds like it is taking the pic but doesn't capture the scene. What is wrong with the camera unit?
Exif Data
- How can I check the focus settings (focus mode and focus distance) in the Exif data?
- Are there Ricoh-specific Exif data and how can I reveal them?
Answers
General
How many camera units have been issued so far, how many have been announced, will there be third-party units?
The Ricoh GXR was announced and released with two camera units from Ricoh in November 2009:
- GR Lens A12 50mm equiv. F2.5 MACRO
- Ricoh Lens S10 24-72mm equiv. F2.5-4.4 VC
 |
|
|
| GR Lens A12 50mm equiv. F2.5 MACRO | Ricoh Lens S10 24-72mm equiv. F2.5-4.4 VC |
In March 2010, Ricoh announced two more camera units:
- GR Lens A12 28mm equiv. F2.5
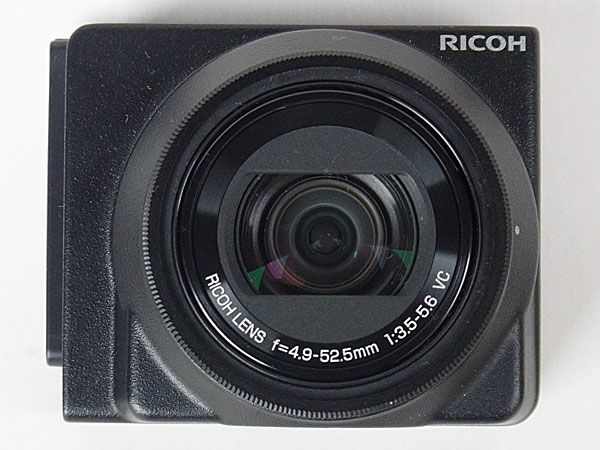
- Ricoh Lens P10 28-300mm equiv. F3.5-5.6 VC
|
|
|
| GR Lens A12 28mm equiv. F2.5 | Ricoh Lens P10 28-300mm equiv. F3.5-5.6 VC |
On May 7, 2010, the availability of the P10 was announced (I received mine in mid-June 2010). The A12-28 was officially announced at Photokina in September 2010 and became (more or less) available in November 2010 (I received mine in mid-November 2010).
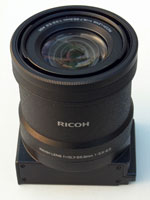
For 2011, an M-mount expansion unit and a 24-85 APS-C zoom were - more or less - announced (Ricoh published a module roadmap at Photokina 2010). The M-mount unit was officially announced in August 2011 and released on September 9, 2011 (I received mine in mid-October, but it had to be exchanged for another one). The 24-85mm equiv. APS-C zoom was announced by the end of November, 2011, but actually appeared in a roadmap only. Officially, it was announced at the beginning of February 2012, and I received my sample on March 23, 2012.
 |
|
||||
| A12 M-mount expansion unit | Ricoh Lens APS-C 24-85mm equiv. |

At different consumer shows, Ricoh demonstrated also concept prototypes of non-camera GXR units that could be developed for the system. The eight mockups, first shown at the CP+ show in Japan in March 2010, include a GPS unit, a wireless kit for underwater photography, storage, and projector units. The company says it will first focus on producing camera units but wants to demonstrate the potential of the system.
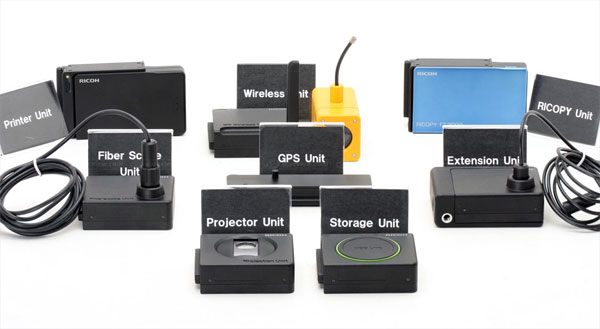
Photo and text from dpreview.com, adapted
Are there different settings for the units and how can these be realized?
The GXR allows to store separate settings for different units. This has to be defined in the Setup menu:
- "Start Settings Readout" has to be set to "Camera Unit"
There is no information from Ricoh concerning, which settings are stored for the units. There is also no information concerning the difference between the two settings "Camera Unit" and "Body" in the Setup menu.
For my experiments regarding the settings, see Individual Settings for the Units
Why do I have to re-enter date and time after removing and reinserting a battery / after switching the camera off and on again?
When you buy a new camera, the first thing you have to do is charge the battery. When you insert it and turn the camera on, you usually have to enter date and time and the user language. You expect that you have to do this just once, and then you are done. However, in some cases, the camera may request you to re-enter these data. Why?
The camera has also an internal battery (or capacitor) that serves for storing data when there is no battery in the camera or when the battery is weak or discharged. For the GXR, the internal battery will help to store these data for about a week. Thus, reason number 1 may be that the battery is exhausted and you left it in the camera in that state for more than a week. Reason number 2 may be that you removed the battery for more than a week.
Another reason may be that the internal battery is not sufficiently charged. It takes about 2 hours to charge the internal battery completely from the battery. Thus, particularly, when you play around with your new camera after you just inserted the newly charged battery, the internal battery may not be able to store the data for a couple of minutes or even for a couple of seconds.
Thus, if you encounter this issue, do the following:
- Charge the battery and insert it in the camera (or insert a charged one if you have a spare battery)
- Wait for about two hours to make sure that the internal battery is fully charged
- Then turn the camera on and set date, time, and user language
- Turn the camera off, wait a couple of minutes and turn it on again. If you are prompted for the data once again, then there is some evidence that the internal battery is broken. However, before you send the camera for repair, repeat the test to make sure that the internal battery is the problem.
Firmware, Manuals, Number of Shots
How can I check the firmware version?
Make sure that the camera is turned off and attach a camera module to the body. Press both, the Playback button and the "-" button on the direction pad, more than a second. The camera will turn on and show the following display:
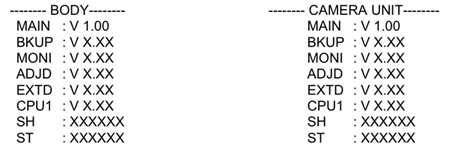
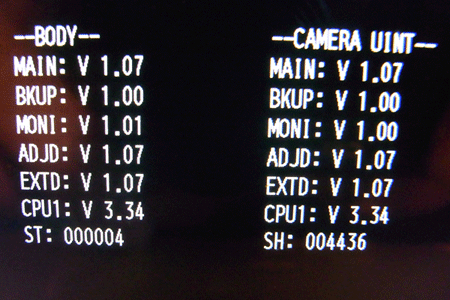
This is an early example of the display, see below for a more recent one.
You can identify the firmware version of the body (MAIN) as well as of the attached module (MAIN). Turn the camera off by pressing the Playback button (after a while, the camera goes into Playback mode; here, you can also turn it off by pressing the Playback button).
For the firmware version of another module, exchange the units and repeat the procedure above.
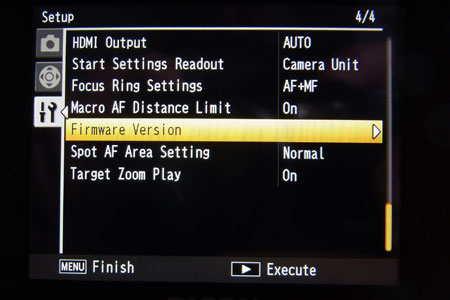
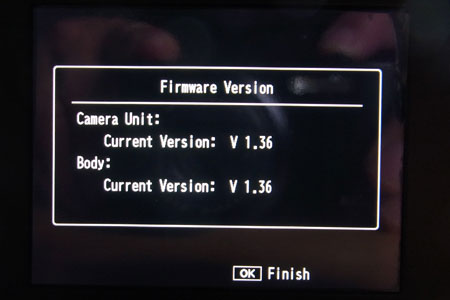
Update: Since firmware version 1.17 (May 2010), the firmware version can also be checked in the Setup menu: Initially, it was the last item in the menu (both, the firmware version of the body and the version of the attached module are displayed), in the meantime it has become the third last.
Note: For instructions on updating the firmware, please refer to the respective document (English manual) on the Ricoh Website.
Where can I find firmware updates?
There are two pages on the Ricoh Website regarding firmware updates:
- General information about function enhancing firmware updates: ricoh.com/r_dc/gxr/firmware.html
- Description and download of firmware updates: www.ricoh.com/r_dc/download/firmware/gxr
For the respective updates to the manual see the next question.
Where can I find updates to the manual (including changes due to function enhancing firmware updates)?
Updates to the manual can be downloaded from the firmware page on the Ricoh Website: www.ricoh.com/r_dc/download/firmware/gxr
The direct link to the updates of the manual are here: www.ricoh.com/r_dc/download/firmware/docs/gxr_vup_en.pdf
How can I check the number of shots (exposure count)?
I found this information buried in a thread of the Ricoh forum at dpreview.com (Guy Parsons provided the answer). The procedure is more or less the same as for checking the firmware version.
Make sure that the camera is turned off and attach a camera module to the body. Press both, the Playback button and the "-" button on the direction pad, more than a second. The camera will turn on and show a similar display:
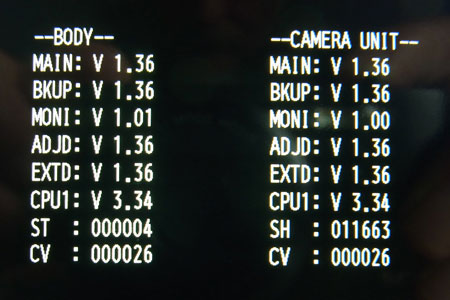
ST displays the number of shots with flash, SH displays the number of shots without flash. ST is the same for all units, whereas the value of SH depends on the module. SH is the same number as the "SHUTTER" value using the other method.
Recently, a new item, CV, has been added, but I do not know what it indicates. It is the same for all units.
How can I determine the error history (including the exposure count) of my GXR?
I found the answer to this question in the ipernity forum (as a comment by the author). Here is the slightly edited orignal answer:
- Make sure, the camera is OFF, select the SCENE mode (SCENE mode is mandatory!)
- Press PLAYBACK and DISP to get the error history screen.
- Press the left or right button (F1, F2) on the direction pad to change
the screens and get to the "MECH COUNT" screen, which shows a number
of technical data such as the number of power ON and OFF presses, the shutter
count (exposure count), etc.
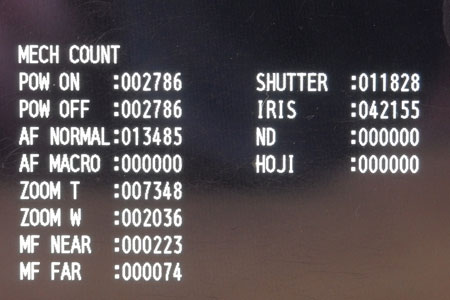
- To exit, press PLAYBACK
Note that the number of shots (called SHUTTER) relates to the respective camera unit. It is the same number as shown for the camera unit's "SH" value using the other method.
Specialties
How do you explain that the shutter count is less than the file number? How can I correct that?
This issue was brought up in the dpreview.com Riccoh forum by a "newbie Ricoh user" in June 2013. He "had a look in the service menu and read a shutter count of 91 yet the last file number is R0020152.DNG." He asked the forum members, "How do you explain that the shutter count is less than the file number?"
An explanation was given by Vladimir V:
- While the file number usually starts at R000001.DNG, it can change if you insert a card from another Ricoh camera as it will just follow on from the last number on there. The file number is not a good indicator of the actual shutter count as it's easy to change it even accidentally."
But how can this corrected? I tried to provide an answer in the forum, but it fell too short:
- I have never tried this, but perhaps it is possible to delete all the files in the 100RICOH folder except for just one and then rename it to reflect the actual shutter count. Perhaps this will reset the file numbering to the correct value. Just an idea...
photoreddi then gave the correct answer:
- I've done this before with several different brands of cameras (not with Ricoh's yet), but it's a bit more complex because the cameras keep track of the highest file number used in non-volatile memory, so they will ignore the renamed file unless its number is higher than the number of the highest photo file that is stored in its memory.
- The way that allows you to reset the file number to 1 is to change the menu option from using sequential file numbers to the option that starts numbering from 1 every time you use the camera to format the memory card. After formatting, change the menu option back to sequential file naming. Now the camera will start naming the files from 1. If you want to start at a higher number, such as 50, take one photo, put the card in a card reader and use the computer to change the file number to 49, and leave the photo file in the folder you found it in. After putting the card back in the camera, the next photo should have a file number of 50.
I checked this procedure, and it worked also on my Ricoh GXR.
What about the 1/1000 sec shutter speed limitation at wide apertures?
In a thread in the Ricoh forum at dpreview.com from January 2010, among others, the shutter speed limitation of 1/1000 sec at f/2.5 for the A12-50 module was discussed. This limitation was attributed to the use of a leaf shutter in the A12-50 module. Here is a list of apertures/shutter speeds limits for A12-50 (from Pavel Kudrys):
- f/2.5: 1/1000
- f/2.8: 1/1250
- f/3.2-3.5 : 1/1600
- f/4.0-4.5: 1/2000
- f/5.0-6.3: 1/2500
- f/7.1 -22: 1/3200
The A12-28 module seems to have the same limitations. In addition, the S10 module has a similar set of limitations even though it does not use a leaf shutter.
According to barjohn, "the wider the aperture the greater the travel distance each leaf has to make and that is the limiting factor. As you stop down the leaves don't have to travel as far for a given speed to be achieved." This was confirmed by other posters.
benaparis wrote: "Leaf shutter are not designed to have fast speed shutter, if you look at medium format lenses with leaf shutter and lenses for 4x5" and more you will notice that they are not faster... (Some new Phase One leaf shutter lenses allows 1/1600.) It is a choice made by Ricoh, and I agree on that, it as two benefits and a third one:
- It is silent... It would have been a huge drawback for me if if the GXR was not as silent as it is...It makes less noise than my Leica MP (which is limited a 1/1000 whatever the aperture chosen but it is not a leaf shutter), that is to say.
- It allows you two make very low speed pictures due to lack of vibrations, I can make sharp pictures at 1/5 but easier at 1/15...Of course it depends on each photographer.
- You don't have flash synchro limitation, as flash gives an aperture, the speed is used to manage ambient light, it allows you to make creative pictures with flash in daylight... But I must agree that the GXR is not really designed to work with flash."
The only solution to overcome this issue is to use neutral density (ND) filters in bright light. A typical filter may have a reduction factor of 4 (2 f-stops). Pavel Kudrys pointed to a variable ND filter, the Fader ND filter (www.lightcraftworkshop.com/site/page1000.aspx), which allows to change reduction between 2 and 8 f-stops light reduction.
Which camera units do the lens cap LC-2, the adapter HA-3, and the two converters DW-6 and TC-1 fit?
Some people speculated that the converters DW-6 and TC-1 might fit the new
P10 module. This is however, not true. Adapter HA-3 and the converters DW-6
(wide angle) and TC-1 (tele) fit only the S10 module. Only the lens cap LC-2
fits both the S10 and the P10.
(As a reference, see the English
system diagram - the German
system diagram contains errors.)
Please note that some GXR users, including myself, tried to fit the converters to other camera units than the S10 and investigated the results. You can find my findings on the pages:
See also Pavel Kudrys' A12-28 converter experiments: GXR A12-28mm + extension lenses (DW6, GW2, GT1, TC1)
What do I have to care for when I set JPEG>RAW to Fn1 or Fn2?
When you want to assign switching between RAW and JPEG to one of the two function buttons you may find that this will not work (as one poster at dpreview.com recently did).
This function works only, if you set Picture Quality/Size to something other than RAW. The manual (page 136, English manual) states:
- JPEG>RAW: If options other than RAW is selected for Picture Quality/ Size, pressing the Fn button selects a RAW option with the same aspect ratio (page 61).
On page 137 of the English manual, you will also find a small table that lists, which RAW setting is used for which Picture Quality/ Size setting.
In addition, I checked whether the usually additional JPEG image is taken, when RAW is selected - it is.
How can I get rid of silvery/sparkling outlines of people or buildings?
In November 2011, I received the following question:
Wonder if you can help me with a problem that I have got with my GXR LCD screen. The outlines of people or buildings seem to have a sparkling outline and I can not get rid of them at all. Have looked in the manual and I can not find a reference to this problem at all.
This question could not have been asked much earlier because it is related to a function-enhancing firmware update (1.40) that was introduced in August 2011. This update added new features that were introduced with the A12 M-mount module. I do not know how this feature had been enabled on the user's GXR, but obviously he had activated "focus assist" mode 1 (default; there is also a mode 2, which shows a gray image with outlines).
Now to the question of how the user can get rid of the sparkling outlines. There is a new "Focus Assist" setting in the "Shooting" menu where you can set focus assist to "on" or "off". Somehow, the user must have managed to set it "on" - or it was "on" after the recent function enhancing firmware update (I cannot remember…). Thus, you can get rid of the sparkling outlines by setting focus assist to "off".
More information:
- In the "Setup" menu you can select between "Mode 1" (default) and "Mode 2" for focus assist ("Focus assist selection"). Mode 1 creates the "sparkling outlines", mode 2 creates a B&W image with pronounced outlines (high pass filter).
- You can assign focus assist to either the Fn1 or Fn2 button, and many posters recommend to set "full screen magnification" to the other function button (for example: set full screen magnification to Fn1 and focus assist to Fn2 as I did and as many posters recommend).
- Information about focus assist can only be found in the additions to the manual, not in the original GXR manual!
As soon as I switch the camera on, the diaphragm keeps opening and stopping down as I move the camera around - is this normal?
nicolabotta posted the following question in the Ricohforum of dpreview that I think may have puzzled other GXR users as well:
- I have bought a A12 50mm module and I have been playing around with it
for about one week meanwhile.
I have noticed that, as soon as the camera is switched on, the diaphragm keep on opening and stopping down as I move the camera around and the lens gets less or more light. This happens no matter in which mode I'm shooting.
Is this normal? Is there a camera setting which prevents this continuous opening / closing ? I find the noise annoying and I guess it also drains the battery quite a lot.
He received a couple of answers and prepared the following summary (slightly modified by me):
- This is not a focusing problem, and Pre-AF is OFF. I'm shooting mainly
in M or A modes but the diaphragm keeps on opening and closing also in S
and P mode.
My understanding is that the camera stops down or opens automatically to maintain a more or less constant brightness of the live view.
The selected F-stop, e.g. when shooting in A or M mode, is enforced only when the shutter-release button is half pressed or pressed through, of course, or if AEL (auto-exposure lock) is selected.
The most effective way to prevent such continuous auto-adjustment is to lock auto-exposure or to simply put a cap on the objective.
I would like to add that you can also prevent this behavior by switching the camera off as soon as it is no longer used - that's what I usually do. But I fear that the on-off switch on my GXR body will be worn out soon...
Flash
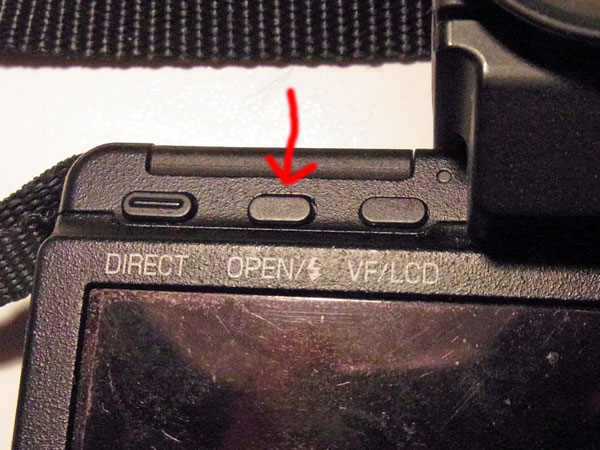
Where can I find the button for the flash settings?
Recently, a new GXR owner asked in a forum where he can find the flash settings. On other Ricoh cameras these are usually on the direction wheel - but there are no such settings. I could not find them in the beginning and consulted the manual. And then the scales fell from my eyes: The settings are now incorporated in the button that opens the flash (see photos below):
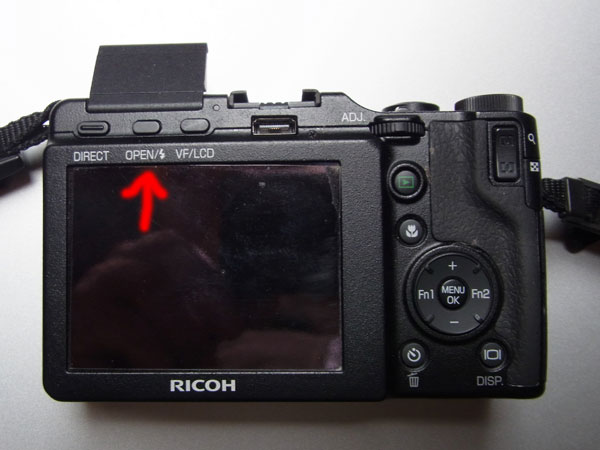 |
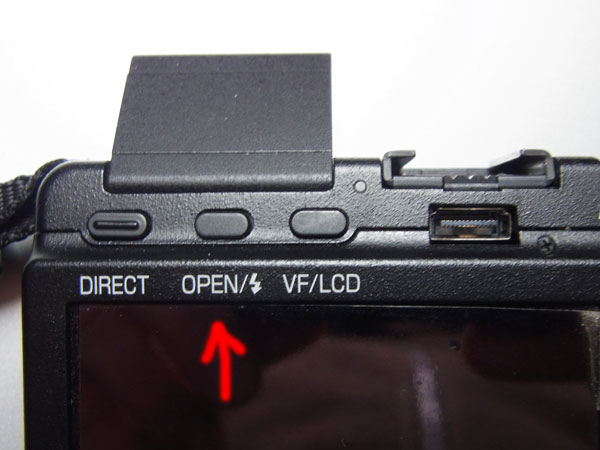 |
|
| GXR back with flash button indicated | Close up of position of flash button |
There are three buttons at the top left of the back of the body. The center button "OPEN/Flash symbol" is the one to use!
A first press opens the flash, starting with the second press you can cycle through the flash settings. Or you press the button and turn the front wheel to change the settings (a second press is also needed!).
Note: The other flash settings (flash exposure compensation, manual flash amount) are located in the shooting menu and can be assigned to one of the "adjust" menu positions or one of the Fn keys.
Why does the flash always pop up and no longer snaps in into the body?
I received this question in September 2012. Here is my attempt to answer it. As I - luckily - do not have any experience with this problem, I took photos of the pop-up mechanism in order to gain an understanding of its functioning.
To pop up the flash you need to press the "OPEN" button on the upper back of the body:
The "OPEN" button mechanically moves a plastic hook that snaps in into a hole at the bottom of the flash case. Here are two attempts to demonstrate this:
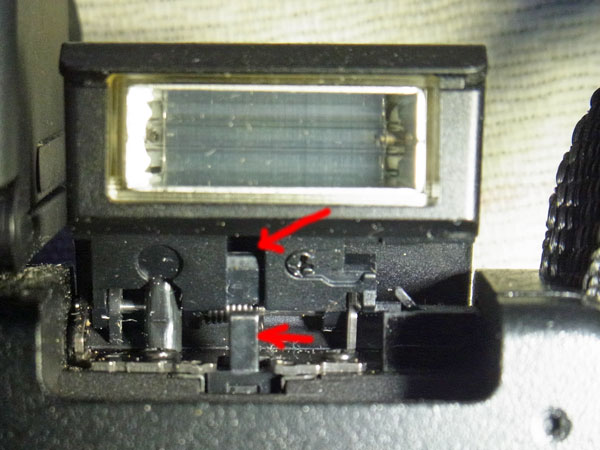 |
 |
The lower arrow points to the hook that is moved mechanically and horizontally using the "OPEN" button. The upper arrow points to the hole into which the hook snaps in when the flash is hinged down. When the hook is moved horizontally, it snaps out and the flash pops up thanks to a spring.
These two photos do not show that the hook really is a hook. Here is an attempt to show this:
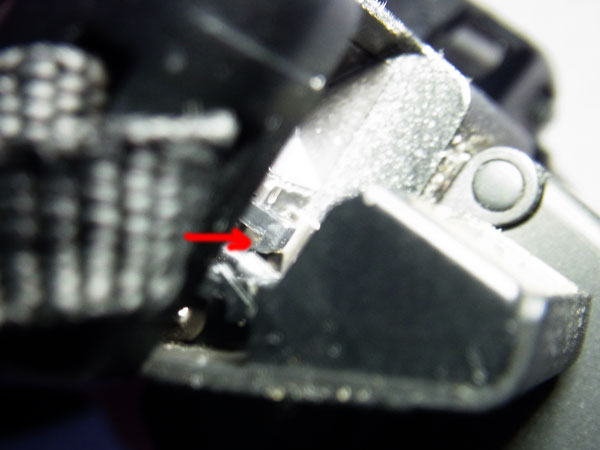
If the flash no longer snaps in, probably the hook is broken. Therefore, I suggest that you take a careful look at the hook (which is made of plastic).
Focusing
What does snap focus mean and how does it work?
Snap focus seems to be a specialty of Ricoh camera. In essence, it is a "manual" or fix focus mode, which provides photographers with a small selection of fixed distances (1 m, 1.5 m, 2 m, 2.5 m, 3 m, 3.5 m, 5 m, infinity for the GXR). For how you can set the snap focus distance, see below.
Snap focus is particularly useful for street photography: It is much faster than autofocus because the camera is "pre-focused." Snap focus can also be activated in Multi AF and Spot AF mode by quickly pressing the shutter-release button down (full press snap - see below).
How can I change the snap focus distance - and how can I do it easily?
The usual way to set snap focus distance is to use the menu system: "Shooting > Snap Focus Distance."
Snap focus distance can be more easily changed by holding the "up/macro" button on the directional pad and rotating the up-down dial (original source).
Note that this is similar to setting distance manually. It does only work if focus is set to "Snap." And it works only if a white triangle appears in front of the snap focus distance in the display (often, it does not when I press the "up/macro" button, and so I change something else, instead...).
What does full press snap mean? How can I enable and disable it?
Full press snap allows users to press the shutter button in one motion when Multi AF or Spot AF is selected as focus mode and switches the mode to snap focus at a preselected distance. It is intended as a means not to miss a shot due to slow autofocus. The default distance of 2.5 m is useful for street photography and many indoor situations, but less useful for landscape shots.
Note that full press snap is enabled (ON) by default (indicated by an undocumented "FS" in the viewfinder/LCD screen). It can be disabled or enabled in the menu "Shooting > Full Press Snap."
Since full press snap is "on" by default, this function can puzzle users who do not know of its existence - as was the case for me. Because of"unexplained" fuzzy images, I decided to disable this function for the moment. I discuss this issue particularly on page Pitfalls of Full Press Snap. See also page Specialties for more information on snap focus and full press snap.
How can I see that full press snap is enabled/activated?
When full press snap is enabled, a "FS" symbol is displayed at the location where typically "MF" and other focus modes are indicated, and the snap focus distance is shown (see photo below). "Multi AF" and "Spot AF" are not indicated, and therefore, full press snap takes the position in case that it is enabled.

Figure: When full press snap is enabled, a "FS" symbol is displayed at the location where typically "MF" and other focus modes are indicated, and the snap focus distance is displayed.
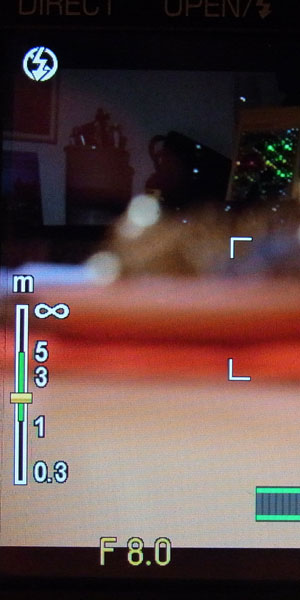
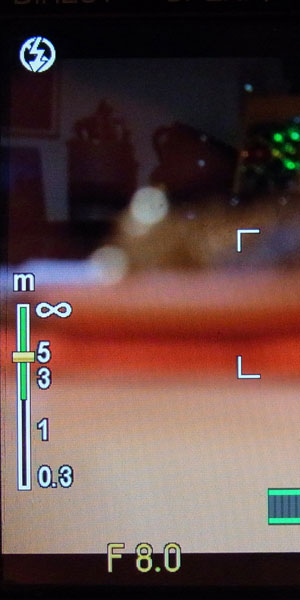
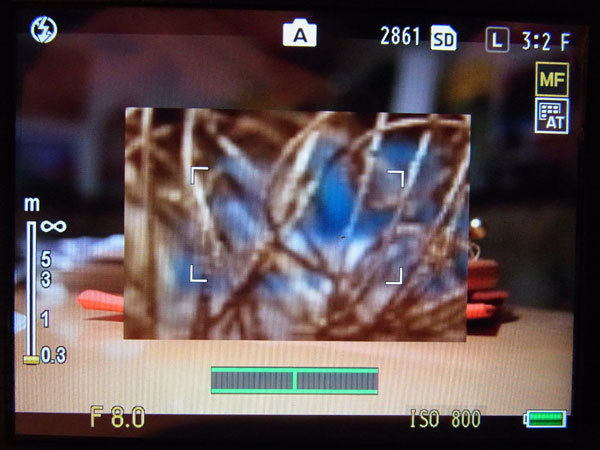
I cannot see the DOF indicators when using snap mode. What did I do wrong?
You can see the DOF indocators only when using snap mode if you set the camera to A or M mode. Probably, you set the camera to a different mode???
 |
 |
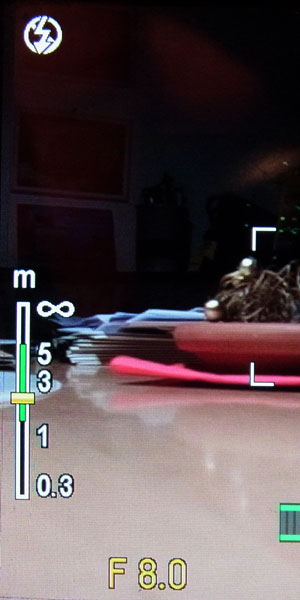 |
Figures: Distance scale with a green depth of field indication (A12-50 left and center, P10 right); the center photo shows a kind of "hyperfocal" distance setting
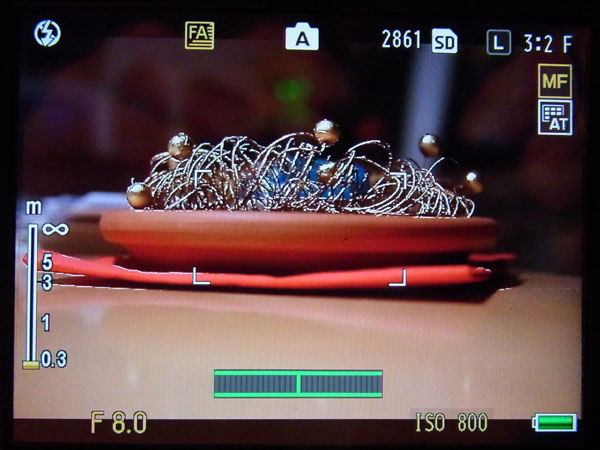
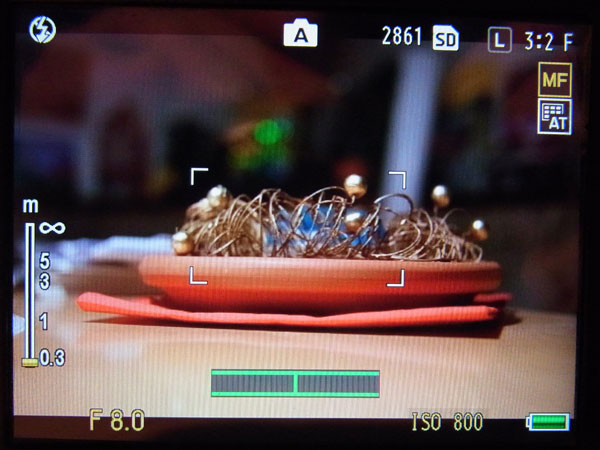
What is focus assist and which focus assist modes are available for the Ricoh GXR?
Focus assist is meant to make manual focusing easer. Since firmware update 1.4, the Ricoh GXR offers such a functionality by optionally intensifying the outlines and the contrast on the screen. There are two modes available:
- Mode 1 creates "sparkling" edges in a colored image, or as the manual states: Shape outlines for subjects/objects in focus are enhanced.
- Mode 2 emphasizes edges in a B&W image (highpass filter), or as the manual states: The picture display switches to black and white, and the area in focus glows in white.
Focus assist has to be activated or deactivated in the "Shooting" menu, menu item "Focus Assist" (On/&Off). This functionality can also assigned to one of the two function buttons (Fn1 or Fn2) (in the "Key Custom Options" menu). You have to select the mode in the "Setup" menu, item "Focus assist selection" (MODE 1 or MODE 2).
Here are sample photos without and with focus assist:
 |
 |
 |
Photos: No focus assist (left, focus assist mode 1 (center) and mode 2 (right)
Most users prefer focus assist Mode 2, whereas I prefer Mode 1 or no focus assist at all, that is, only full screen magnification. Focus assist can, of course, be combined with screen magnification.
Hint: Focus assist can not only be used with manual or snap focus to find focus, but also with AF and may help to verify that the focus is correct. in a post directed at me, Tom Caldwell pointed out that you can set "custom snap distances" this way:
- I don't use focus assist for MF, as MF on Ricoh cameras is a bit of a pain. But I do find it useful in regular MODE 2 magnified with pinpoint focus where the point of focus can be seen as very precise and the DOF very visual even in AF mode.
- So pinpoint focus very precisely and then switch to MF - then you have made yourself a very precise pre-selected custom snap mode.
How can I activate focus assist?
Focus assist has to be activated or deactivated in the "Shooting" menu, menu item "Focus Assist" (On/&Off). This functionality can also assigned to one of the two function buttons (Fn1 or Fn2) (in the "Key Custom Options" menu).
You set the mode in the "Setup" menu, item "Focus assist selection" (MODE 1 or MODE 2).
How is manual focusing supported on the GXR?
Note: For the M-mount unit, see the M-mount unit FAQ page.
Depending on the needs of the photographer, the GXR offers several methods for focusing manually:
- Snap focus (German: Fixfokus): Focus is set at a fixed distance (from a predefined selection of distances)
- Full Press Snap (German: Bild bei ganzem Durchdrücken): Autofocus is overruled if the user presses the shutter-release button quickly. Default snap focus distance is set to 2.5 m, but can be changed in the menus by the users (the same values are available as for snap focus).
- Manual focus ("Pure" Manual Focus): The user sets the focus manually by turning the focus ring ("by-wire" for the A12-50 and A12-28) or by pressing a button and turning the scroll wheel.
- Manual Override of Autofocus: With the A12 camera units, you can override autofocus using the focus ring.
- Focus Lock: Locking the focus at a certain distance for one or more shots (one might debate whether this is a manual focus method, but it fits in here...).
Manual focusing is furthermore supported in several ways:
- Depth of field display: For all three manual focus modes in Ricoh lenses, a distance scale with depth of field indication is displayed in the viewfinder/LCD display. This allows you to apply the so-called "zone focusing" method or to set the "hyperfocal distance" (everything is sharp beginning at a certain distance to infinity).
- Screen magnification: The screen can be magnified 2x, 4x, and 8x. Either, a section of the display shows the magnified section ("Enlarge Part", lower quality), or the magnified section is shown full screen ("Enlarge All", better quality). The magnified section can be moved.
- Focus assist (two methods): The GXR offers two methods for supporting manual focusing: Mode 1 creates "sparkling" edges in a colored image, mode 2 emphasizes edges in a B&W image (highpass filter). Most users prefer mode 2, whereas I prefer mode 1 or no focus assist at all, only full screen magnification.
 |
 |
 |
Photos: No magnification (left), "Enlarge Part" (center), and "Enlarge All" (right); in the latter case, a small display indicates where the enlargement is located in the image
|
|
|
Photos: No focus assist (left, focus assist mode 1 (center) and mode 2 (right)
For details, see page Manual Focusing.
How can I lock exposure? How can I lock focus? How can I lock both of them?
See below
Exposure, ISO, Modes
How can I lock exposure? How can I lock focus? How can I lock both of them?
Lock Focus and Exposure
The simplest method to lock both, exposure and focus, is to press the shutter-release button down halfway. Then reframe the picture and press the shutter-release button completely to take the picture.
Lock Exposure
For locking exposure alone, you can use the "AE Lock" (automatic exposure lock) function. You can use it only if you assign it to one of the two function buttons Fn1 or Fn2 in the "Key Custom Options" menu.
Lock Focus
You can lock focus alone by focusing with autofocus and then switching to manual focus using the "AF/MF" function, which keeps the focus from AF to MF. Typically, you assign it to one of the function buttons as well.
You can also use the "Focus" setting in the "Shooting" menu or the Adjust lever settings (if you assigned "Focus" to one of the the four available positions) to switch to MF, but this is more cumbersome.
Afterword
Actually, there is a shortage of function buttons on the GXR body since the recent firmware updates. In my case, the following functions compete for function buttons: (1) AF/MF, (2) AE Lock, (3) Focus assist, (4) Magnification (Enlarge Part or Enlarge All). And there are many more functions to choose from, like JPEG>RAW, for example.
How can I take long exposure shots with the GXR?
I received this question in September 2012. Here is my attempt to explain how long exposure times can be set on the GXR.
With the P, S, and even the A mode,
you can set exposure times of up to 15 seconds.
For A mode you have to change aperture - you can see the exposure
time only after half-depressing the shutter release button).
In P mode, you can change exposure time only indirectly by
turning the up-down dial (front), which changes between f-stop/exposure time
combinations with the same light value (EV).
If you need even longer exposure times (beyond 15s) you have to use the M mode - at least, this is what I found out.
For the M mode, I configured the up-down dial (front) to set f-stops, and the adjust lever (back) to set exposure time. You can also set the camera in the menu the other way round (menu "Key Custom Options" > "M Mode Dial Options").
In M mode, you can select exposure times from 1s and up in
the following steps: 1, 1.3, 1.6, 2, 2.5, 3.2, 4, 5, 6, 8, 10, 13, 15, 30,
60, 120, 180, B, T (I hope, I did not forget anything…).
B (Bulb): Press the shutter release button and keep it depressed
until the end of the exposure (that is, you release the button when you want
to stop exposure).
T: Press the shutter release button to start exposure; press
it again to stop exposure.
In M mode, there is an indicator in the display (at the lower left) that shows you whether the exposure is correct or whether it is off. For B and T there should be none, but there is one, obviously using the 180s setting.
For B and T you need to count or use a watch to determine the exposure time. However, contrary to analog cameras, exposure time should not be too long because the sensor heats up, causing a lot of noise. But I do not know of any recommendations as to the longest usable exposure time (I think, I read of 10 to 15 minutes).
What happens when I set ISO to Auto/Auto-Hi in M (manual) mode?
On the Ricoh GXR, you can set ISO to Auto or Auto-Hi when the camera is in M (manual) mode. One might argue that this does make not much sense, because you do not want the camera to change exposure in manual mode by changing the ISO value automatically... Probably, Ricoh thinks so, too (except for the A16 camera unit - see below). Actually, the GXR sets ISO to a fixed value when ISO is set to Auto/Auto-Hi. The value differs between camera units and is documented in the respective manual. Here is, what the manuals tell (and what I confirmed for some units):
- S10, P10: ISO 100
- A12-50, A12-28, A12 M-mount: ISO 200
However, this information seems to be missing for the A16 camera unit. I therefore checked the unit and found out the following:
- ISO Auto: ISO 400
- ISO Auto-Hi: The ISO value varies according to the lighting conditions and may get as high as the upper ISO limit that you set (e.g. ISO 1600).
Thus, for ISO Auto-Hi, the GXR A16 camera unit attempts to achieve a correct exposure within the permitted ISO range.
Is there an aperture priority mode for the GXR (with EV compensation) and if so, how does it work? Can I see the shutter speed in the viewfinder/on the LCD display?
Yes, just turn the mode dial to the "A" position (see Figure below):
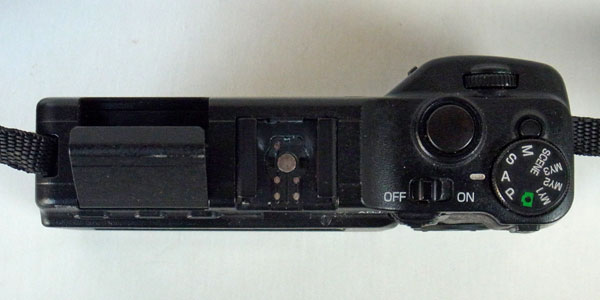
Figure: Mode dial on the Ricoh GXR body set to aperture priority mode
Exposure compensation can be activated in several ways on the Ricoh GXR: (1) assign the function to one of the four positions in the "Adjust" menu, (2) assign it the the +/- buttons on the directional pad on the camera back, or (3) assign it to the zoom lever, which is not used by some GXR camera/expansion units. I use only the second option to have one more position available in the "Adjust" menu. Having it on the zoom buttons often led to inadvertent changes...
When you compensate exposure, the GXR attempts to simulate the effect in the viewfinder/on the LCD display. That is, the image in the viewfinder/on the LCD display gets lighter or darker than the normal image. The camera attempts to maintain this as long as the viewfinder/LCD display image doesn't not get too dark.
Shutter speed is displayed after you half-pressed the shutter release button (which also locks exposure and distance). In "M" mode, the shutter speed is displayed permanently. Of course, aperture is not displayed for the A12 M-mount expansion unit in "M" mode, because this unit does not "know" it.
What does the function "Switch Shooting Mode" do?
Ricoh introduced the function "Switch Shooting Mode" to support mode handling for the custom settings. It took me a while to understand that this function actually serves two purposes:
- To temporarily switch the shooting mode when one of the three MYx
settings is set on the mode dial.
This setting gets lost when the mode is changed or the camera is turned off. - To change = edit the shooting mode for an already defined MYx set of custom
settings in the menu.
This setting remains in effect until you edit the set again.
Below are more extended explanations.
1. Switch Shooting Mode when in MYx Mode (Mode Dial)
When you select a MYx mode on the mode dial, the camera sets the shooting mode (Auto, P, A, S, M, or SCENE mode) that was assigned to this MYx mode. You can change the shooting mode temporarily, that is, until you change the MYx mode to another MYx or shooting mode or if you switch the camera off. This is done in the "Shooting" menu using item "Switch Shooting Mode".
2. Change Shooting Mode for a MYx Set of Custom Settings
When you created a MYx set of custom settings and want to change the shooting mode (or you forget to set it properly at the beginning), you can do so by using the "Switch Shooting Mode" function as well, but this time by entering the "Key Custom Options" menu, selecting item "Edit My Settings", then selecting the respective MYx mode and finally item "Switch Shooting Mode". Depending on the Shooting mode, you can also save and aperture (A mode), shutter speed (S mode), or both (M mode).
For screen examples, see page Custom Settings.
I cannot find the item "Switch Shooting Mode" in the "Shooting" menu. What did I do wrong?
Probably, your camera is NOT set to one of the three MYx modes on the mode dial. The menu item "Switch Shooting Mode" is only used for switching the shooting mode while the camera is set to on of the three MYx modes.
Display: Viewfinder, LCD Display
Does the VF-2 viewfinder show the same information as the LCD screen on the rear?
Yes, it does. Both show 100% of the image, and both have the same resolution (about 900k pixels).
Why has the sight of the VF-2 viewfinder a gray border around it on all sides?
The original question was a bit more involved and asked in Ricohforum.com as follows:
Last week I received a new-to-me GXR with an VF-2 and the GXR M-mount module.
Somewhere during my first few hours of use I was under the impression that the viewfinder image had changed from an image that filled the whole sight of the VF-2 to an image that has a gray border around it on all sides.
This is not the setting where the image is reduced and camera info placed in a black border, bur rather a smaller image with a gray surface around it. To me it seemed like a setting to allow glasses wearers to see the whole image in the VF-2, but I have not found any reference to that even existing anywhere.
Anybody know what I mean? Had it and remedied it? Or is it just my imagination?
Here is my answer (similar to the one in the forum):
In my opinion the poster simply sees what we all see but never really noticed. Maybe, it's the autumn with its not so bright days that we can see the grayness differences in the viewfinder now...
You simply see more in the viewfinder than just the LCD panel. You look through an optics at a flat surface in the housing of the EVF. At the center of the surface, the LCD panel resides. Depending on how you look into the viewfinder, you can see only the flat surface that holds the panel and/or also parts of the housing.
If the image format is 3:2, you can also see dark gray bars at the top and bottom of the LCD panel (both bar are part of the LCD panel) because the LCD panel has a 4:3 aspect ratio. There is also a dark black border around the LCD panel, particularly visible at the bottom of the LCD panel.
I took several photos to explore the case. I used my wife's CX4 in macro mode and set the distance to infinity for this purpose. Here are two sample photos that illustrate what I found out.
On the first photo, I indicate the "black" bars within the LCD panel with blue arrows. One red arrow points to the black border at the bottom of the LCD screen (hard to see here), another one at the bottom left to parts of the housing. "Background" denotes the surface which carries the LCD screen.

Photo of viewfinder with outdoor scene, 3:2 image format
On the second photo, there are no "black" bars within the LCD panel - not because of on 4:3 image format, as I originally thought, but because the image itself is black (the format is also 3:2 here; I verified that photos with 4:3 format look the same). One red arrow points to the black border at the bottom of the LCD screen (better to see here), two others at the bottom left and right to parts of the housing. "Background" denotes the surface which carries the LCD screen.
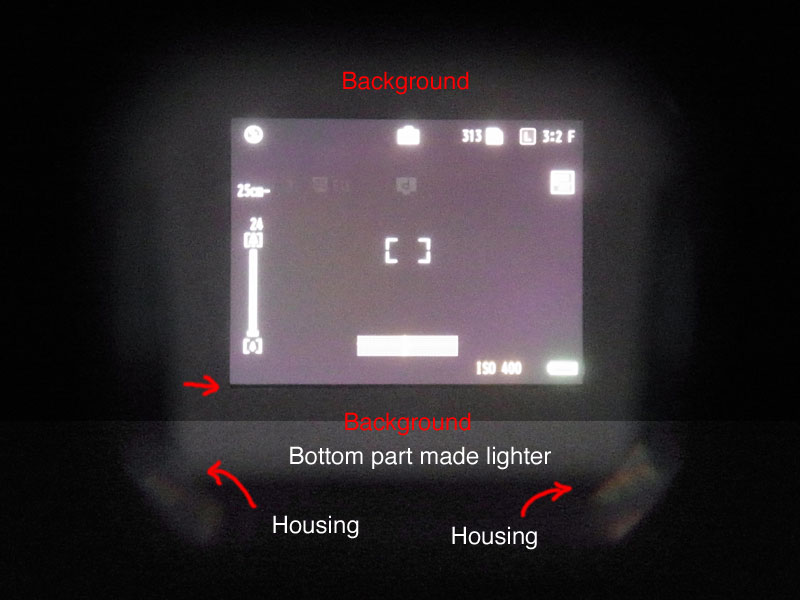
Photo of viewfinder with lens cap on, 3:2 image format
My P10 GXR Module no longer registers the scene on the LCD. All the other functions work, and it even sounds like it is taking the pic but doesn't capture the scene. What is wrong with the camera unit?
A poster at the dpreview Ricoh forum sent the following question:
- My P10 GXR Module no longer registers the scene on the LCD. All the other functions work, and it even sounds like it is taking the pic but doesn't capture the scene. I can press "Menu" and any other button and it will show on the screen properly, but it will not show the scene as seen through the lens. ... I tested other modules and they are all working properly. I switched to another GXR body but the problem persists.
After suggesting to restore the camera settings to the default, I read the GXR (body) manual (p.42) and stumbled over the following passage:
Turning the Picture Display On/Off Pressing the VF/LCD button while the picture display is on turns the picture display off. Some camera operations are not available when the picture display is off. Pressing the VF/LCD button again turns the picture display on. When a LCD viewfinder is attached, pressing the VF/LCD button switches between the LCD viewfinder and the picture display. |
I checked this an found that indeed only the shooting is blanked when you press the VF/LCD button*. All the other screens (menu, playback) do appear, though. So this might be another option to check if you have this phenomenon (even though a second body of the original poster showed the same behavior).
*) located on top of the screen, the right one of three buttons
The original poster replied that my proposals did not help - pressing the VF/LCD button did not solve this issue. But at least, it would be worth a try if you encounter the same issue.
Exif Data
How can I check the focus settings (focus mode and focus distance) in the Exif data?
In case of focus issues, it might be useful to find information about the selected focus distance, either set manually or by the autofocus, in the Exif data. Some companies provide such information, but regrettably, Ricoh did not seem to provide it. In July 2010, I had an e-mail exchange with Pavel Kudrys from Ricohforum.com regarding distance information in the Exif data. I had to download and install ExifTool and use the Terminal application on my Apple Macintosh, which is not at all convenient... The application is installed in directory /usr/bin. I typically move the photos to directory /usr and have the output displayed in the Terminal window. This leads to the following command line:
- exiftool -a -u -g1 /usr/filename.ext (replace "filename.ext" with the filename of your photo and care for capitalization - it's Unix!)
Sidenote - How to move photos to directory /usr: As this is a Unix directory that is usually hidden from the user's view, you may have difficulties in finding it. A simple way is to access it via the Finder's Go menu and select menu item Go to folder:

After you click the Go button a window showing the /usr directory opens. Now you can copy or move images there. Note that you have to provide an administrator password to be able to do this.
BTW: GraphicConverter on the Mac provides information using ExifTool but does not display the manufacturer-specific fields.
Here is an explanation of how to calculate the focus distance from Ricoh Subdir 0x0008 - Focus distance:
- 67108914/value of tag8 = focus distance in meters
- If the value of tag8 = 50 (in some Ricoh cameras it could be 49) => infinity
- The value 67108914 is an equivalent of 1m. It should be the same in all Ricoh cameras, but of course, there might be differences
I would like to add that Multi AF seems to provide a value of 50 for infinity, whereas manual focus seems to provide a value of 49.
Pavel Kudrys also deciphered the tag for focus mode (Ricoh Image Info 0x0023). Here are the values for the different modes that this tag displays:
- 0: Multi AF
- 1: MF
- 2: Snap
- 3: Infinity
- 6: Spot AF
- 7: Multi-target AF
- 8: Continuous AF
- 9: Face-Priority AF
Note: You have to set the verbose mode to 3 at least (-v3) to find the tag in the ExifTool output. Here is a sample command line and section of the output indicating "spot AF":
Command: exiftool -a -u -g1 -v3 /usr/R0065824.JPG
| | | 5) ImageInfo (SubDirectory) -->
| | | - Tag 0x1001 (224 bytes, undef[224]):
| | | 04e8: 13 40 0c c0 01 18 20 13 06 10 16 57 51 00 01 00 [.@.... ....WQ...]
| | | 04f8: fa 02 30 00 64 74 fc 00 00 00 02 00 00 00 00 00 [..0.dt..........]
| | | 0508: 00 00 01 06 02 0d 09 08 01 00 00 00
00 00 00 00 [................]
| | | 0518: 00 03 04 03 09 09 00 00 02 00 00 18 00 00 00 00 [................]
| | | 0528: 00 00 00 00 00 00 00 00 00 00 00 00 00 00 00 00 [................]
| | | [snip 144 bytes]
Plase note that 0x0023 is a hexadecimal number, meaning 35 in decimal (there are 16 bytes in each row).
Are there Ricoh-specific Exif data and how can I reveal them?
Nowadays, every camera stores metadata with each shot that it takes, the so-called Exif data (Exchangeable Image File Format). However, there are wide differences as to how and what data different camera manufacturer store data. So, the question arises whether there are Ricoh-specific Exif data. Yes, there are, and Ricoh provides for example focus information (focusing distance, focus mode) there (see here). Usually, however, these specific Exif data are not displayed by photo processing or other software. Therefore, specific tools are needed to reveal them.
The probably largest set of Exif data is displayed by the ExifTool application provided by Phil Harvey. This is a command-line tool that can be installed on Unix, Windows, and Apple Macintosh computers. For Windows, there is also a GUI shell available. For copyright reasons, I do not duplicate the information that Phil Harvey provides on his site and provide just a number of links to specific content and topics.
Phil Harvey also provides a page on which he lists Ricoh-specific Exif tags. This page is quite useful for understand the output of the ExifTool application for images taken with Ricoh cameras like the Ricoh GXR. However, I found that Phil Harvey still does not include the focus-specific tags that Pavel Kudrys an I have revealed. Perhaps, I should send him an e-mail...
Links to ExifTool:
- ExifTool: www.sno.phy.queensu.ca/~phil/exiftool
Download links are provided on the page; as they include the version number, they would soon break if provided here... - Ricoh-specific tags (overview): www.sno.phy.queensu.ca/~phil/exiftool/TagNames/Ricoh.html
- ExifToolGUI for Windows v5.xx: u88.n24.queensu.ca/~bogdan/
|
made by |
| 19.11.2020 |