Astronomy | GXR · GR · RX100 M1 · RX100 M4 · RX10 M3/4 · TZ202 · X Vario · M240 · General | Photos | Conf. Places | Calendars | Art
Ricoh GXR: Manual Focusing and Focusing Support
How is Manual Focusing Supported on the GXR? - Overview | GXR Manual Focus Methods | Support for "Pure" Manual Focusing | Conclusions
Archive
On this page, I describe how manual focusing works with the Ricoh GXR camera units and how it is supported.
Note: For the M-mount unit, see the Manual Focusing with the GXR M-Mount Unit. For an overview of manual focusing methods, see page Manual Focusing Methods.
Note: For a comparison of these features between the Leica X Vario and the Ricoh GXR A16, see page Leica X Vario and Ricoh GXR 16: Manual Focus Comparisons.
How is Manual Focusing Supported on the GXR? - Overview
Depending on the needs of the photographer, the GXR offers several methods of focusing manually:
- Snap focus (German: Fixfokus): Focus is set at a fixed distance (from a predefined selection of distances)
- Full Press Snap (German: Bild bei ganzem Durchdrücken): Autofocus is overruled if the user presses the shutter-release button quickly. Default snap focus distance is set to 2.5m, but can be changed in the menus by the users (the same values are available as for snap focus).
- Manual focus ("Pure" Manual Focus): The user sets the focus manually by turning the focus ring ("by-wire" for the A12-50 and A12-28) or by pressing a button and turning the scroll wheel.
- Manual Override of Autofocus: With the A12 camera units, you can override autofocus using the focus ring.
- Focus Lock: Locking the focus at a certain distance for one or more shots (one might debate whether this is a manual focus method, but it fits in here...).
"Pure" manual focusing is furthermore supported in several ways (but note that these methods can also be used for autofocus):
- Depth of field display: For all three manual focus modes in Ricoh lenses, a distance scale with green depth of field indication is displayed in the viewfinder/LCD display (snap focus: A and M exposure modes only).
- Magnification/Enlargement*: A section of the picture can be enlarged 2x, 4x, or 8x. Either, a section of the display shows the enlarged section (lower quality), or the enlarged section is shown full screen (better quality). The enlarged section can be moved in either mode.
- Focus assist (two methods)*: The GXR offers two methods for supporting manual focusing: Mode 1 creates "sparkling" white edges in a colored image, Mode 2 emphasizes edges in a B&W image (highpass filter).
*) Enlargement was considerably improved and focus assist introduced with firmware update 1.40, which accompanied the release of the M-mount expansion unit.
GXR Manual Focus Methods
The focus methods can be selected in the menu: Shooting > Focus. You can select from the following modes: Multi AF, Spot AF, MF (manual focus), Snap (fix focus), and infinity. You can assign the "Focus" selection menu to one of the four "Adjust lever settings", which I always do.
Furthermore, you can activate/deactivate full press snap (item "Full Press Snap", default: "On") and set the snap focus distance (item "Snap Focus Distance") there.
Finally, you can assign the "AF/MF" selection to one of the two function buttons (Fn1 or Fn2). I use this for the two A12 camera units (A12-50 and A12-28), particularly for switching to manual focus in macro mode for the A12-50. This is also kind of a focus lock...
Snap Focus
Snap focus allows you to preset the focus distance according to your needs. For example, street photographer may want to set the distance at 2.5 m, which is also the default snap focus distance. Infinity* is a "special" fixed distance, which can be also directly set in the "Focus" menu (like snap focus).
Values: 1m, 1.5m, 2m, 2.5m, 3m, 3.5m, 5m, infinity for the GXR. You can select the snap focus distance in the menu: Shooting > Snap Focus Distance. To set the distance, you can also turn the front wheel while pressing the macro button.
When using snap focus, including infinity, a DOF scale appears in the viewfinder with a green depth of field indication (see below), provided you the camera is in A or M expoure mode.
*) I use the infinity setting typically for sky photos, when Autofocus cannot find a target. Sometimes, I use it also for landscape and architectural shots, particularly with wide angle lenses. As I am not a "streetshooter" I neither use snap focus nor full press snap.
Full Press Snap
Full press snap allows users to press the shutter button in one motion when Multi AF or Spot AF is selected as focus mode and thus, to overrule AF. It switches the focus mode to snap focus at a preselected distance. This functionality is intended as a means not to miss a shot due to slow autofocus. The default distance of 2.5 m is useful for street photography and many indoor situations. However, it is less useful for landscape shots.
Here is the description of the full press function taken from the GXR manual (adapted):
- Take photographs without pausing to focus the camera when Multi AF or Spot AF is selected for focus.
- If the function is "on" the following happens: If the shutter-release is pressed all the way down in one motion, the camera will take a picture at the focus distance selected for Snap Focus Distance (which is 2.5m by default). Choose this function when quick shutter response is required.
Note that full press snap is enabled (ON) by default (indicated by an undocumented "FS" in the viewfinder/LCD screen). It can be disabled or enabled in the menu: Shooting > Full Press Snap (default: ON). Snap focus distance can be set in the menu: Settings > Snap Focus Distance (default: 2.5m).
Since snap focus is "on" by default, it can puzzle users who do not know of the existence of this feature. Therefore, I decided to disable it. I discuss this issue on pages Specialties and Pitfalls of Full Press Snap.
Manual Focus (MF)
Manual focus (MF) allows you to set the focus at your own will. Depending on the camera unit, you change the focus manually by:
- A12-50, A12-28: Turning the "by-wire" focus ring; pressing the "Macro" button increases focusing speed.
- S10, P10, A16: Pressing the "Macro" button and turning the "up-down dial".
Apart from the A12-28/A16 camera units that do not have a macro function, you can switch from normal to macro mode and vice versa by simply turning the focus ring or the up-down dial. Personally, I find having to press the "Macro" button for focusing not very comfortable when using the EVF with the left eye.
Like for snap focus, in manual mode a distance scale appears in the viewfinder with a green depth of field indicator (see below).
Manual focusing can be based on:
- The image displayed by the viewfinder/LCD screen (sharpness of the image, focus aids offered by the focus assist function, magnification)
- The distance and depth of field scales displayed in the viewfinder/LCD screen
- Or a combination of both
You can also set the distance in advance and correct it using the viewfinder/LCD screen. See also page Manual Focusing Methods.
Manual Override of Autofocus
With the A12 camera units, you can override autofocus and use the focus ring to fine-tune the focus. You can do so as long as you press the shutter button down halfway after autofocus has settled. Pressing the shutter button once again cancels the manual fine-tuning. I have to admit that I use this function only in rare cases.
You have to enable this function in the "Setup" menu by setting item "Focus Ring Settings" to "AF+MF" (default).
Focus Lock
Locking the focus at a certain distance for one or more shots is useful in a number of occasions, such as sports photos where AF is too slow, series of photos, etc. (one might debate whether this is a manual focus method, but it fits in here...). The GXR provides the following options for locking focus:
- Pressing down the shutter-release button down halfway. Note that this also locks exposure! Mostly I use this technique for the latter reason, not because I want to lock the focus.
- Switching from autofocus to manual focus ("AF/MF"). This may sound cumbersome, but can be easily done if "AF/MF" is assigned to a function key (otherwise you need to select it in the menu).
While the technique of pressing the shutter-release button down halfway is easy to use (and I use it quite often), the coupling of exposure and focus lock may lead to problems. For example, when I take a picture of a landscape, and the image looks too dark, I point the camera lower to brighten the image up - but now the focus may be too close. The other way round, when I point the camera to the sky to darken the image, focus may not find a target.
The "AF/MF" function has the advantage that it sets the manual focus to the distance that AF has set. Thus, for pre-focusing you can first use the AF to set the appropriate distance and then switch to manual focus. Of course, this works only in cases where AF finds focus (for example, it may not work for sky or macro photos). As Tom Caldwell explained, you can use this technique to create "custom snap modes."
Support for "Pure" Manual Focusing
Note that magnification and focus assist can be used for autofocus as well and may be sometimes useful together with it.
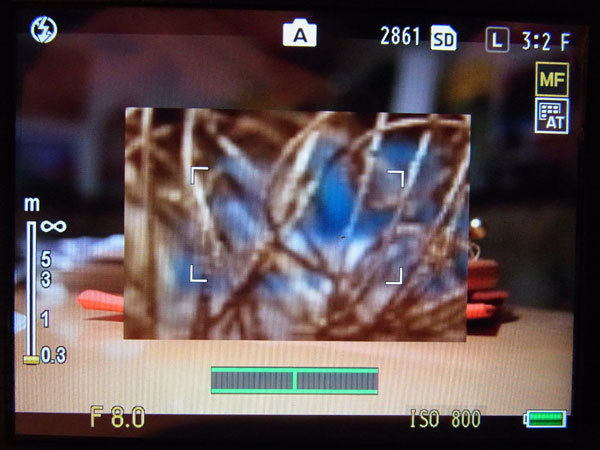
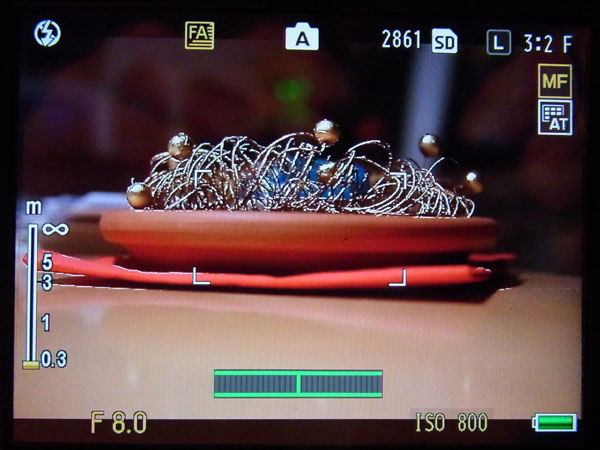
Depth-of-Field Display
For all manual focus modes and also for snap focus in A and M mode, a distance scale with depth of field indication is displayed in the viewfinder/LCD display. This allows you to apply the so-called "zone focusing" method or to set the "hyperfocal distance" (everything is sharp from a certain distance up to infinity). Although this is best used with true manual focus (MF), you can, at least, observe what is going on and, for example, change the aperture to extend the depth of field to a kind of hyperfocal distance...
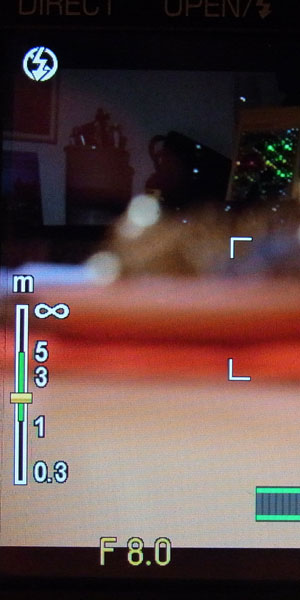 |
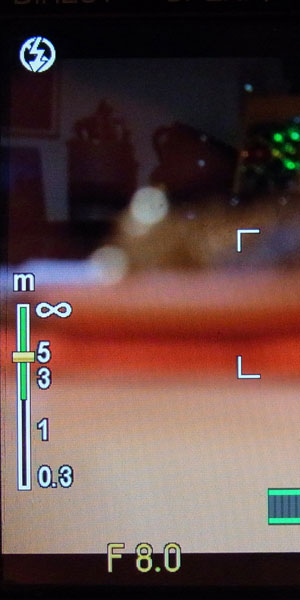 |
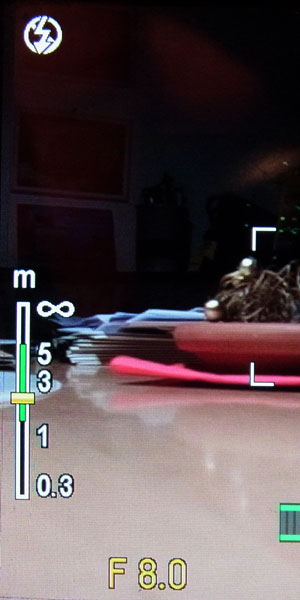 |
Photos: Distance scale with a green depth of field indication (A12-50 left and center, P10 right); the center photo shows a kind of "hyperfocal" distance setting
Magnification
A section of the image can be magnified 2x, 4x, or 8x (since firmware update 1.29) ("Enlarged View mode"). The enlarged section is either shown in a section of the display (lower quality) or full screen (better quality) (since firmware update 1.40). The enlarged section can be moved in either mode.
Note: The Ricoh GXR manual as well as the menus sometime use the term "magnification" and sometime speaks of "enlarge"...
Basic Procedure
- Turn on screen magnification: Press the "Menu" button for about a second. Initially, only a section of the screen is enlarged ("Enlarge Part")
- Change screen magnification to full screen (if needed): Press the "Menu" button for about a second ("Enlarge All")
- Turn off screen magnification: Press the "Menu" button for about a second when if pull screen mode, otherwise repeat the procedure when in section mode.
Thus, by repeatedly pressing the "Menu" button for a about a second, you can cycle through the magnification modes.
 |
 |
 |
Photos: No magnification (left), "Enlarge Part" (center), and "Enlarge All" (right); in the latter case, a small display indicates where the enlargement is located in the image
Details
If you want to avoid cycling through the modes you can can set either "Enlarge All" or "Enlarge Part" to one of the function buttons Fn1 or Fn2. I use this setting for the M-mount expansion unit, not for the regular camera units.
Magnification ratio can be set in the "Shooting" menu (item "Magnification" ratio). You can change the magnification ratio dynamically by pressing the self timer button for more than a second. Then you can select between a magnification of 2x, 4x, or 8x.
You can move the enlarged section of the screen ("Mode Target") by pressing the "Adjust lever" button, then selecting the AF/AE setting in the fifth tab of the "Key Customs Settings", and using the direction buttons. Personally, I find this function only useful if the camera resides on a tripod. In other words, I never use it...
When you half-press the shutter-release button in "Enlarge All" mode (fullscreen), magnification is turned off, and you see the image in normal magnification so that you can frame the photo. This is not the case for the "Enlarge Part" mode (but the manual does not distinguish between both modes). Personally, I prefer the behavior of the "Enlarge All" mode.
Last, but not least, in the "Setup" menu you can set that enlargement is turned off after shutter-release (item "Zoom Display Release") so that you have to turn it on when you need it again:
- Zoom Display Release: You can select whether to maintain or cancel the enlarged view after shooting pictures in "Enlarged View" mode. Selecting "Off " maintains magnification and "On" cancels it after a picture is shot.
"Secret" Information
Now comes information that you cannot find in the manual. First, the quality of the 4x and 8x enlargement has clearly improved since firmware update 1.40. Secondly, the image quality of fullscreen mode ("Enlarge All") is considerably better than when only a section of the screen displays the enlarged section ("Enlarge Part"). For manual focusing it is therefore evident that only an enlarged fullscreen view is useful - I often use it even without focus assist.
My Preferred Settings
Currently, I initiate magnification mode by pressing the "Menu" button. Usually, I set the magnification ratio to 4x or 8x. I prefer "fullscreen" magnification, but do not want to loose a function button for setting it (I use one for switching AF/MF and the second one for focus assist), so I have to cycle through the modes...
Focus Assist
Since firmware update 1.40, the Ricoh GXR offers a "focus assist" functionality for supporting manual focusing. There are two modes available:
- Mode 1 creates "sparkling" white edges in a colored image, or as the manual states: Shape outlines for subjects/objects in focus are enhanced. You cannot change the color of the sparkling edges as for some other digital cameras.
- Mode 2 emphasizes edges in a B&W image (highpass filter), or as the manual states: The picture display switches to black and white, and the area in focus glows in white.
There is no cycling through the focus assist modes as there is for the screen magnification mode and macro modes. You have to select the mode in the "Setup" menu, item "Focus assist selection" (MODE 1 or MODE 2). There is also no button for selecting a focus assist mode (after pressing it for a second). Actually, there is no button available any more... As you can see, Ricoh is inconsistent here in comparison with the magnification and macro modes.
*) Focus assist has to be activated or deactivated in the "Shooting" menu, menu item "Focus Assist" (On/&Off). This functionality can also assigned to one of the two function buttons (Fn1 or Fn2) (in the "Key Custom Options" menu).
Here are sample photos without and with focus assist:
 |
 |
 |
Photos: No focus assist (left, focus assist Mode 1 (center) and Mode 2 (right)
Most users prefer focus assist Mode 2, whereas I prefer Mode 1 or no focus assist at all, that is, only full screen magnification. Focus assist can, of course, be combined with screen magnification.
Conclusions
For "normal" photos, I use manual focus only on rare occasions. One such instance where I use it are photos of the sky. Here autofocus often cannot find a target, and therefore I set focus to infinity. Another instance are sports photos where autofocus is too slow. Here, I often also use focus lock as an alternative. That is, I focus in advance, keep the shutter button half-pressed and wait for "the" moment.
My main application for manual focus are macro photos, because here it often happens that autofocus does not lock or finds the wrong target. Even spot AF is not of much help, but I never tried the new "mini" spot - perhaps this might improve matters...
I have focusing issues for macros not only with the A12-50 camera unit, but also with the P10 when shooting "tele macros" (macros at wide focal lengths are less critical). Here, manual focus comes to the rescue for me. Typically, I preset distance (for example, the minimum distance of 7 cm for the A12-50) and "focus" by moving head and camera.
Note: For an overview of manual focusing methods, see page Manual Focusing and Focusing Support (ditto for the M-mount expansion unit).
|
made by |
| 19.11.2020 |