ZWO Color Cameras - SharpCap
Introduction | SharpCap | Operating SharpCap | Final Words | Links
Archive
This page is about live stacking (for EAA) with the software SharpCap. For the alternative software ASILive, I created a further page ZWO Color Cameras - ASILive.
Note: This page describes an outdated version of SharpCap.
Introduction
To be able to operate an astronomy camera at a telescope, a software for controling the camera is needed. With the Atik Infinity, Atik provides the easy-to-use Infinity software, which I used to operate that camera. Of course, this software only works with Atik cameras. And so most users of ZWO cameras use different programs, of which the universal program SharpCap written by Robin Glover is probably the best known. Here it is about SharpCap! Note that contrary to ASILive from ZWO, there is a comprehensive manual available for SharpCap. I therefore do not repeat the manual but just present some information that I regard as useful.
Alternatively, you can use the software ASILive, which is provided by ZWO for free (and many other dedicated software packages).
SharpCap
In the following, I would like to address some items that are important for working with SharpCap.
Download and Information
The first question is where to download the program and what sources of information are available. Here is a selection:
- Download (Windows)
- SharpCap Downloads: www.sharpcap.co.uk/sharpcap/downloads
- Information Sources
- SharpCap Homepage: www.sharpcap.co.uk
- SharpCap Forums: forums.sharpcap.co.uk
- SharpCap User Manual: docs.sharpcap.co.uk/3.2
- Astrophotography Stacking Software: Imaging Deep Sky Objects the Fun and Easy Way (David Barrett): www.highpointscientific.com/imaging-deep-sky-objects-dave-barrett
SharpCap runs only under the Windows operating system, so that I have to use a Windows emulator to be able to use it.
Overview of the Application Window
Here an overview of the application window showing the selected camera (preview mode):
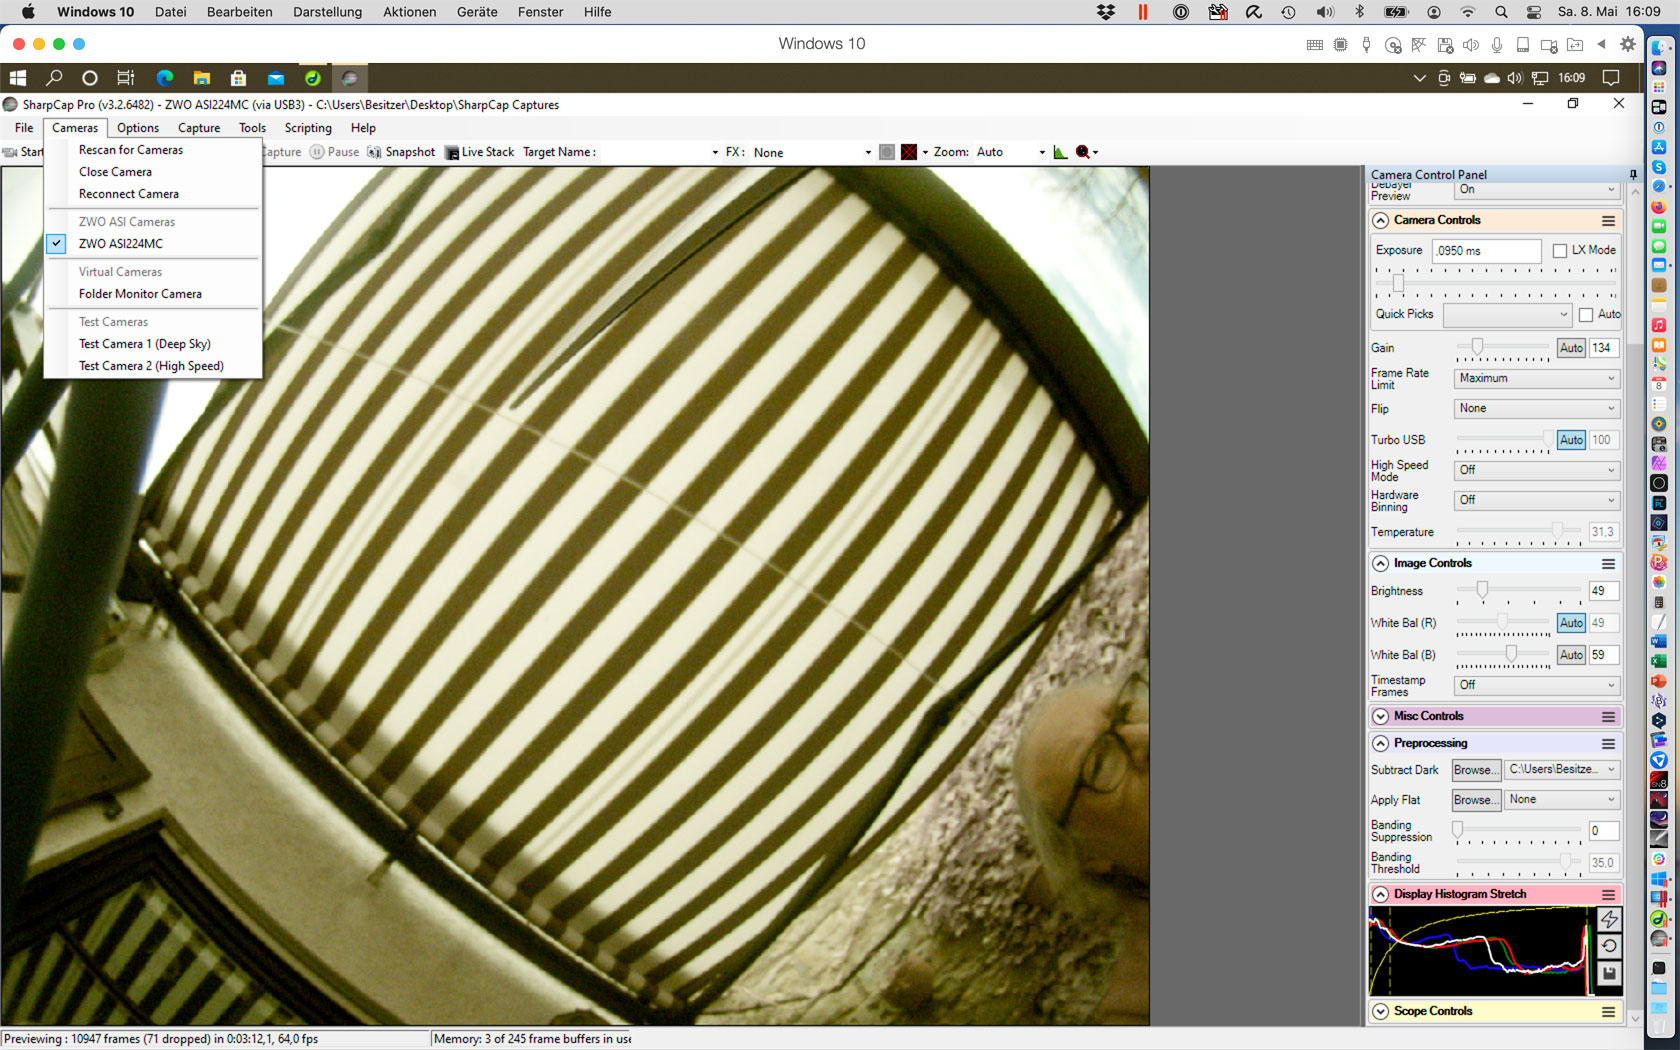
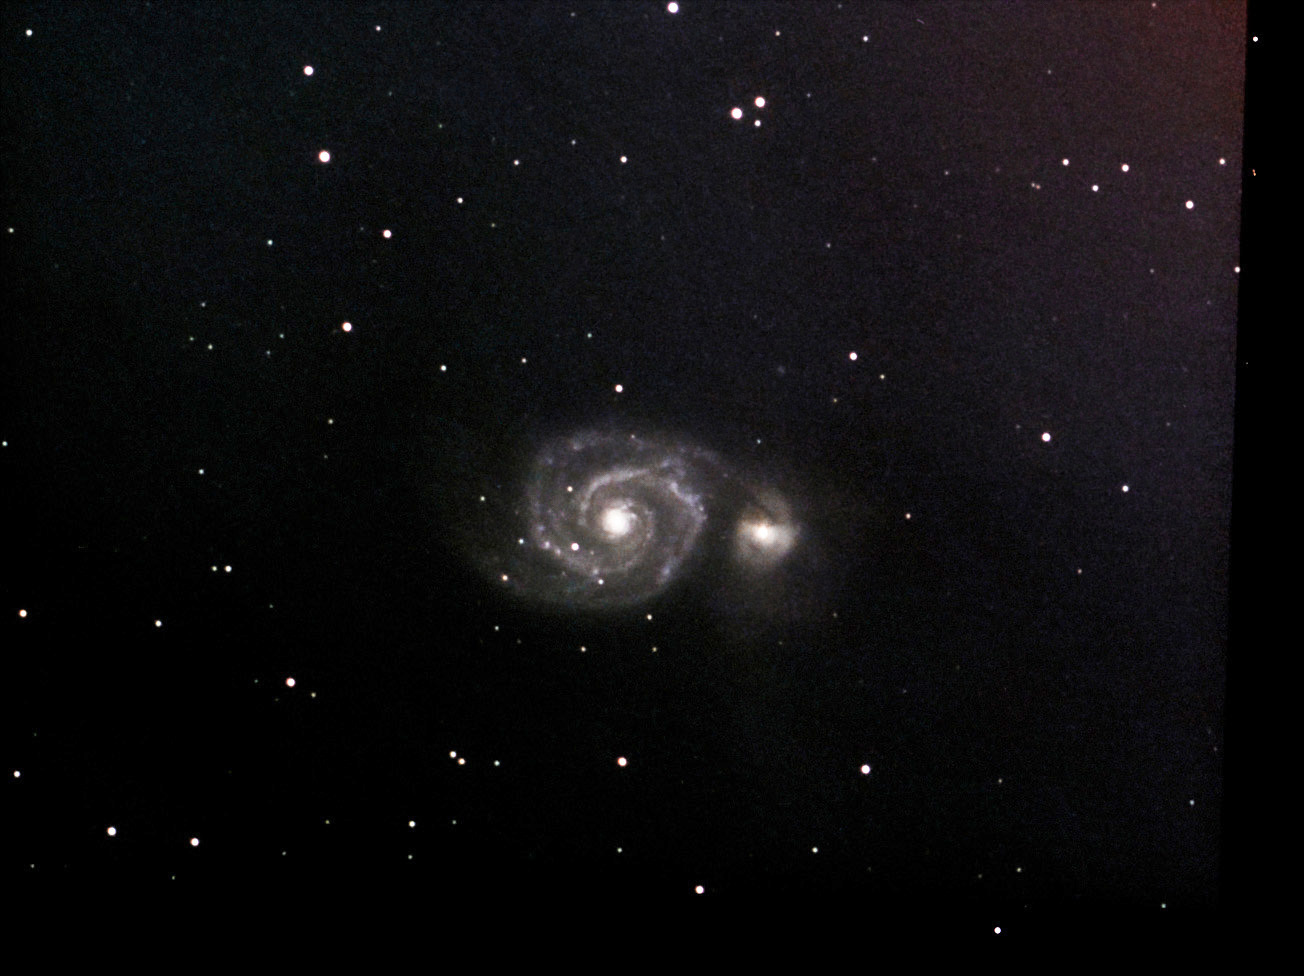
Figure: The application window of SharpCap with an image from the camera (preview mode); on the right, there are the most important controls (Camera Control Panel).
The camera has to be connected to the computer, and is selected in the "Camera" menu (it should be shown there automatically).
In the large space on the left, the observation object appears once the camera has been activated (on the figure above, a panorama lens is connected to the camera in daylight). On the right, there are the controls, and this area has to be be scrolled down to reach all of them.
After you have provided the camera settings and are ready to stack (= observe EAA), you select "Live Stack" in the "Tools" menu (or click the "Live Stack" button above the camera image) and get a screen that looks similar to this one:
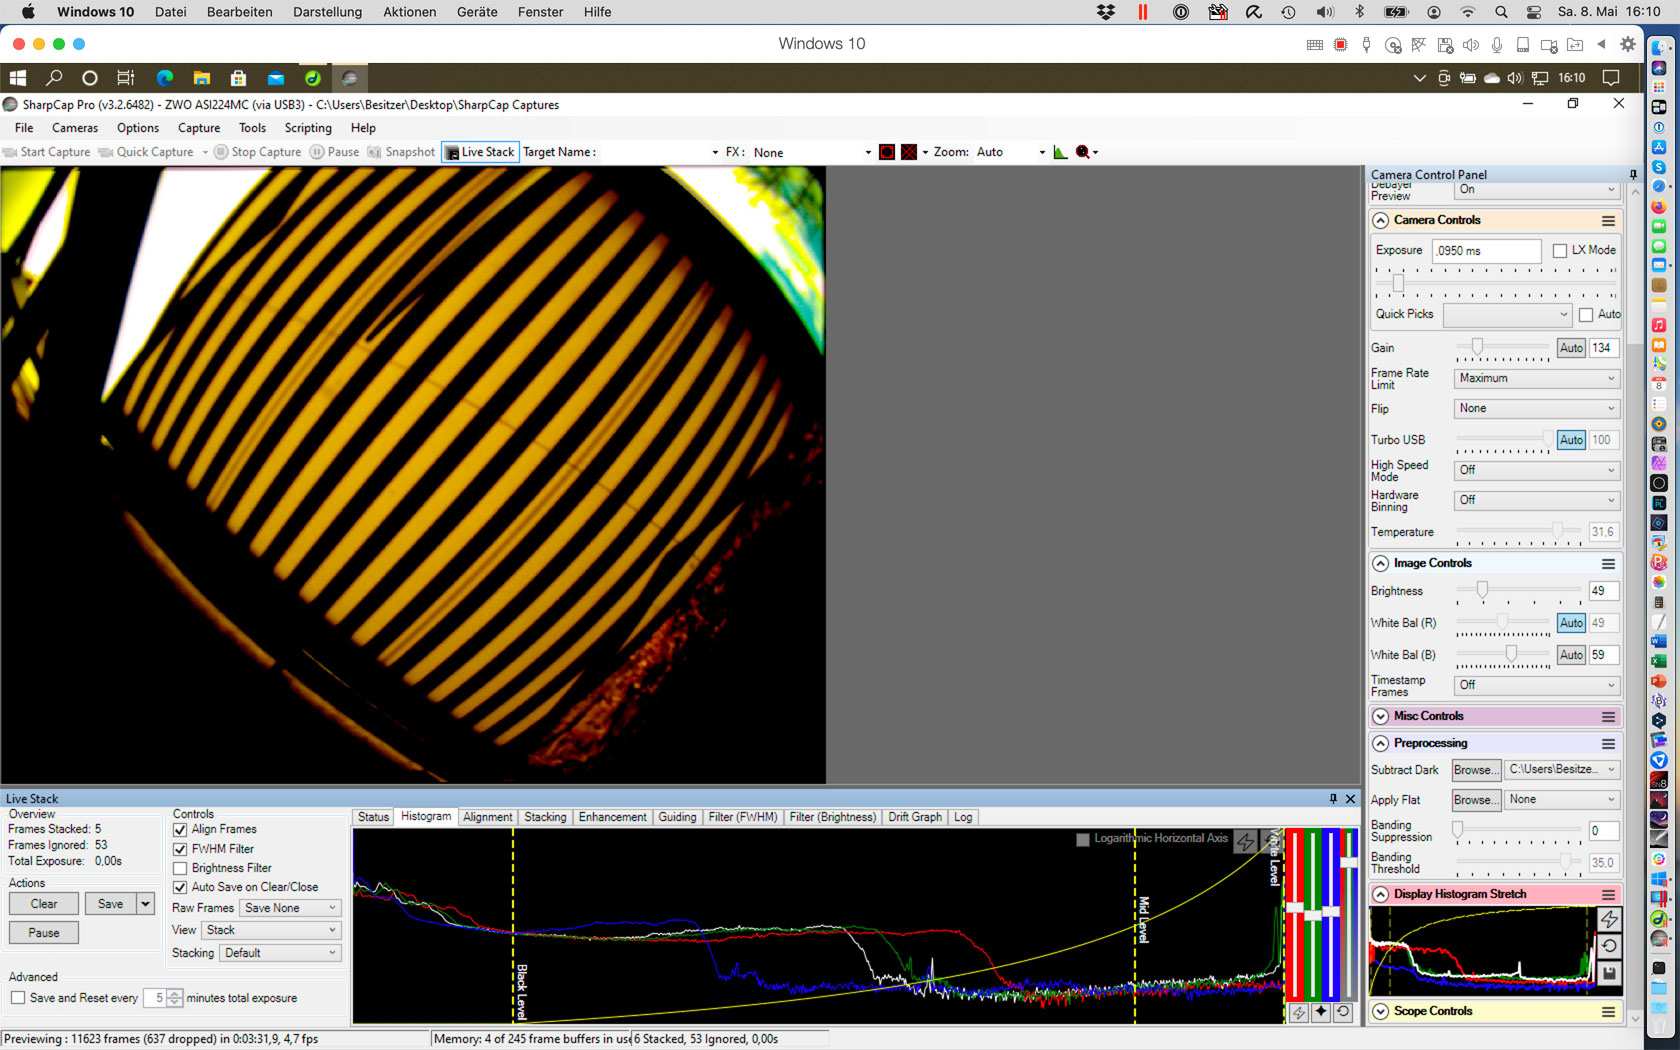
Figure: "Live Stack" mode, the "Histogram" tab is selected, and the histogram is displayed
Operating SharpCap
For simple EAA operation with SharpCap, two things are important:
- The generation of suitable dark frames (master darks),
- The "live stacking" during the observation and thereby the optimal adjustment of the view of the observation object, as well as the saving of selected views.
Both will be discussed in the following. Otherwise I do not plan to offer a "replacement manual" here...
Generating Master Darks
To suppress "hot pixels" and amp glow in the image and on photos, darkframes must be generated. These are "subtracted" from the current frame or stack by the program during live stacking. For best results, a dark frame should be taken with the same gain and exposure time (and ideally with the same temperature; some users therefore generate the dark frames directly before they start observing) as the current frames. Therefore, one typically generates several darkframes and then selects the appropriate one for the current observation. Please note that the darkframes are actually not single images, but "stacks"; they are therefore called "master darks".
Instruction
In SharpCap, call the function "Capture Dark" from the "Capture" menu and get the following dialog that guides you step-by-step through the process:
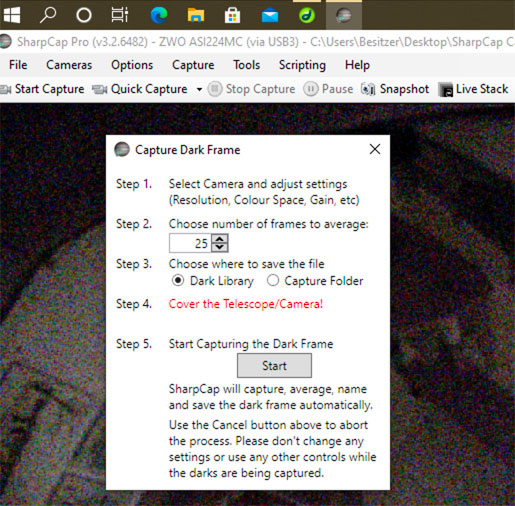
After you started the capture process (step 5), everything continues automatically. That is, you need not stop it manually as is the case in ASILive.
Initially, I wondered how many images are needed for a master dark. Here, my star friend gave me the number "25", which works for him. Of course, it is important that the camera or the telescope (if the camera is already attached to it) is covered (with a lid or blanket) when taking the darkframes. Furthermore, it is to be noted that one should take darkframes for all combinations of exposure times and gain values, which one would like to use. Here, I first chose 8 and 12 seconds exposure time and a gain of 300 and 400, resulting in 4 master darks.
SharpCap automatically saves the dark frames in specific directories and then automatically selects them based on the current camera settings. This is very convenient!
"Live Stacking" during the Observation
Only a few remarks on "live stacking"! Before you start stacking, you first observe the accessed sky object in single frame mode and with short exposure times, among other things, to correct the sharpness or to place the object (or objects) optimally in the field of view.
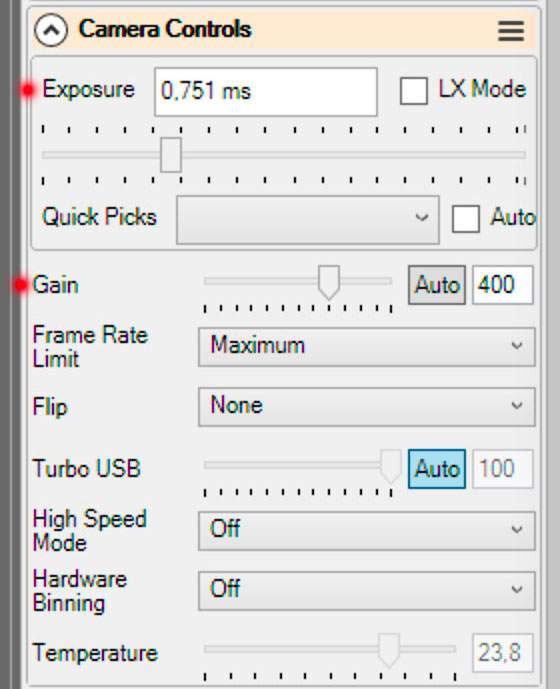
Then select a suitable exposure time and gain for stacking and start the stacking using the menu item "Live Stack" in the "Capture" menu or the "Live Stack" button. If the image result is not satisfactory, you can change exposure time and gain, and start a new stacking process by pressing the "Clear" button. Here are the most important camera settings in the "Camera Controls" panel:
Usually, you select the histogram in the "Live Stack" panel in order to optimize the view, that is brightness and color according to your preferences:

Details can be found in the SharpCap manual!
Saving the Stack
If you want to save a stack, you either click the "Save" button or select an entry from the "Save" drop-down menu:
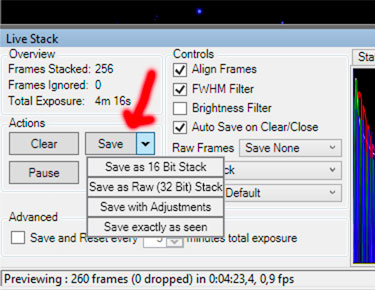
If you click the "Save" button, the current image is saved as a 16- or 32-bit stack (this seems to depend on the format of the dark frames...). If you want to save it as you see it on the screen, select "Save exactly as seen" (the filename will say "WithDisplayStretch"). It would be nicer if one were able to set the default format...
Shortcut ("WithDisplayStretch"): Click the button with the "Disk" symbol in the "Display Histogram Stretch" mini histogram.
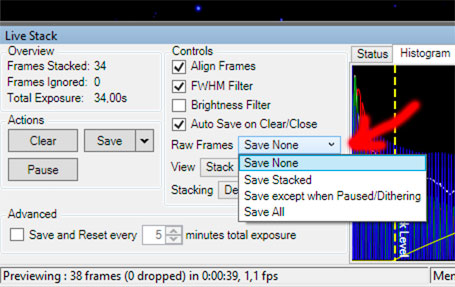
Saving Raw Frames During Stacking
Like in ASILive, it is possible in SharpCapto automatically save the single frames that are captured during stacking (SharpCap changed the naming from "single frames" to "raw frames"). To do this, open the "Raw Frames" drop-down list and select one of the options:
Problems
So far I have had little success with SharpCap. One might state that my experiences with it have been frustrating up to now. My main problem was that SharpCap did not want to stack the frames and discarded all other frames after the first one. Apparently, SharpCap did not find enough stars. In the "Alignment" tab in the "Live Stack" panel you can specify 10 stars as a minimum, but, according to the manual, SharpCap seems to get by with three stars only.
So why the stacking would not work has remained unclear to me. I also "tweaked" the width of the stars without much success. At least, there is the option "Highlight detected stars", which shows which stars were detected (does not always work, though). Here are the settings that can be made in the "Alignment" tab:
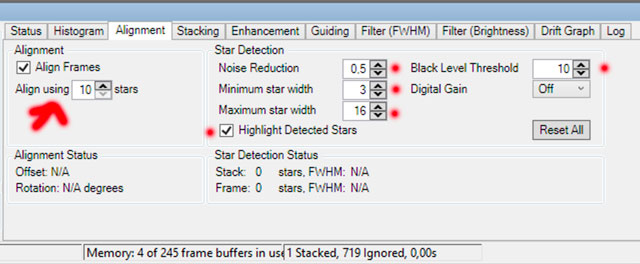
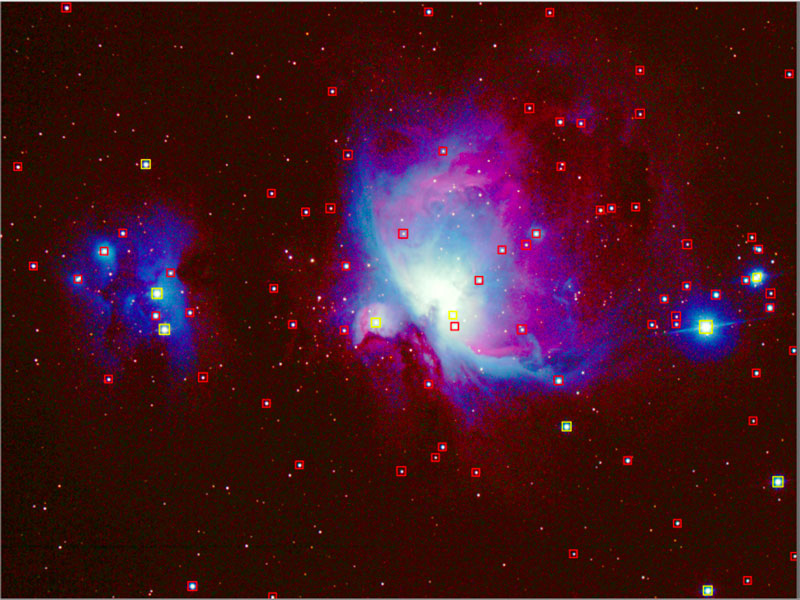
When "Highlight Detected Stars" is activated, stars that are used for the aligment are marked in yellow, stars that are not used are marked in red:
Another problem with SharpCap is the white balance - I do not seem to be the only one with it. Often, the colors are completely off and can neither be adjusted automatically nor with the histogram controls to the right of the histogram. Hopefully, I will be able to learn how to deal with this issue.
Compared with the eVscope with its quite aggressive image processing, the SharpCap photos look dull and noisy; this is similar when I use ASILive.
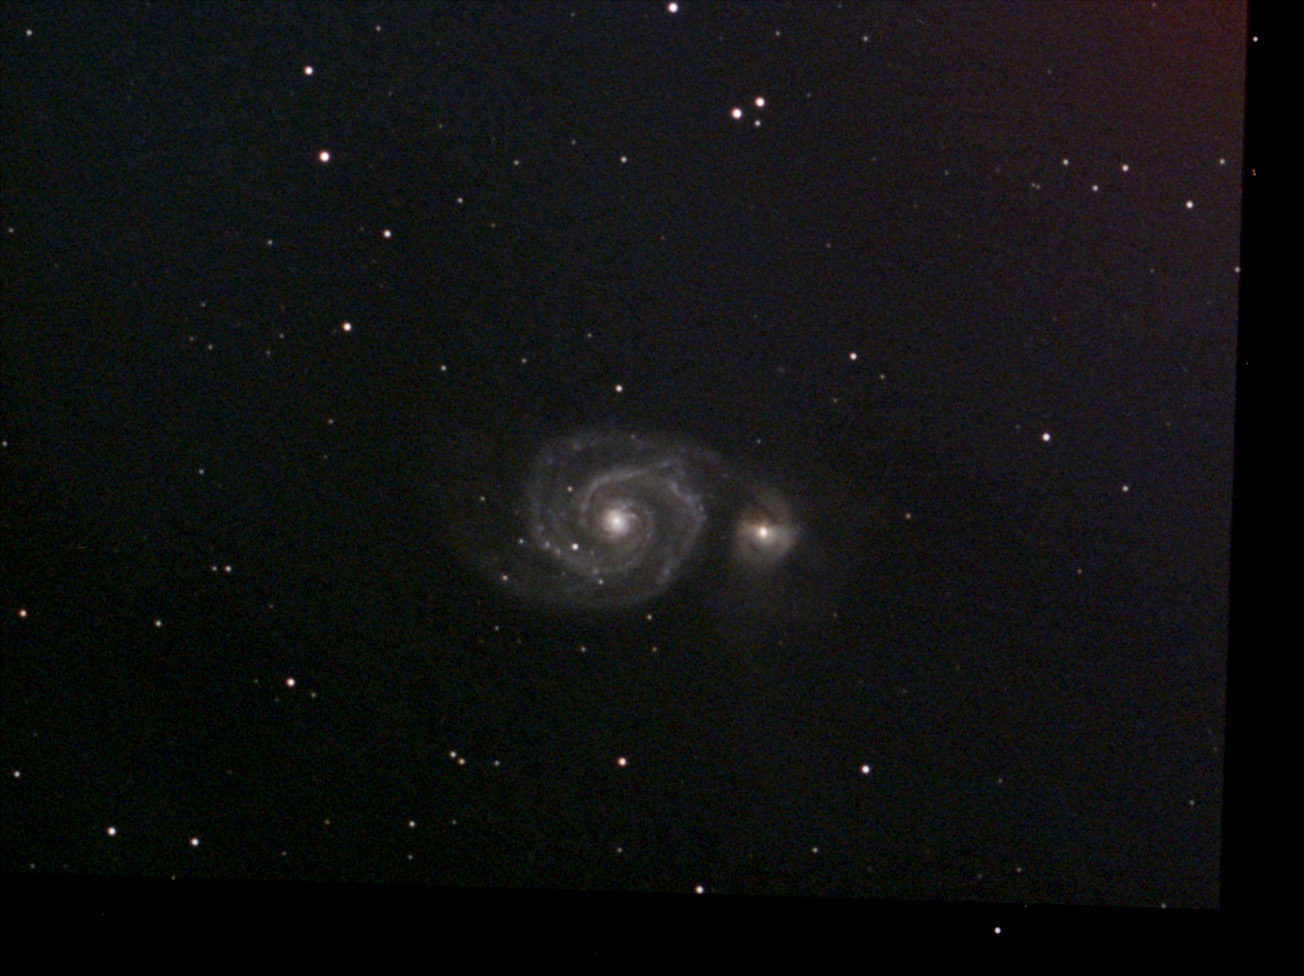
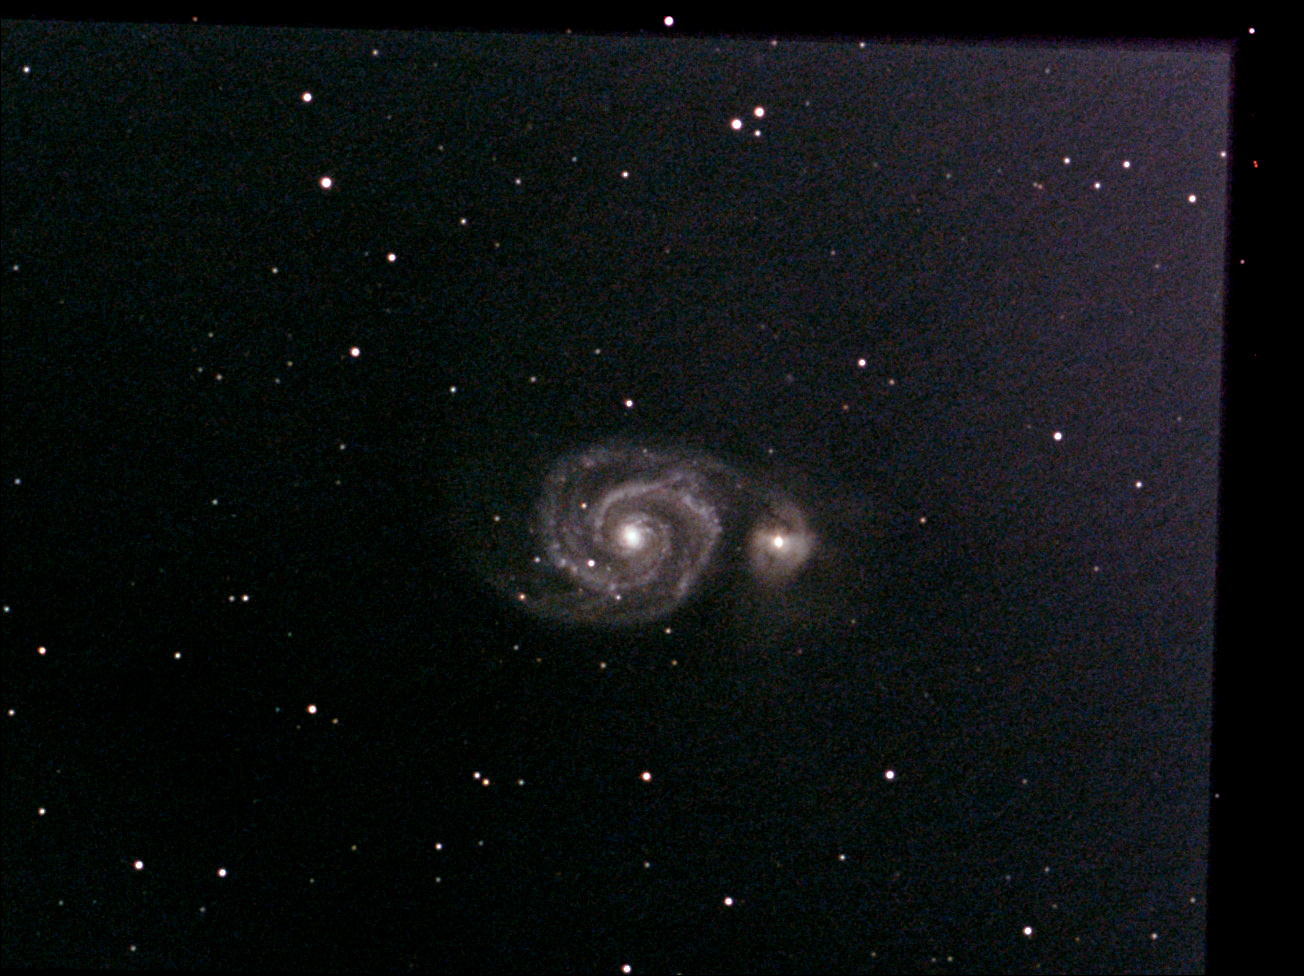
M 51 (100 frames, 10 s, gain 300), SharpCap, processed |
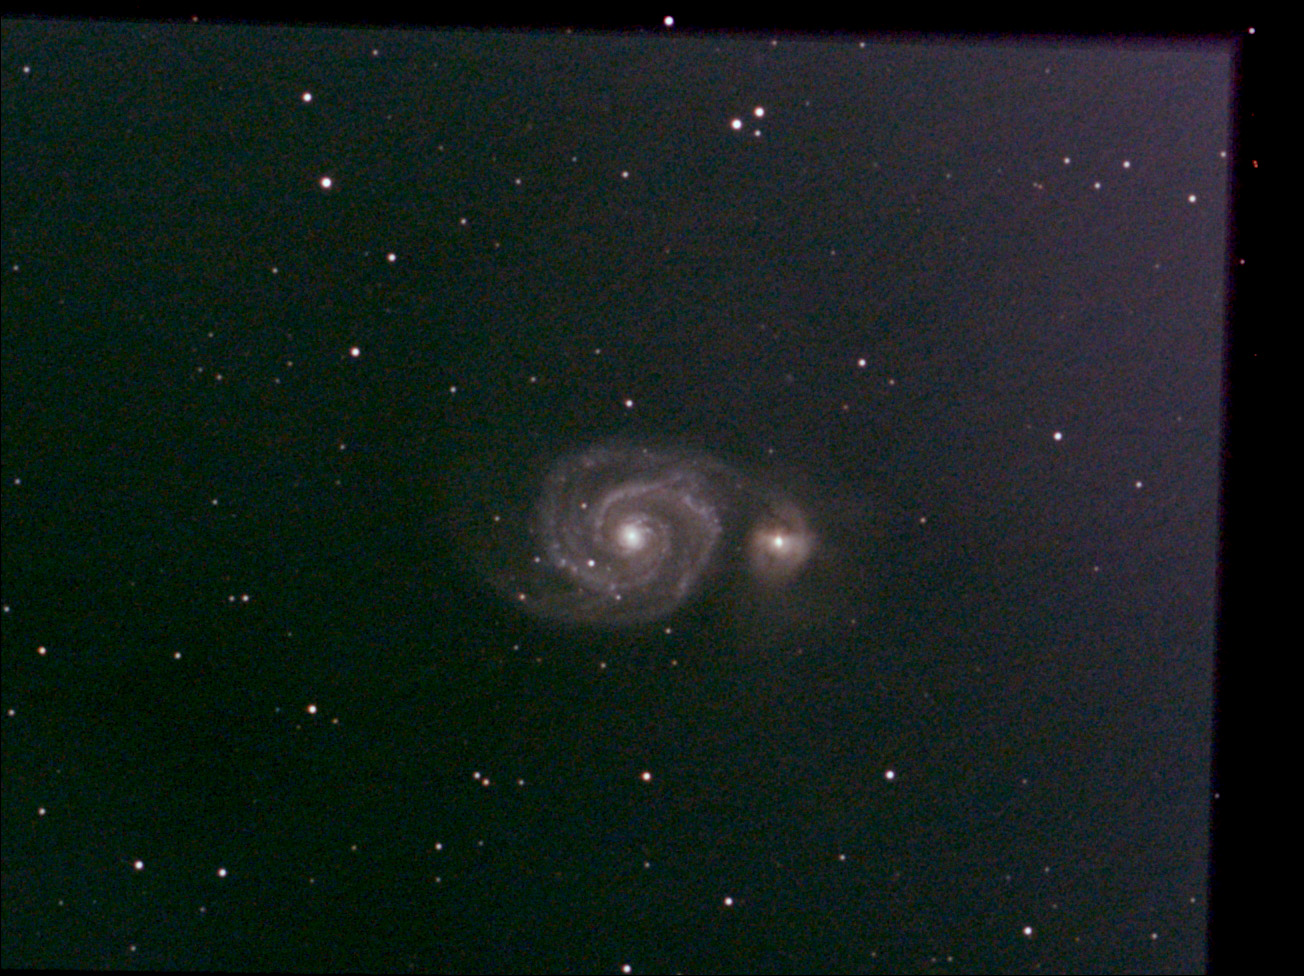
M 51 (123 frames, 12 s, gain 300), ASILive processed |
M 51 - 6.3.2021, processed, eVscope |
M 51 (100 frames, 10 s, gain 300), SharpCap, processed alternatively |
M 51 (123 frames, 12 s, gain 300), ASILive, processed alternatively |
M 51 - 6.3.2021, processed, eVscope |
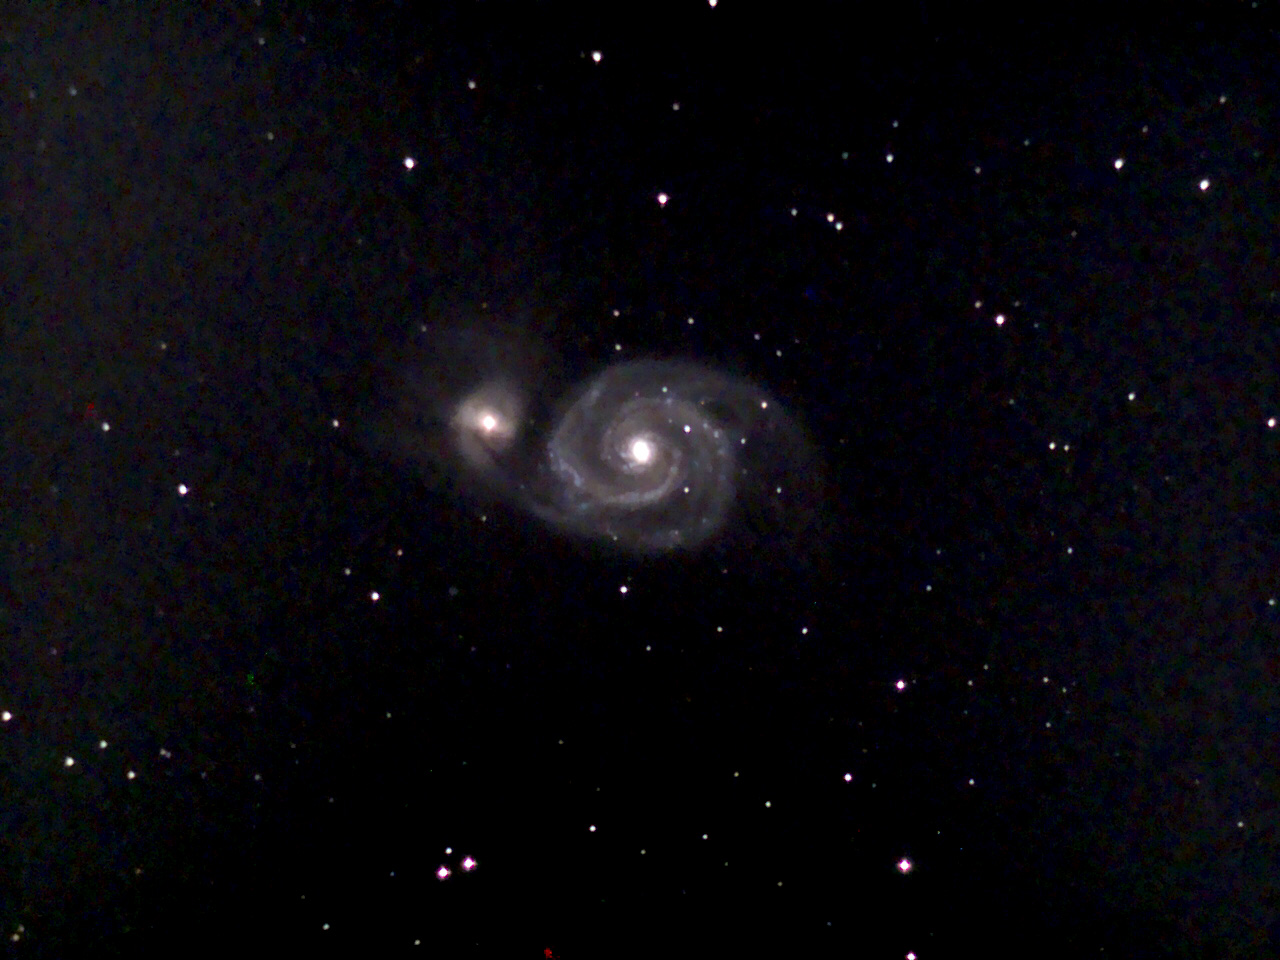
With a somewhat more aggressive post-processing (bottom row), here using Polarr and a little PSE, I come already closer to the look of the eVscope...
Final Words
I would like to point out that I only describe here how to use the program SharpCap, but not my results when using the ASI224MC, ASI462MC, or ASI294MC with this software. I describe my results in practice elsewhere.
Links
- ASI224MC (color) (ZWO Website): astronomy-imaging-camera.com/product/asi224mc
- SharpCap Homepage: www.sharpcap.co.uk
- SharpCap Download Page: www.sharpcap.co.uk/sharpcap/downloads
- SharpCap User Manual: docs.sharpcap.co.uk/3.2
- SharpCap Forums: forums.sharpcap.co.uk
- Astrophotography Stacking Software: Imaging Deep Sky Objects the Fun and Easy Way (David Barrett): www.highpointscientific.com/imaging-deep-sky-objects-dave-barrett
- See also my page offering Astronomy Links.
|
made by |
| 28.11.2024 |