
Overview of the Tips and Tricks | Tips and Tricks | Links
Archive
On this page I present some tips and tricks for my electronic 4,5" Newton telescope Unistellar eVscope 112 mm/450 mm (f/4). Please note, however, that many of the tips presented below are based on app version 1.0, which was replaced by app version 2 in mid-2022 and in which "everything looks completely different"...
Notes:
In the Unistellar Help Center there is an article with exactly this title (How do I get started? Do you have any user guide or instructions available?) available. If offers links to introductory videos and to instructions in several languages.
Update: On April 10, 2020 an answer to this question was published
in the Unistellar Help Center: How
to observe a target which is not in the catalog of objects?. The procedure
was also described in an e-mail from Unistellar on the same day calling for
the observation of comet ATLAS.
Update: On April 21, 2020, version 1.0.3
of the Unistellar app was released, adding significantly more objects to the
database, including all Caldwell objects, and also the open star cluster NGC
752 mentioned below.
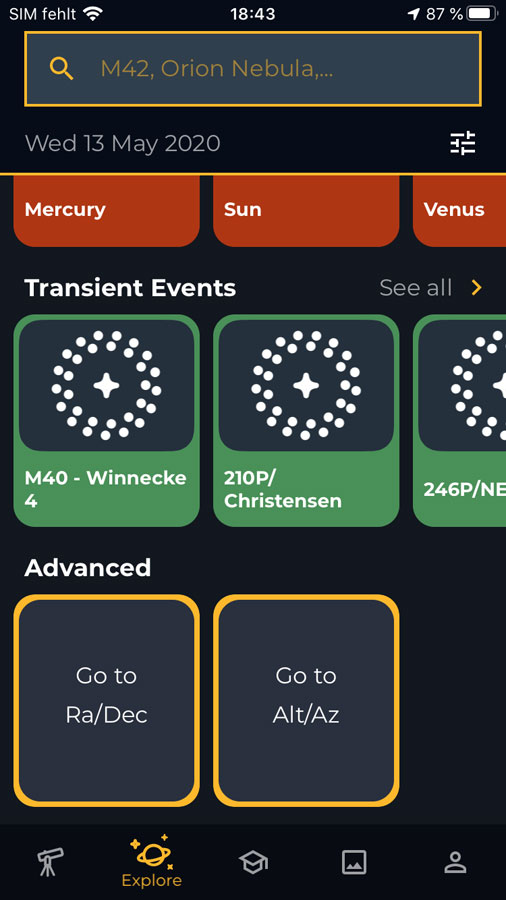
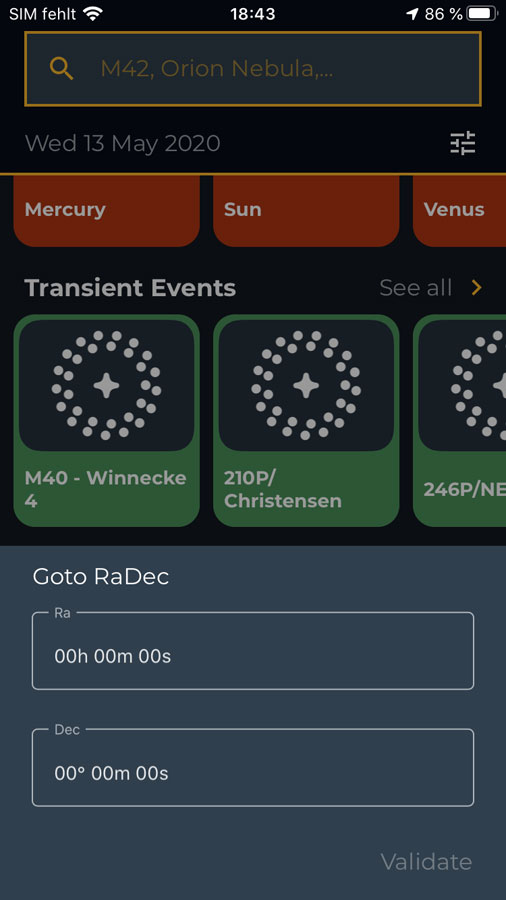
If you want to observe a DSO that is not included in the object list of the Unistellar app, you can do this by selecting one of the options "Go to Ra/Dec" or "Go to Alt/Az" in the "Explore" tab under "Advanced" (at the bottom of the page):
|
|
|
Figures: Unistellar app, "Explore" tab selected; here you can find recommended objects and objects by type; you can also specify the object by number or name; at the bottom of the screen, you can select objects using coordinates and enter the coordinates in one of two formats (confirm with "Validate")
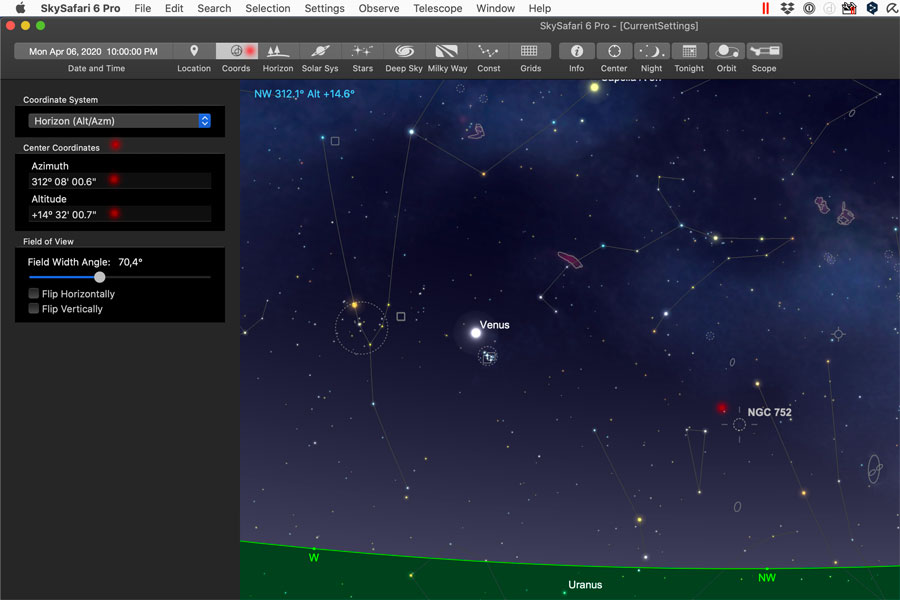
Personally, I prefer the "Alt/Az" variant, but Unistellar recommends the "Ra/Dec" one. I retrieve the coordinates from astronomy applications like SkySafari or Stellarium. Over time, I learned that the Stellarium data work better (Ra/Dec format).
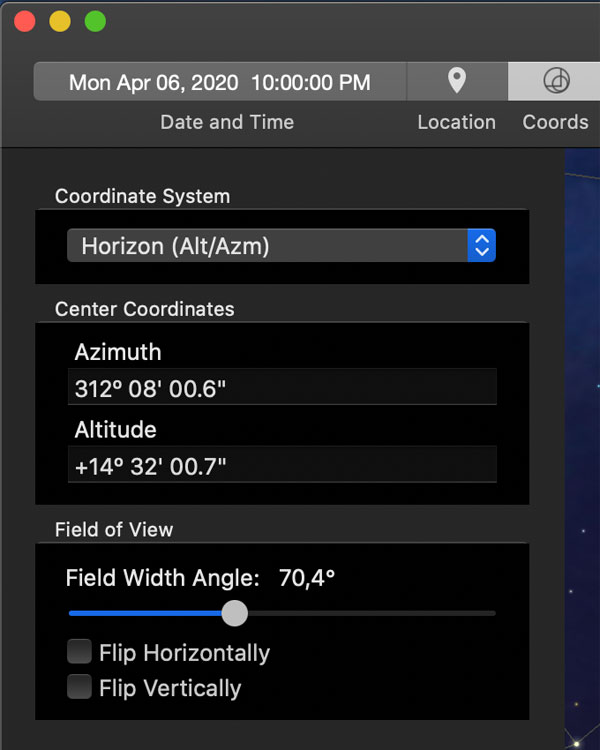
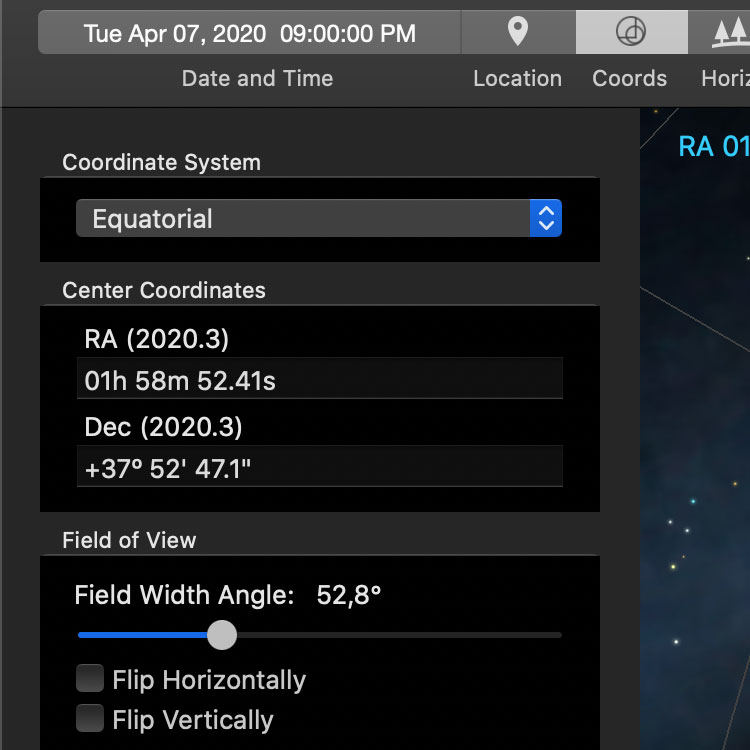
SkySafari: Search for object (NGC 752 in Andromeda here), select object (it will be centered), click the "Coords" button at the top, select the coordinate system (e.g. "Horizon (Alt/Azm)"), then the coordinates you are looking for will appear below (in "Center Coordinates"):
 |
 |
|
NGC 752 selected and centered; finding the coordinates |
The coordinates in detail |
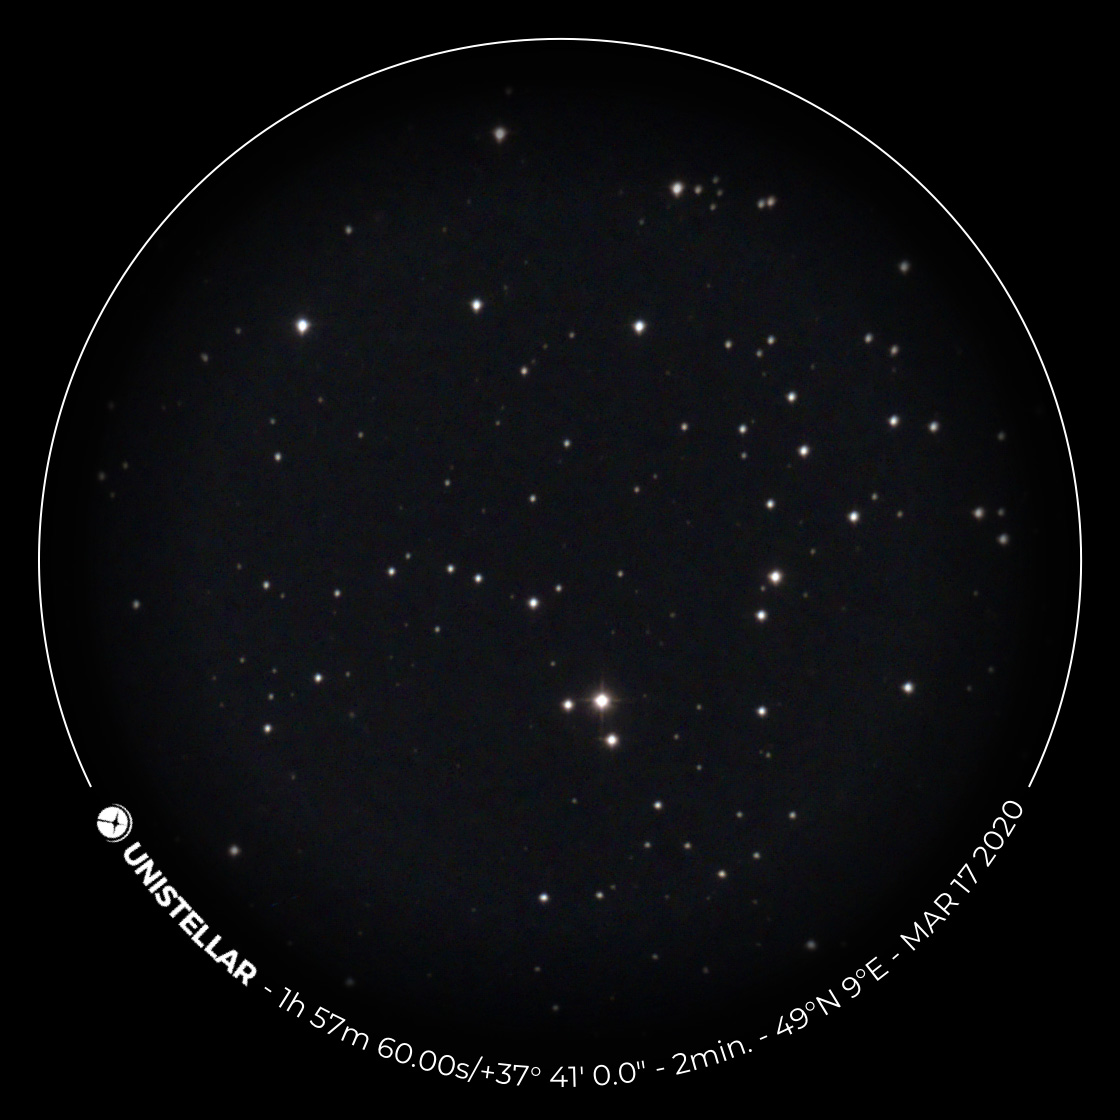
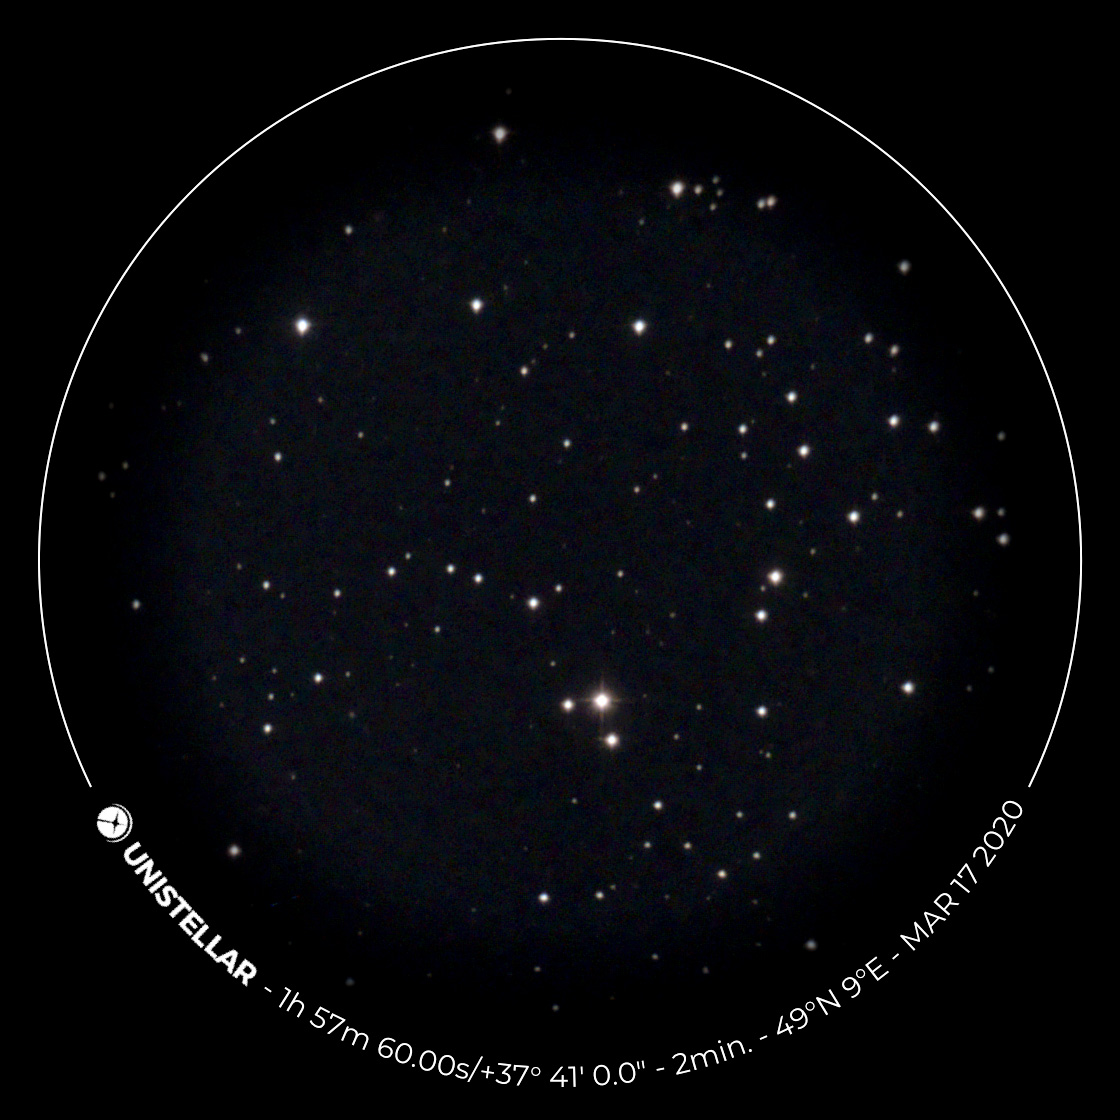
NGC 752 found using Ra/Dec coordinates:
 |
 |
 |
||
Ra/Dec coordinates for NGC 752 in SkySafari |
NGC 752 - Mar 17, 2020 |
NGC 752 - Mar 17, 2020, processed |
Maybe one day it will be possible to save "user objects". Then you need to perform the above procedure only once.
 |
Sometimes I select an object on the "Explore" screen, and when the app jumps to the detail view, the "Goto" button is not activated, that is, it is gray instead of yellow (see figure left). This means that I cannot access the object, although this should be possible. In the meantime, I found three potential causes for this behavior: App issue: In some cases, it helps to quit and restart the app. Unfortunately, I do not know why this works only now and then. Target too close to the zenith: I once had the case with M 51 that all trial and error did not help. Unfortunately, the app did not provide a reason for blocking the GoTo. So I thought I would try to get to the object by entering the coordinates. That did not work either, but this time I got an error message, which explained why the GoTo did not work: The object was too high in the zenith for the eVscope! So whenver the app does not activate the "Goto" button, the reason might be that the object is too high in the zenith. Whether this is really the case can then be checked easily! App switched to "Observer" mode unnoticed: Meanwhile, I often had the case that the app had switched to "Observer" mode (with and without another observer) for reasons unknown to me. Since this is not indicated on the "Explore" screen, this behavior often confused me at lot, because nothing seemed to help. In the meantime, I learned to look at the "User" screen to see which user mode my app has. If it is in "Observer" mode, I request control back. Getting control back usually works only after quitting and restarting the app, but even then the user mode is often not displayed correctly at first go. Switching between screens usually helps. I do not know the reason for the change of the user mode. Sometimes, the change happened after the WLAN connection was interrupted, but by no means in all cases. |
When I observe in "Enhanced Vision" mode, I usually take a picture every moment, because you never know... Afterwards, I have a lot of photos, from which I typically select the ones where I stayed the longest in the "Enhanced Vision" mode, because they show the most details and the least noise.
But not everything gets better with longer dwell time! With a very long dwell time (15 to 30 minutes) the sky may become, particularly when post-processing the photos, brighter and bluer and is no longer black. Hot pixels can appear in the middle of the observation and sometimes show up as strange traces. If there are not too many of them, and they do not disturb important picture elements, you can, of course, remove them with an image editing application (which means some work).
In the meantime, I have learned a little about the optimal times in "Enhanced Vision" mode, especially when the sky is dark and when it is brighter, for example around the new or full moon.
Furthermore, the optimal "Enhanced Vision" mode durations depend on the type of the observed DSO. Open star clusters can do with shorter times (even below a minute), nebulae and galaxies require longer times, and faint nebulae such as the Flame Nebula or the Horsehead Nebula require very long times.
In the following, I demonstrate some of the effects described above. In addition, I demonstrate the difference between photos taken under a dark sky and at full moon in the tip Should I Refrain from Observing During a Full Moon?
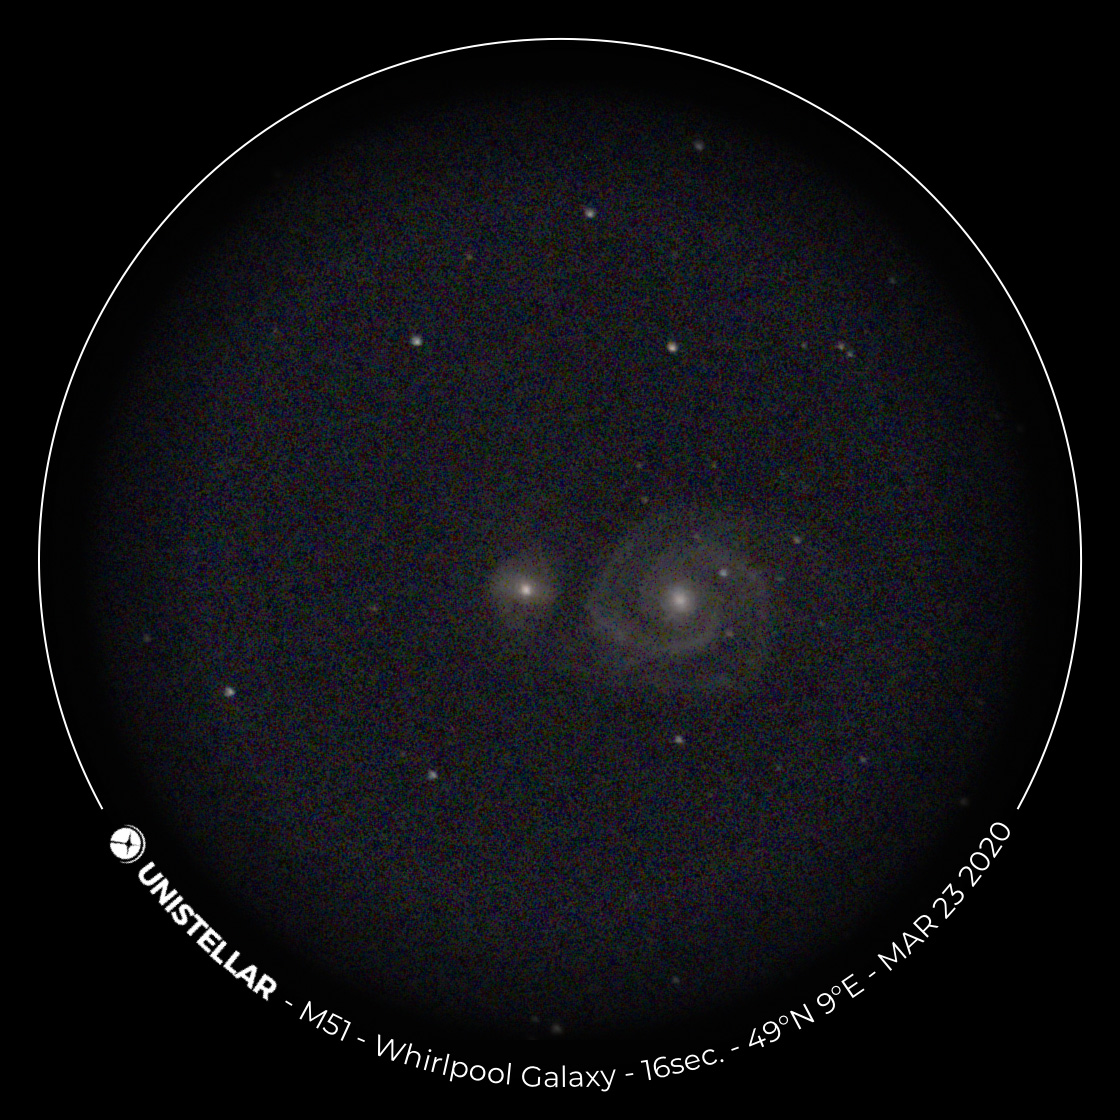
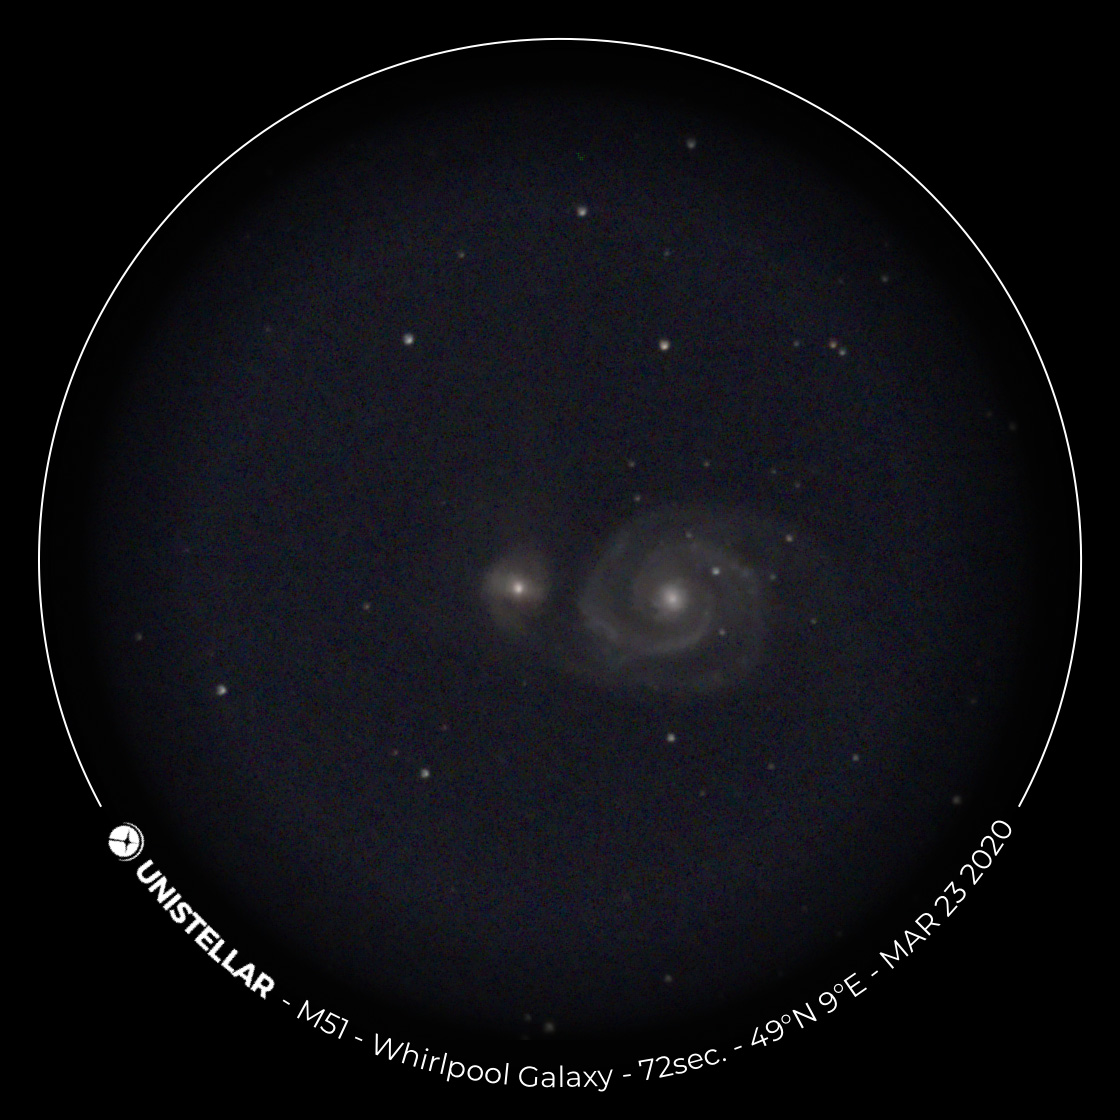
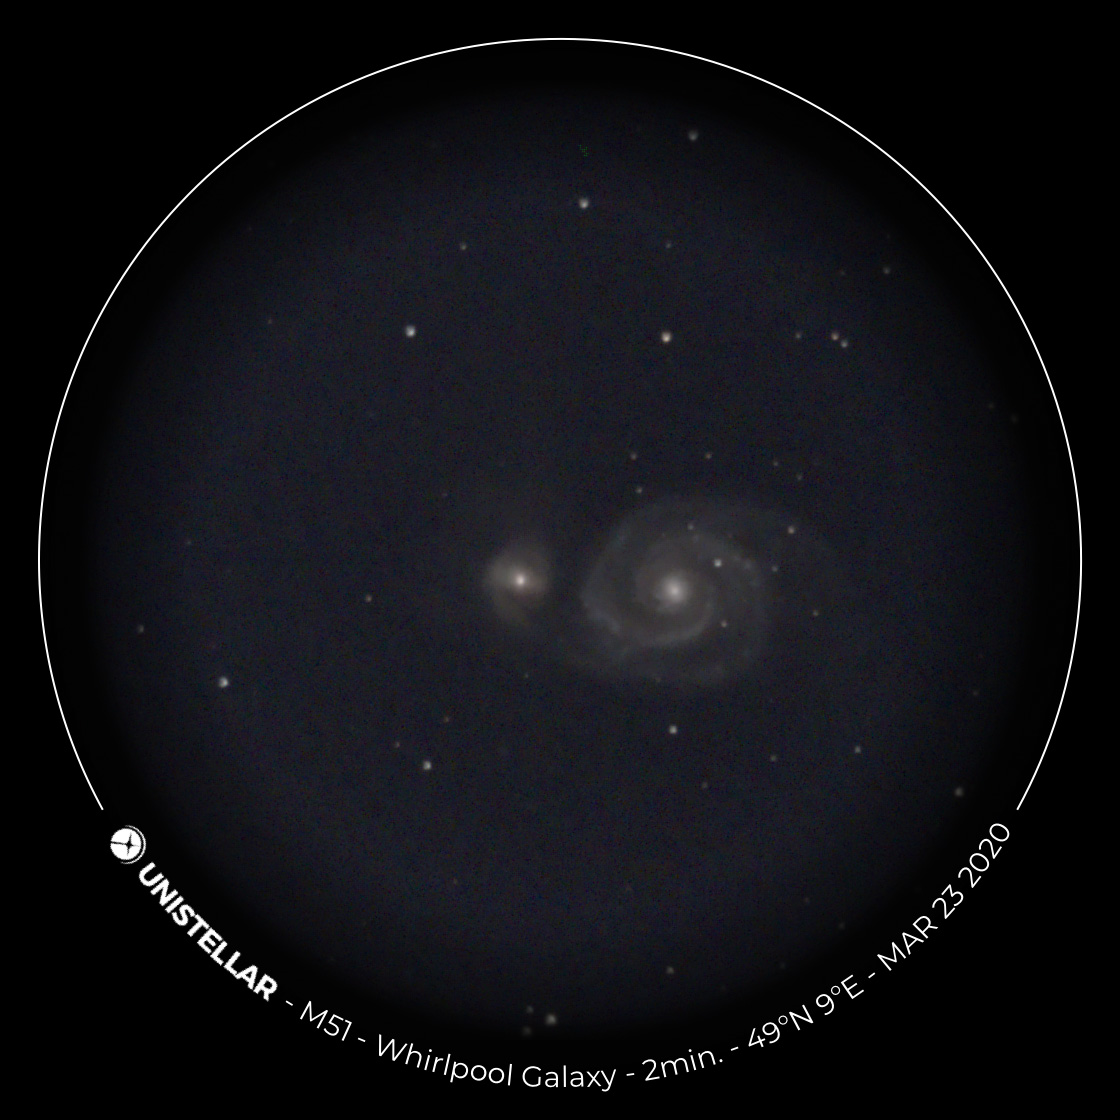
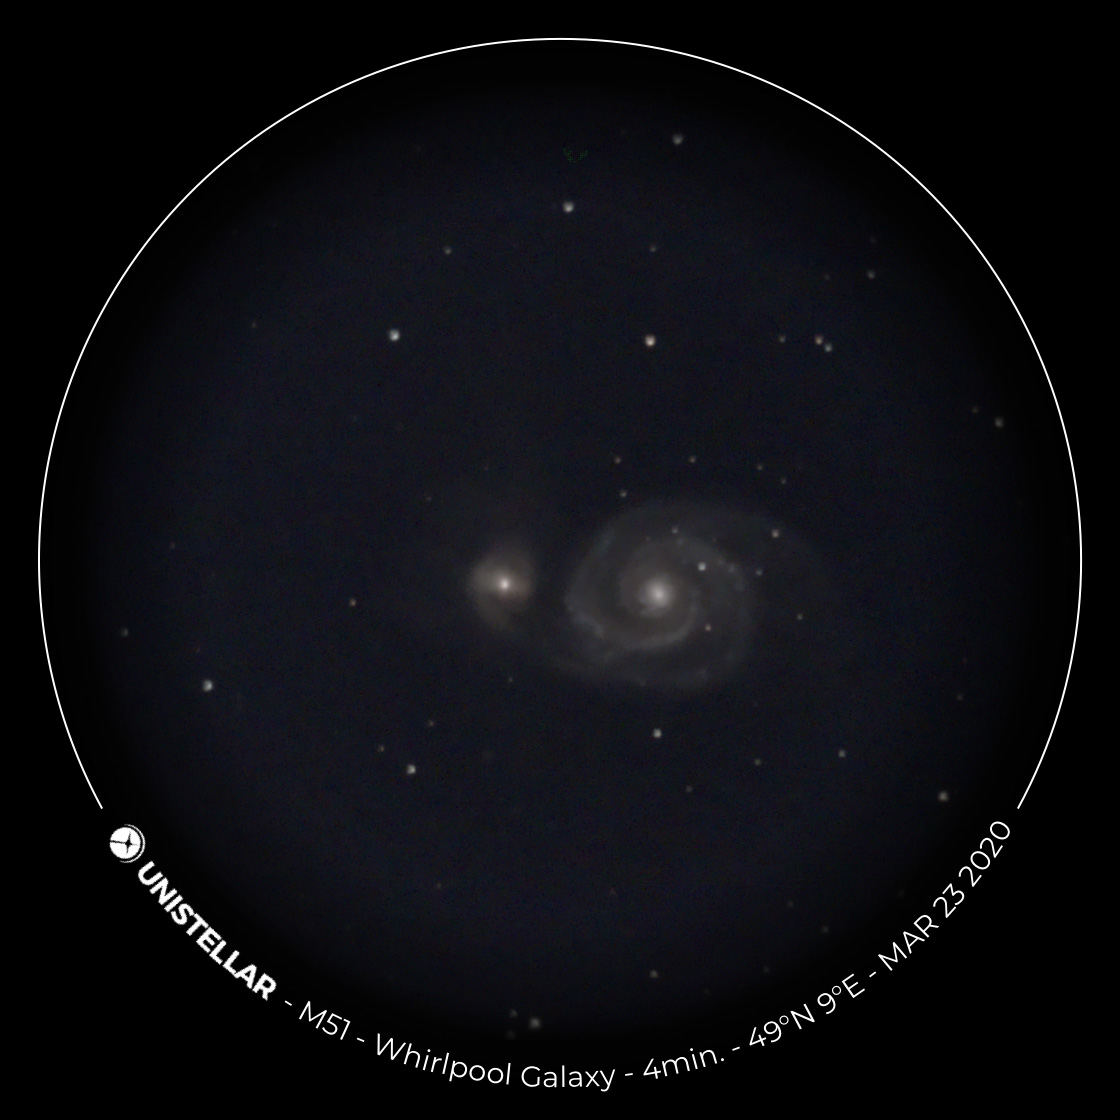
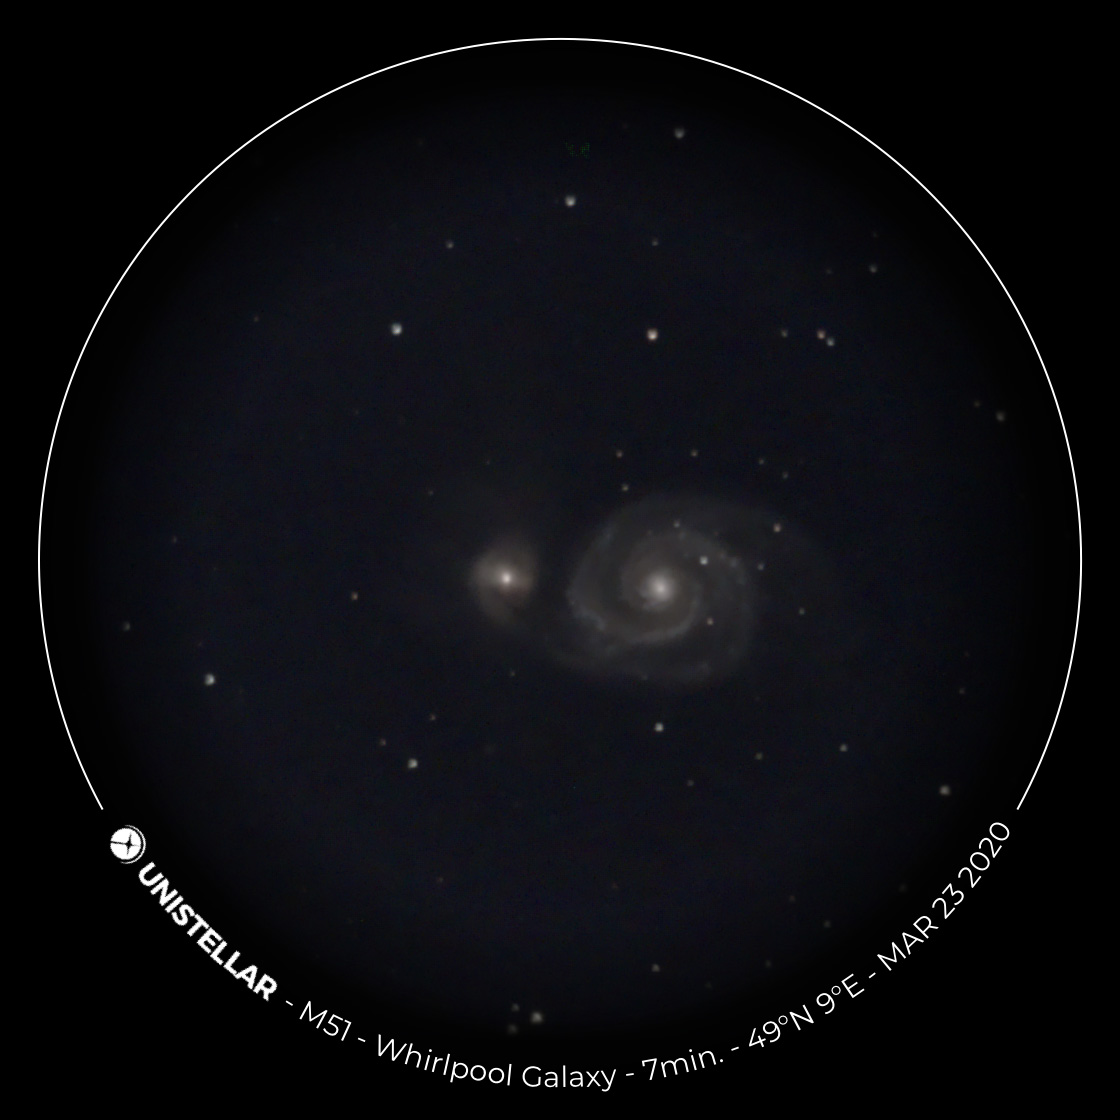
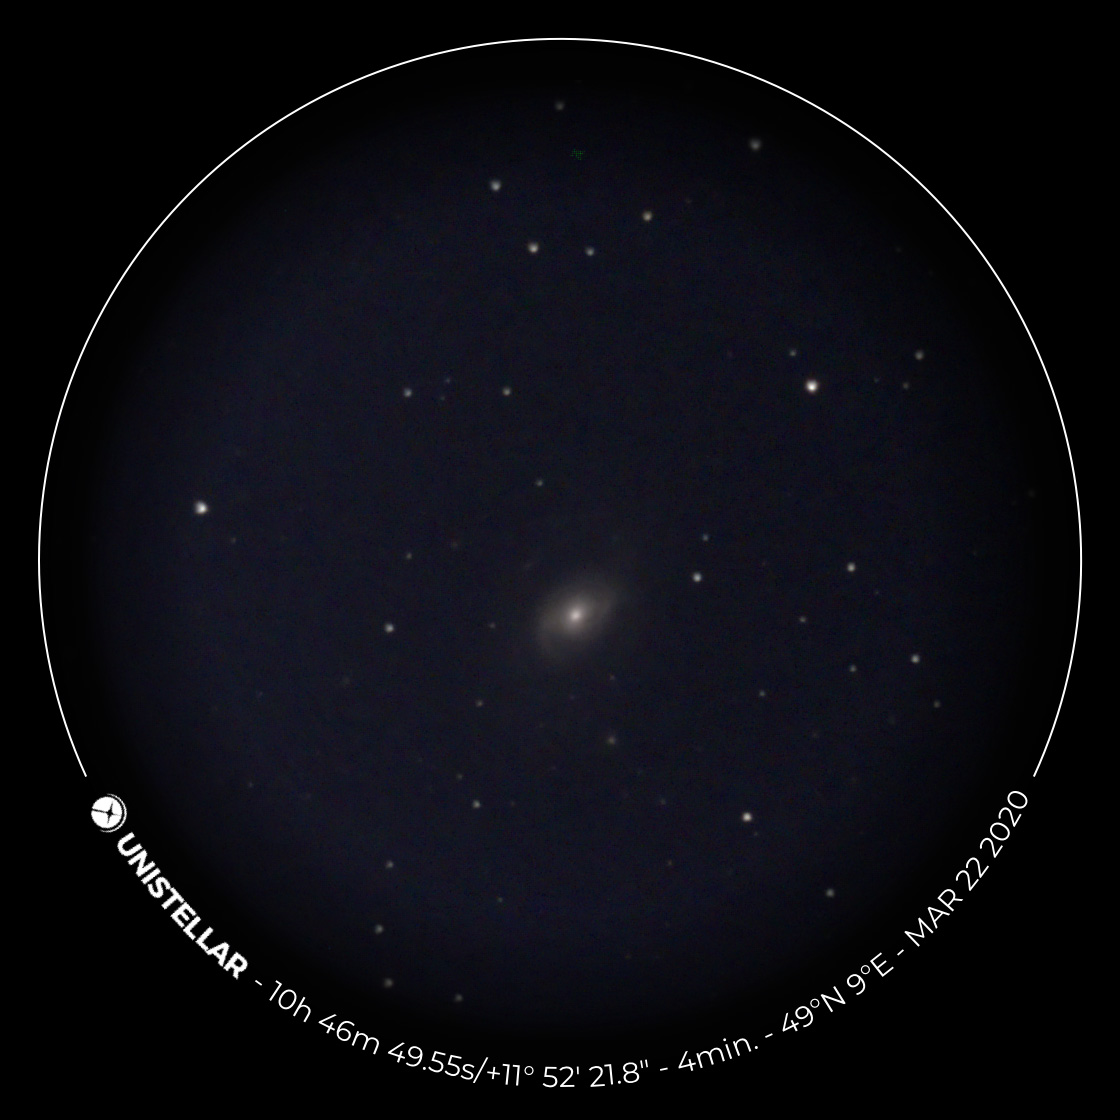
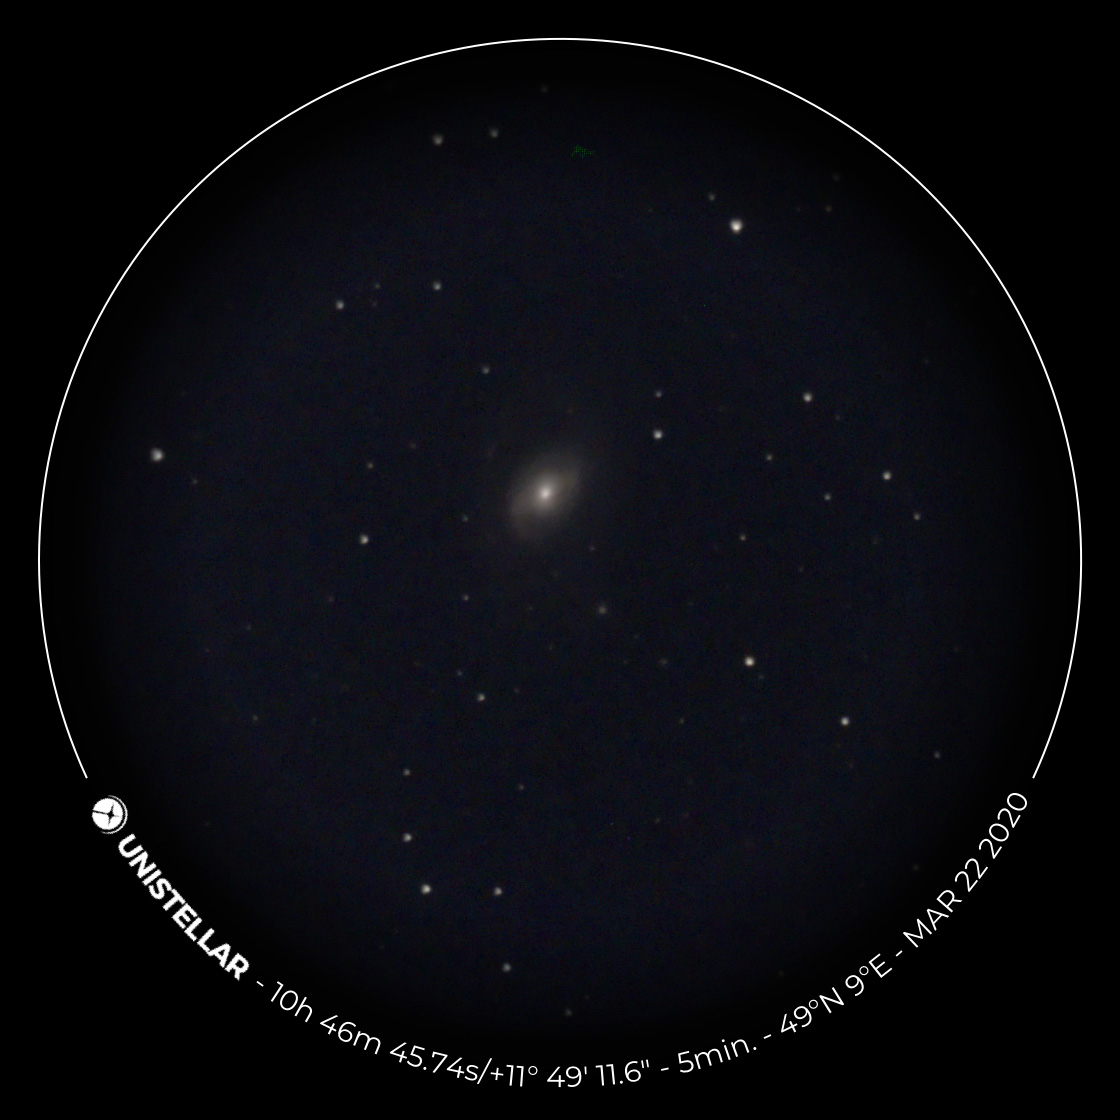
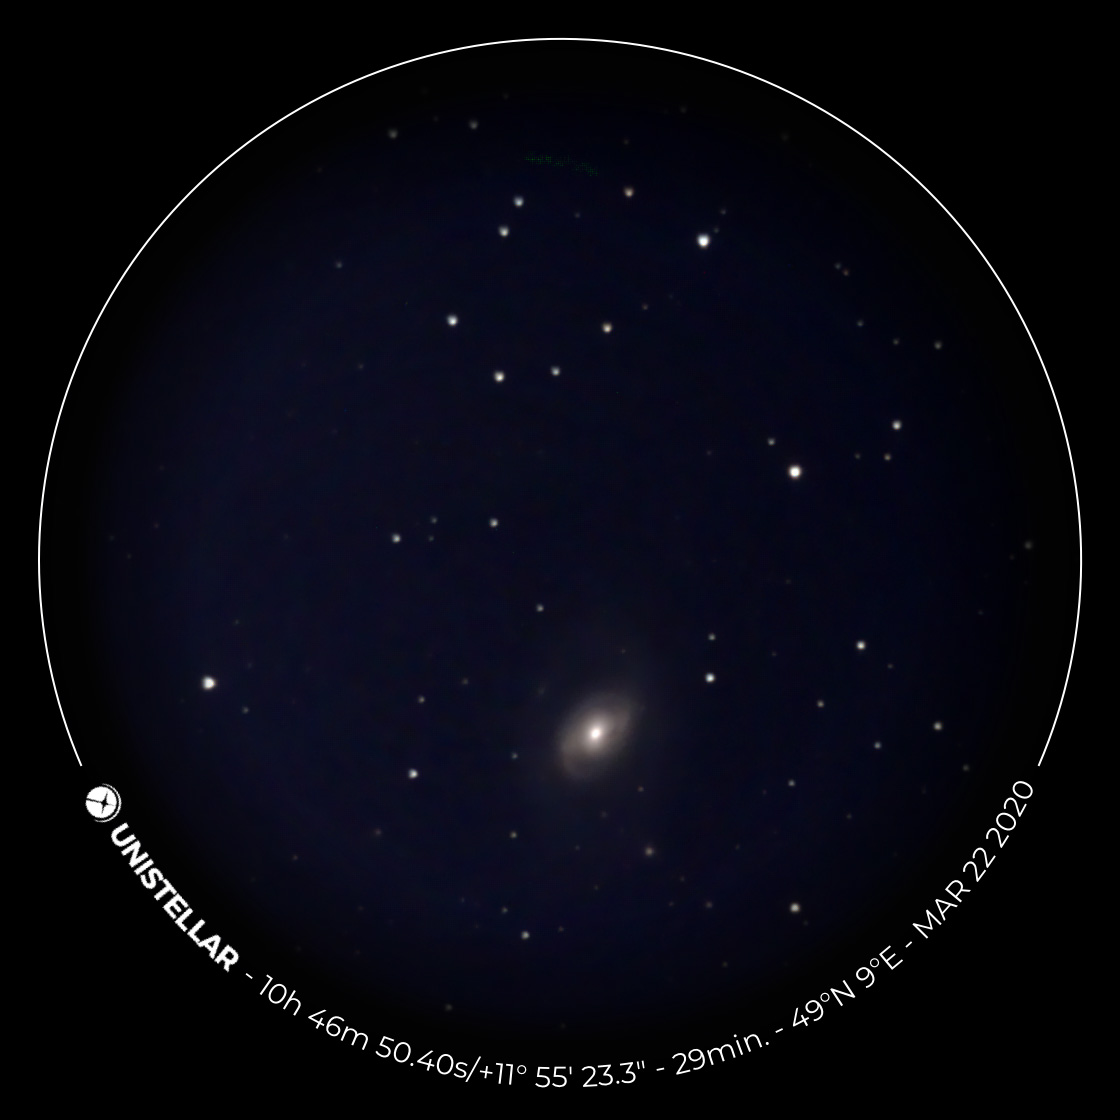
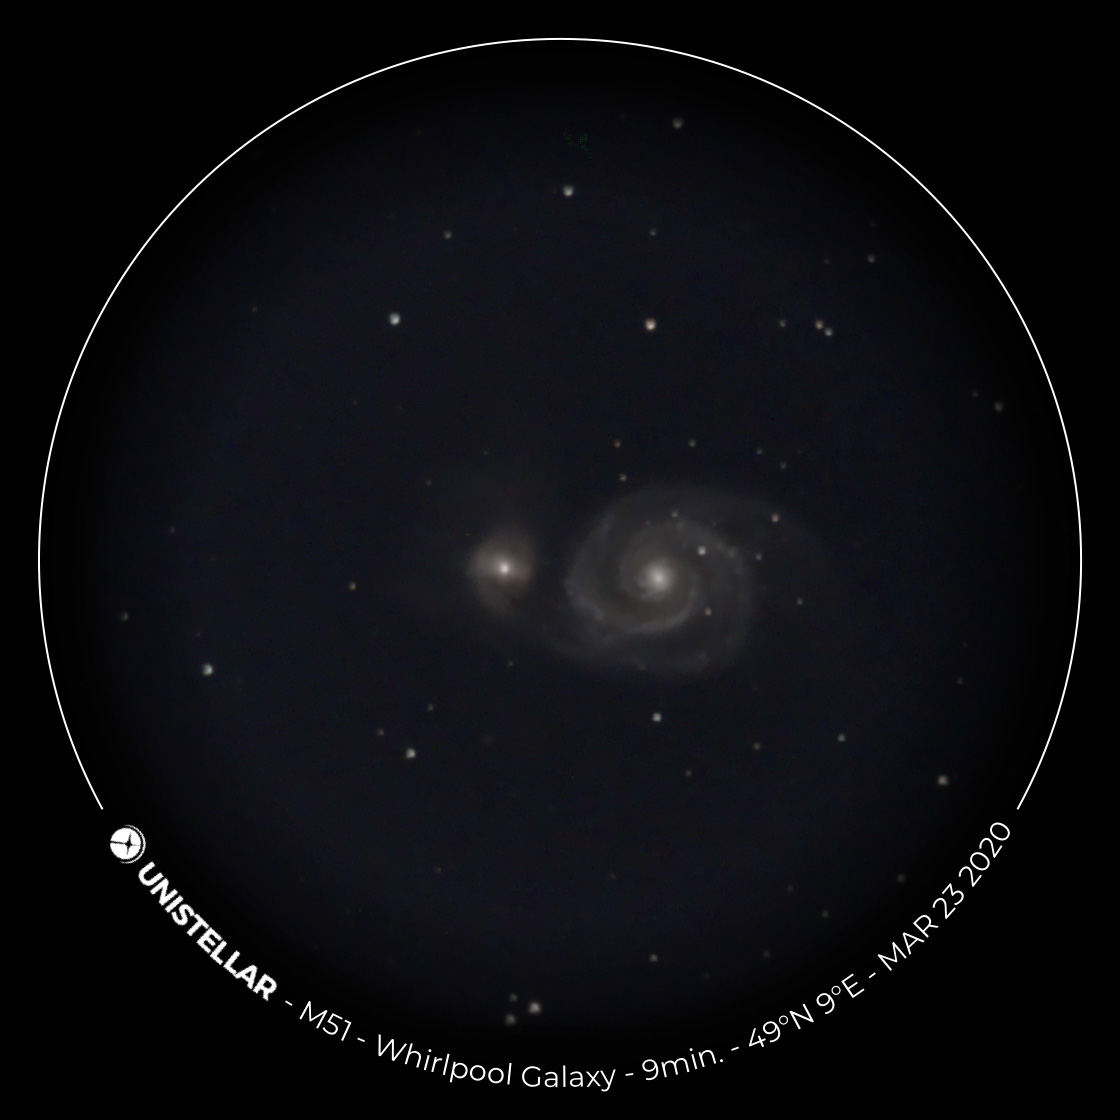
It is not easy for me to find example photos that demonstrate how the image quality improves during the observation in "Enhanced Vision" mode. Moreover, the times and the improvement in quality of the images depend a lot on the quality of the sky and on the type of DSO. As a first example, I present original eVscope photos of the galaxy M 51 taken briefly before new moon and after staying between 16 seconds and 9 minutes in "Enhanced Vision" mode. For a closer inspection, please click the previews to see the original photos.
 |
 |
 |
||
M 51 - Mar 23, 2020 - 16 seconds |
M 51 - Mar 23, 2020 - 72 seconds |
M 51 - Mar 23, 2020 - 2 minutes |
||
 |
 |
 |
||
M 51 - Mar 23, 2020 - 4 minutes |
M 51 - Mar 23, 2020 - 7 minutes |
M 51 - Mar 23, 2020 - 9 minutes |
 |
 |
 |
||
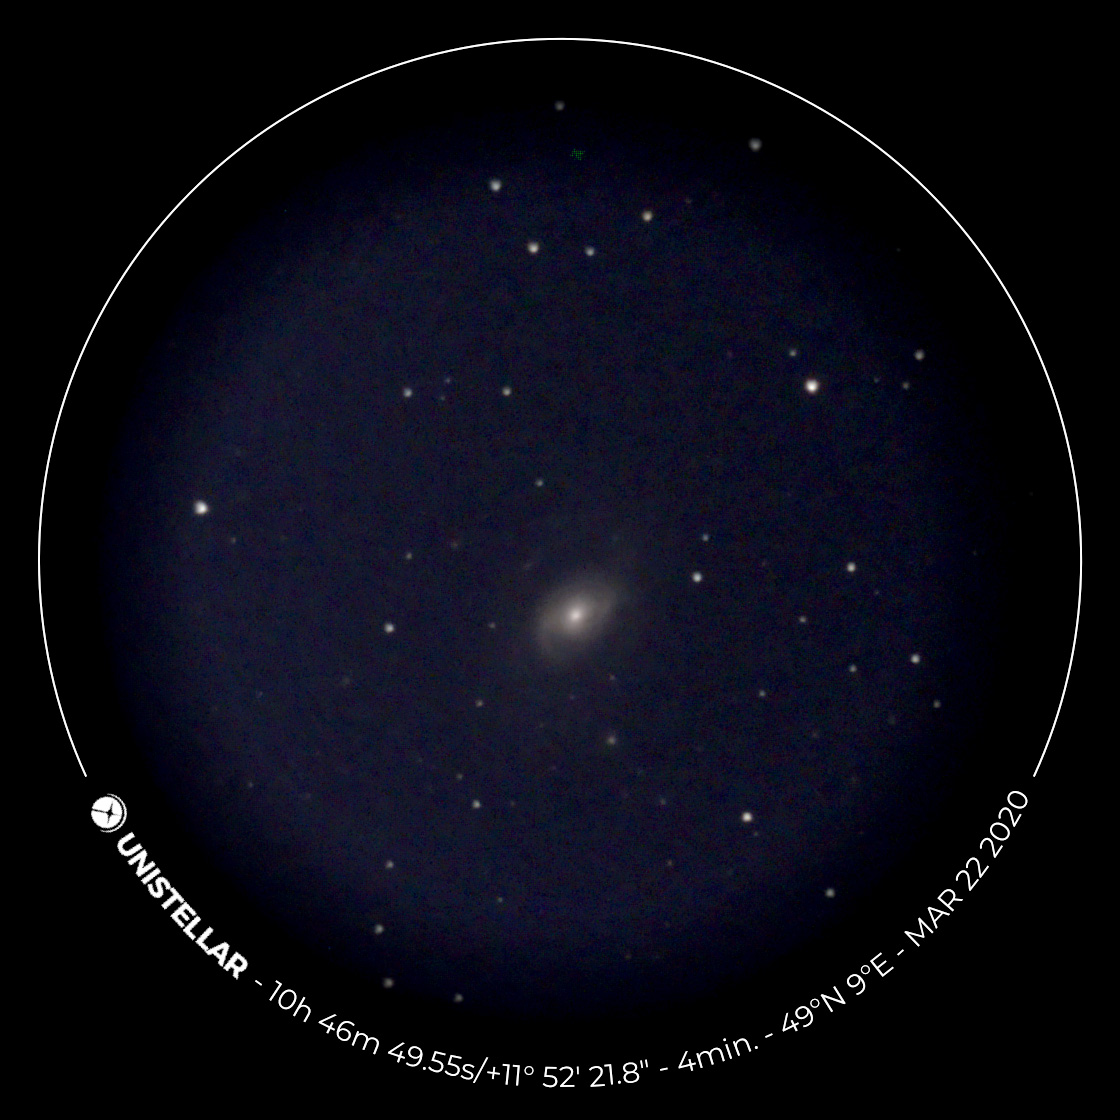
M 96 - Mar 22, 2020 (4 min) |
M 96 - Mar 22, 2020 (5 min) |
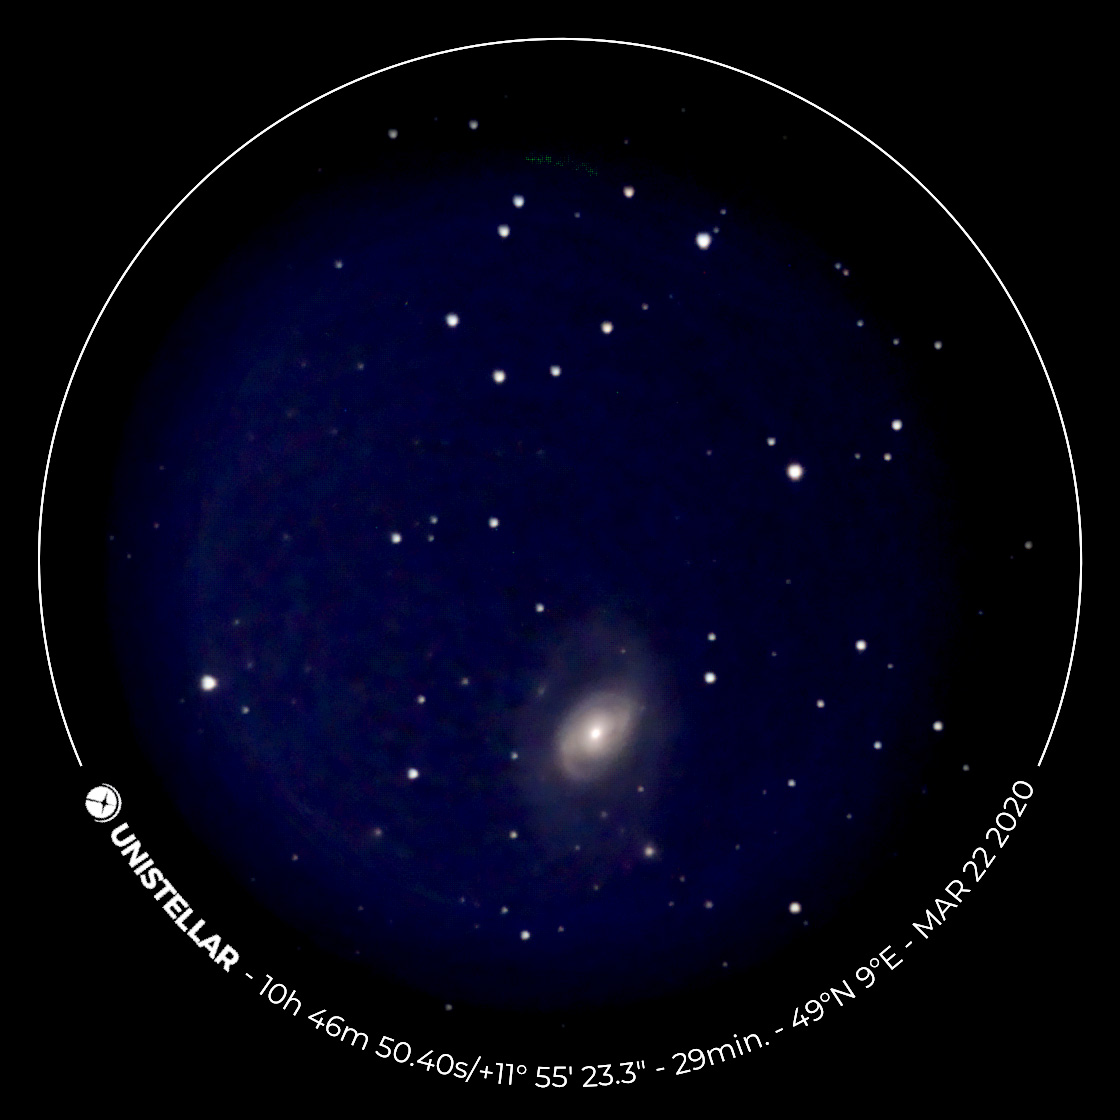
M 96 - Mar 22, 2020 (29 min) |
||
 |
 |
 |
||
M 96 - Mar 22, 2020, version on top processed |
M 96 - Mar 22, 2020, version on top processed |
M 96 - Mar 22, 2020, version on top processed |
 |
 |
 |
||
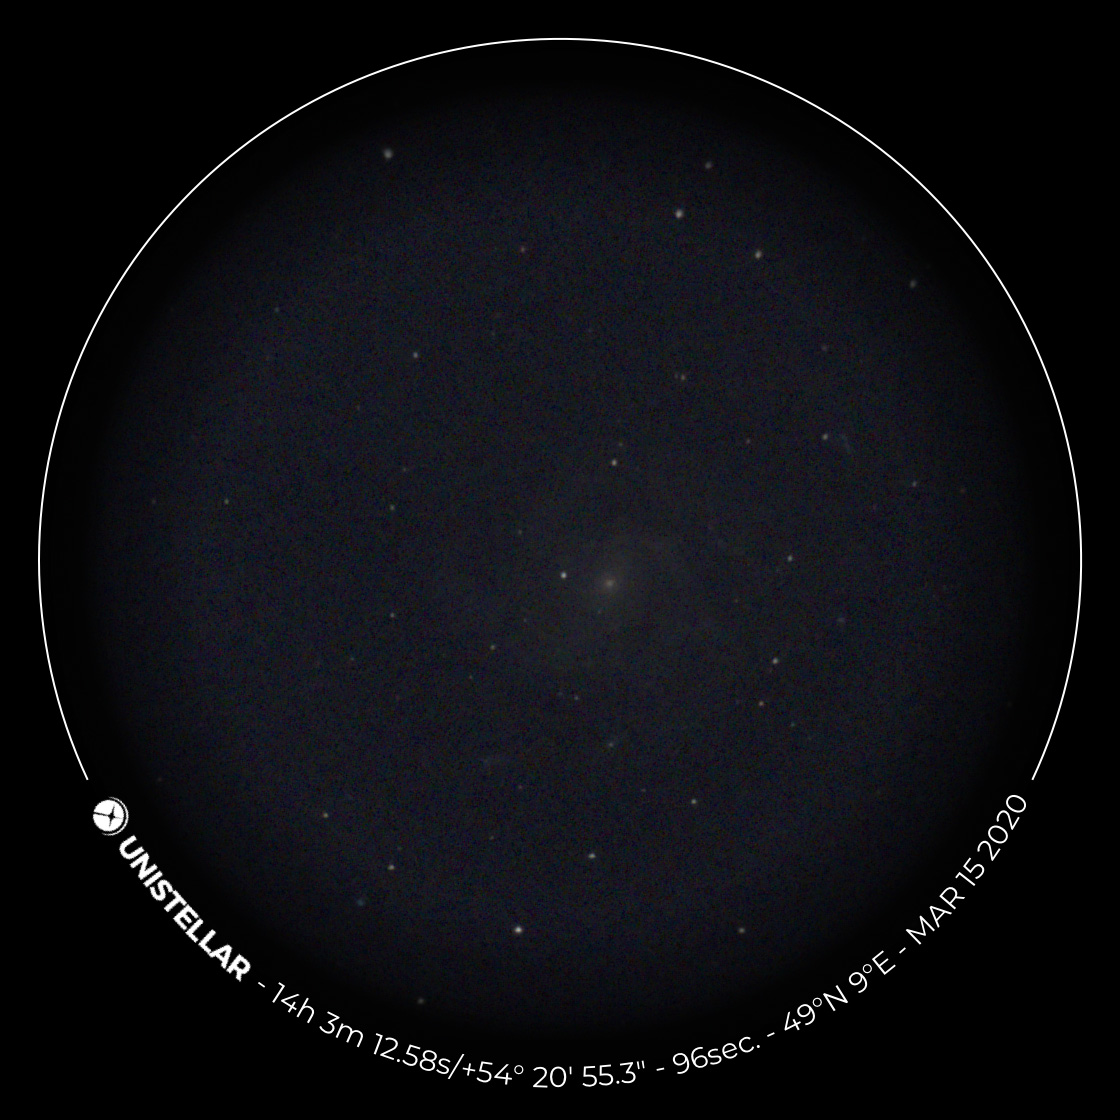
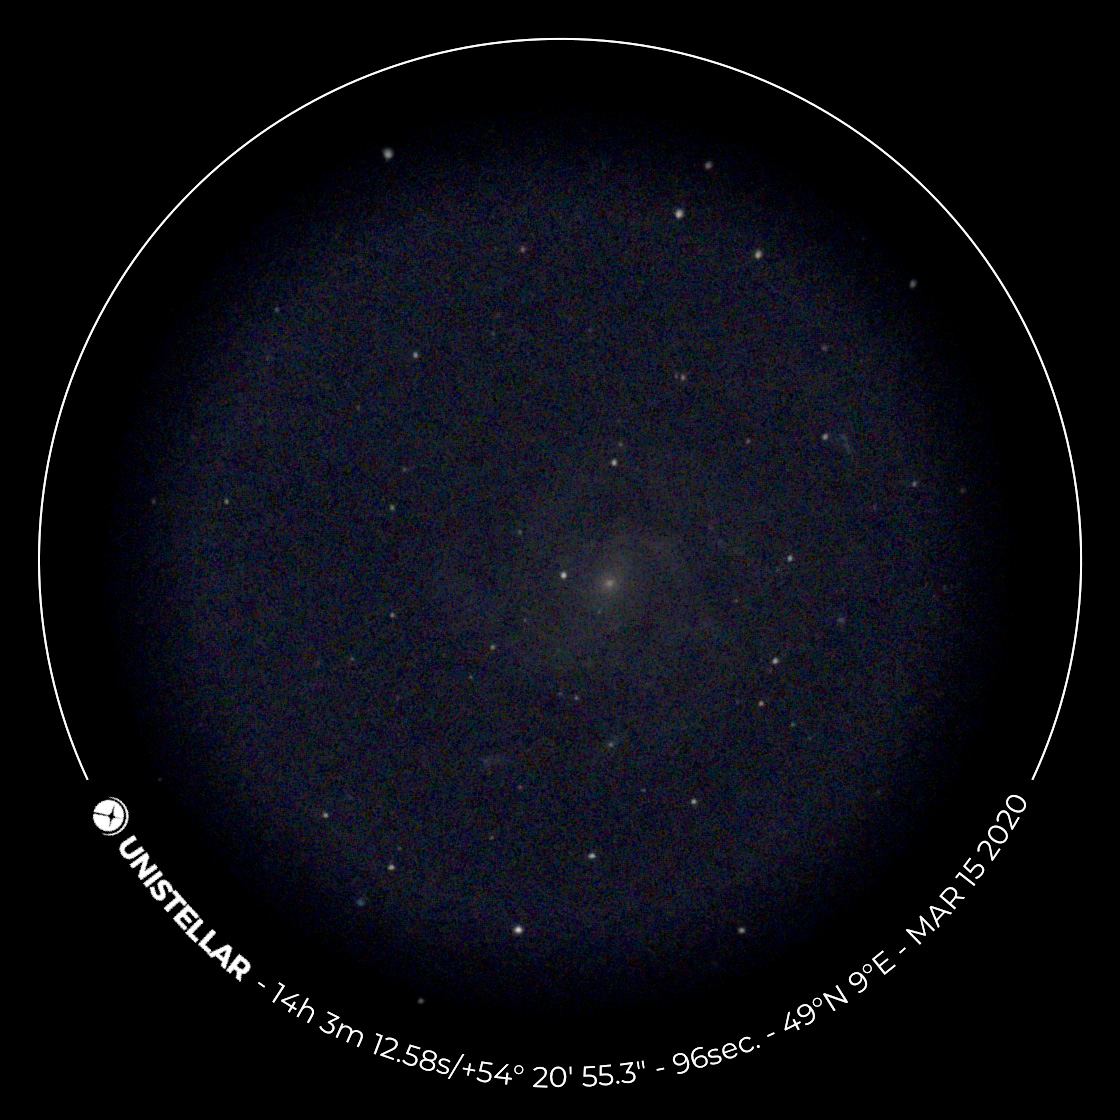
M 101 - Mar 15, 2020 (96 sec, noisy) |
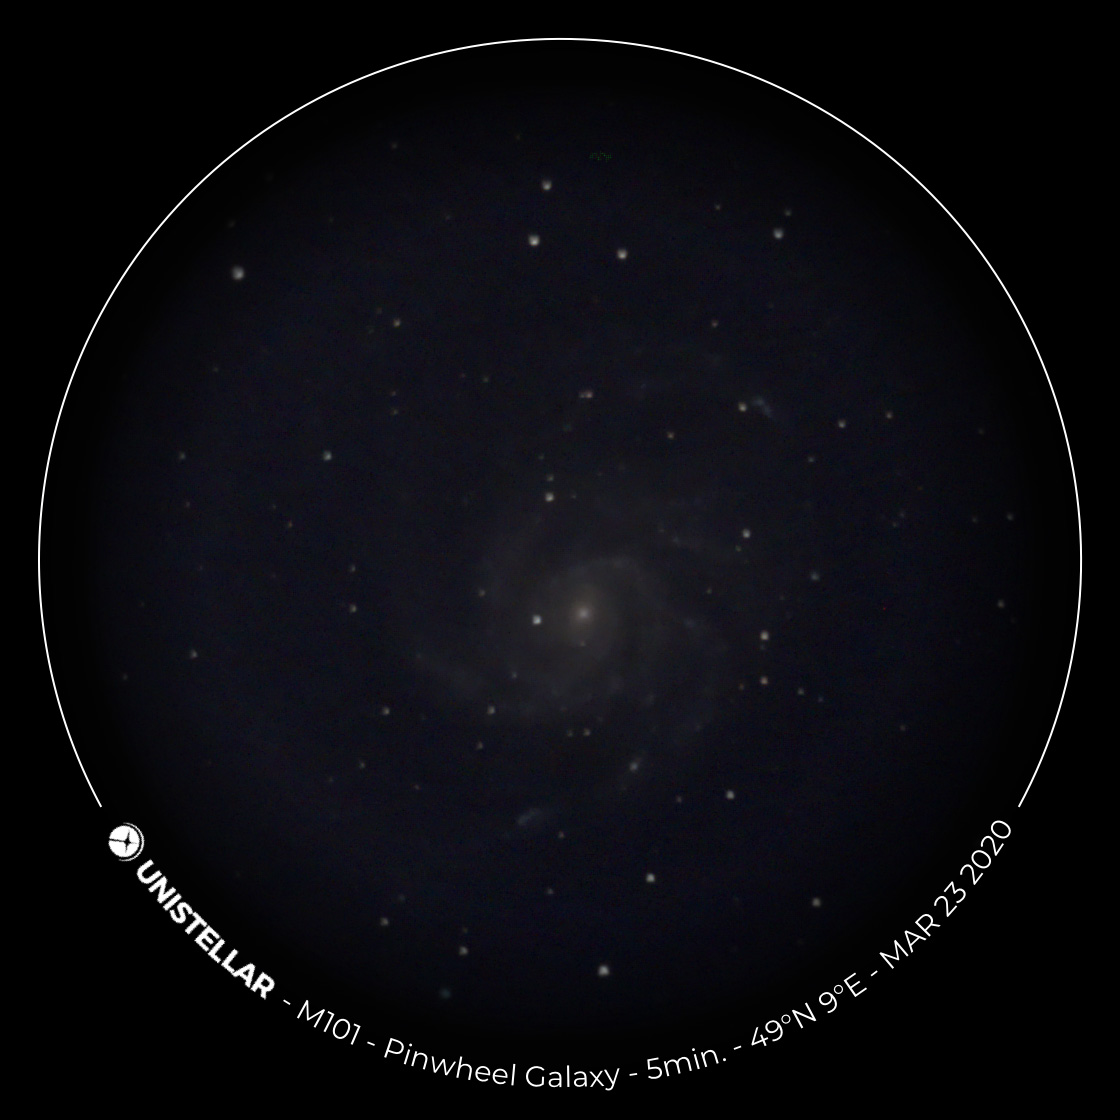
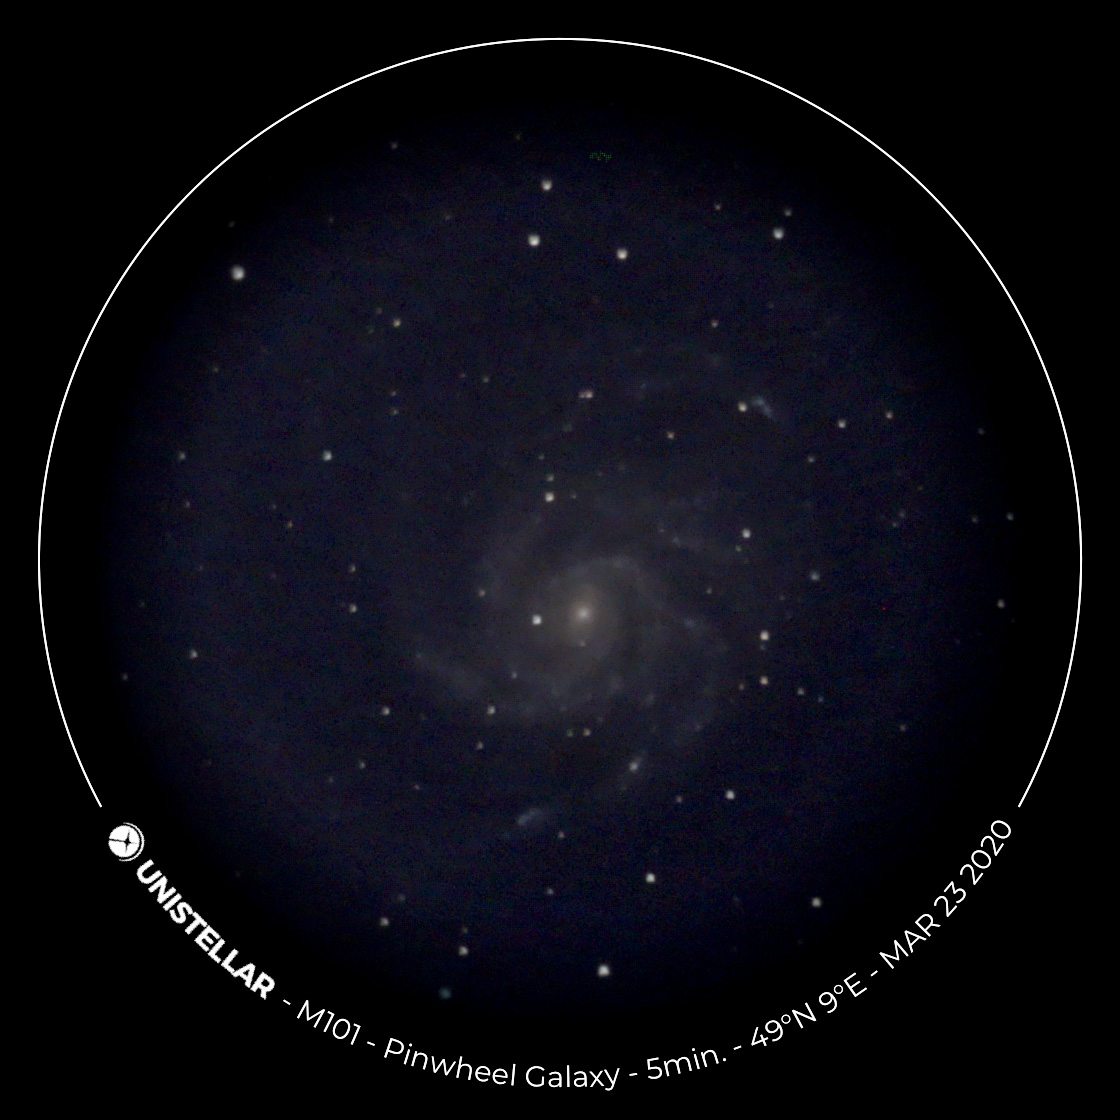
M 101 - Mar 23, 2020 (5 min) |
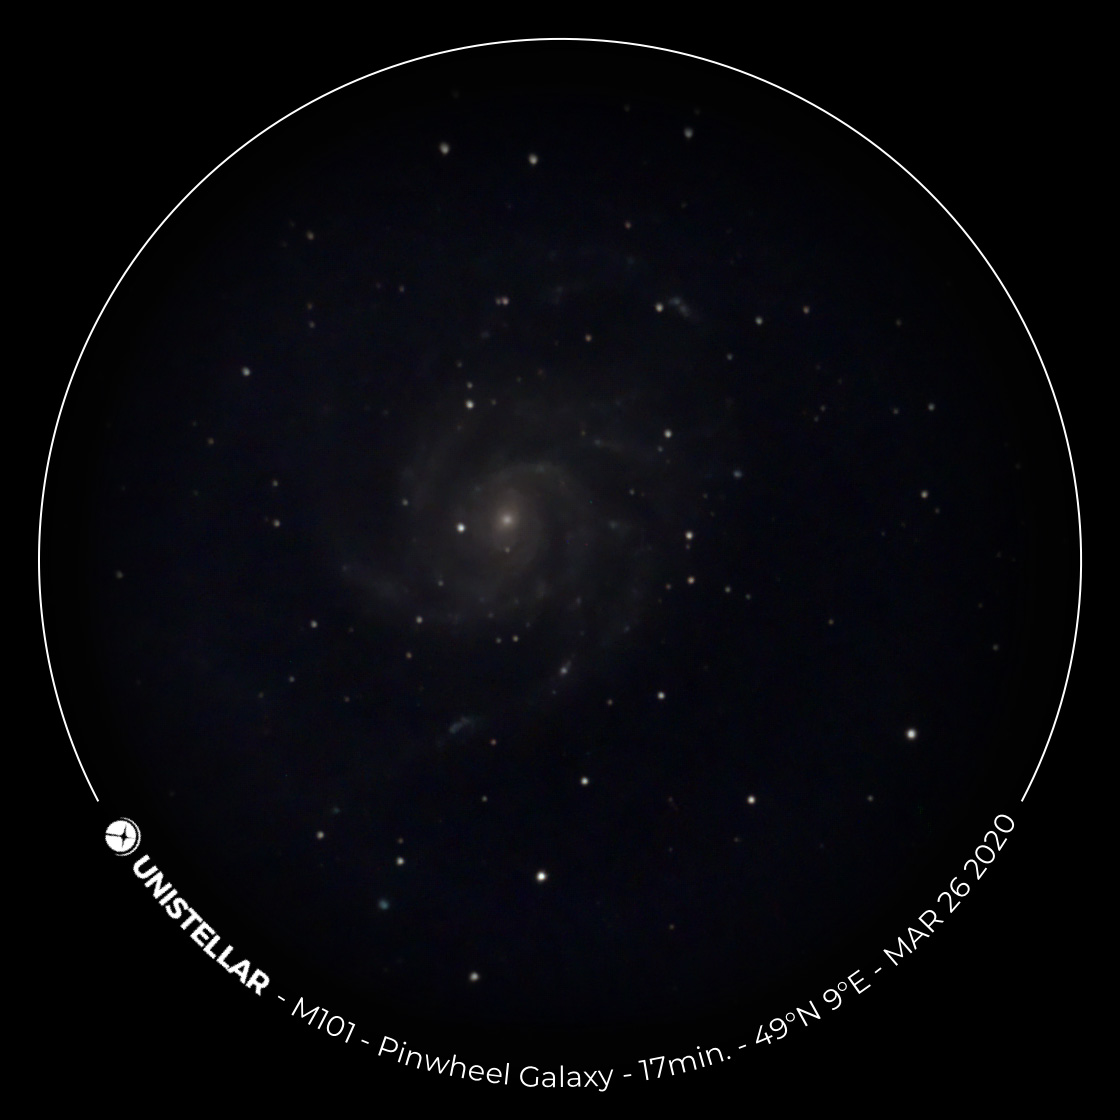
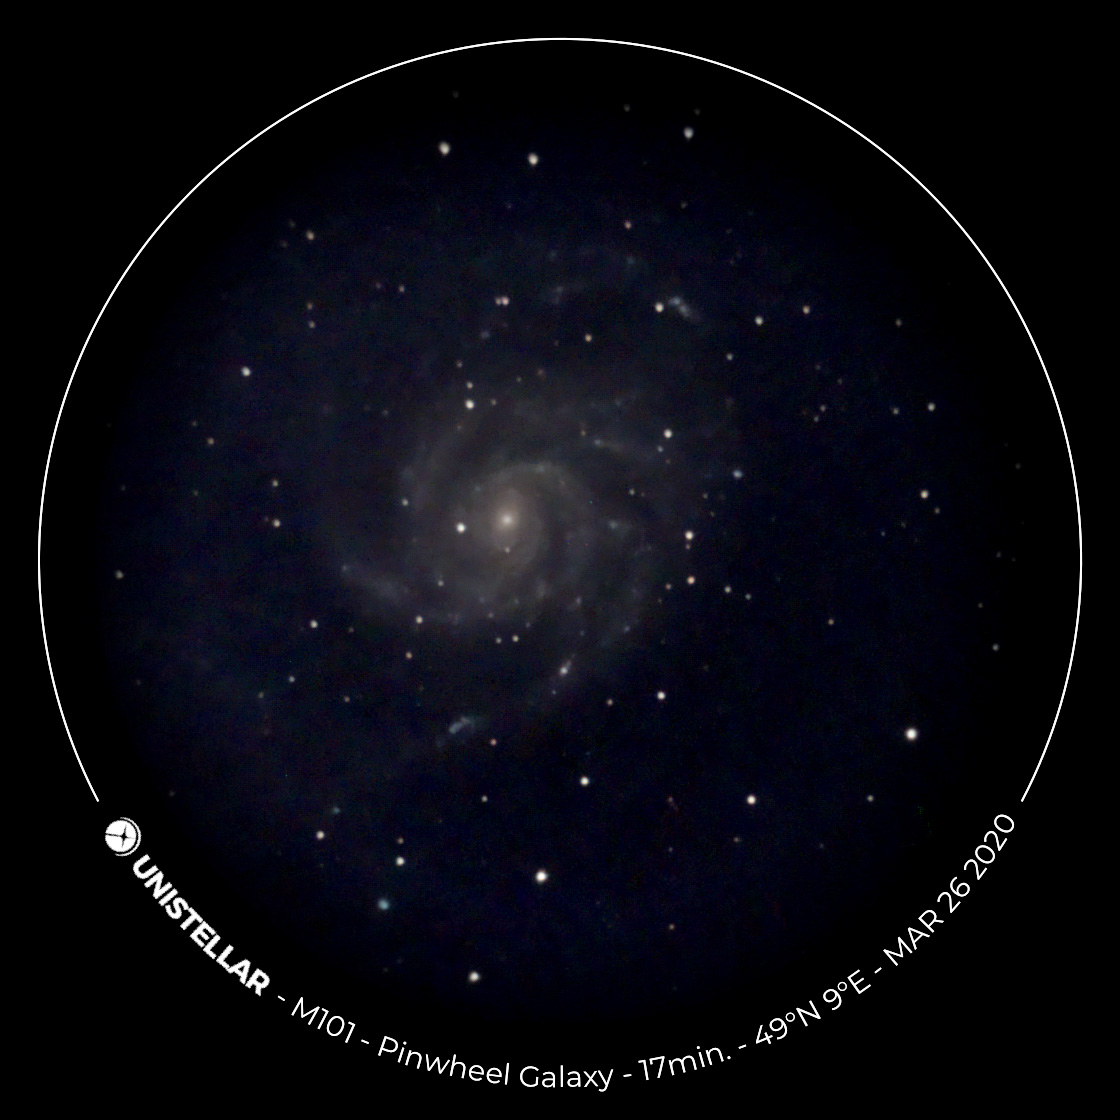
M 101 - Mar 25, 2020 (17 min) |
||
 |
 |
 |
||
M 101 - Mar 15, 2020, processed |
M 101 - Mar 23, 2020, processed |
M 101 - Mar 25, 2020, processed |
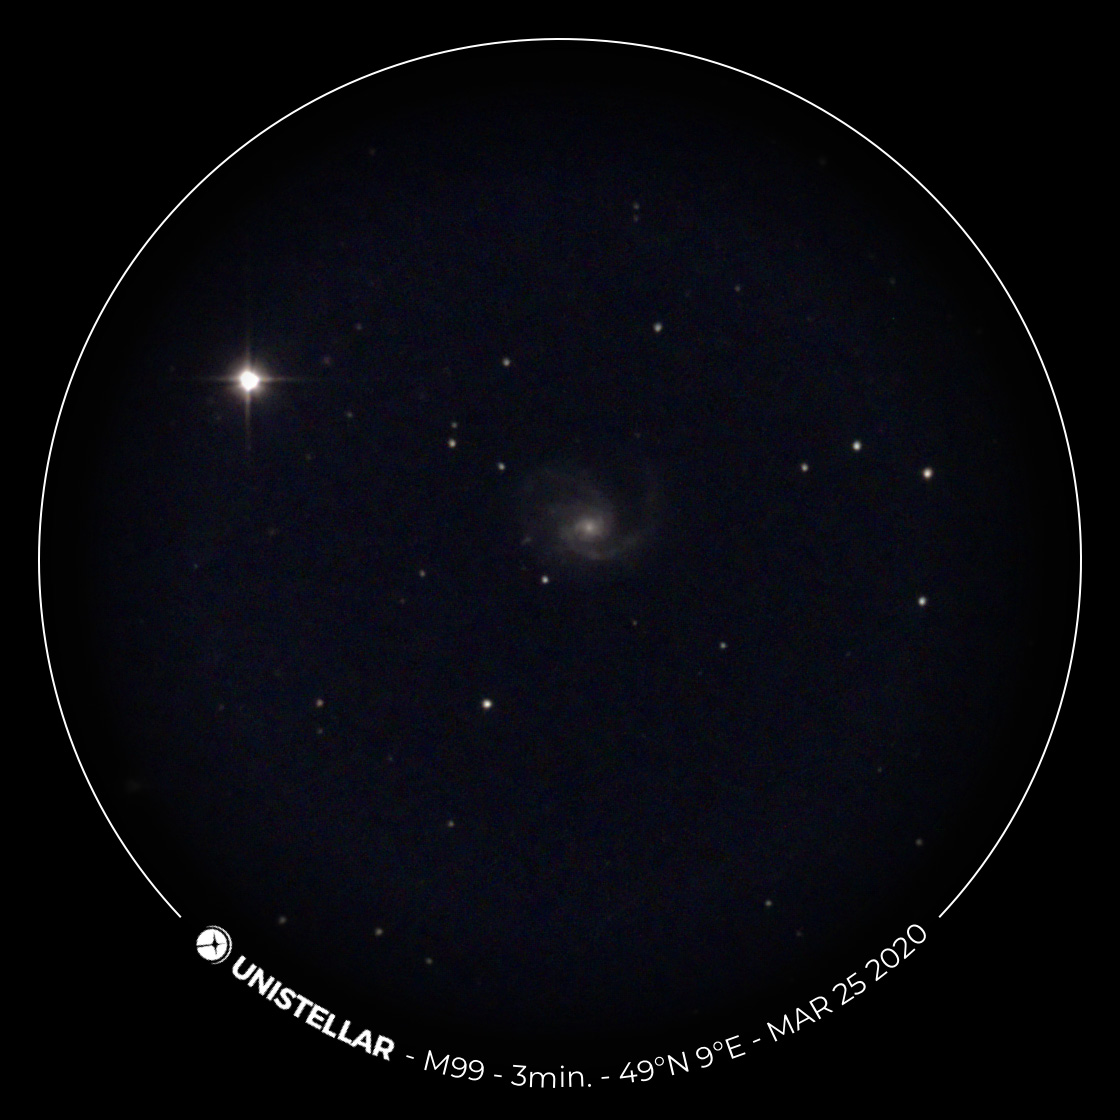
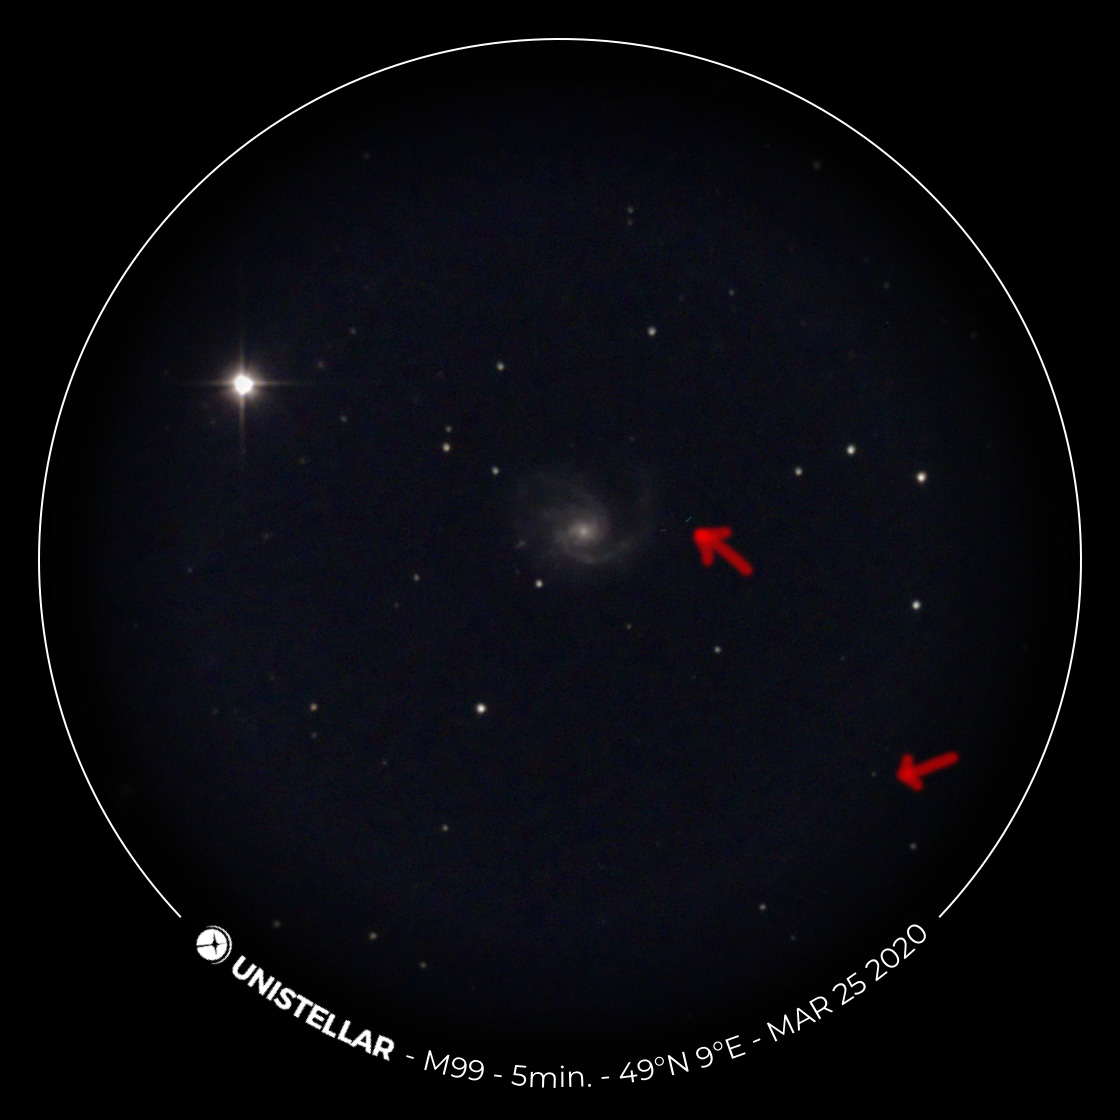
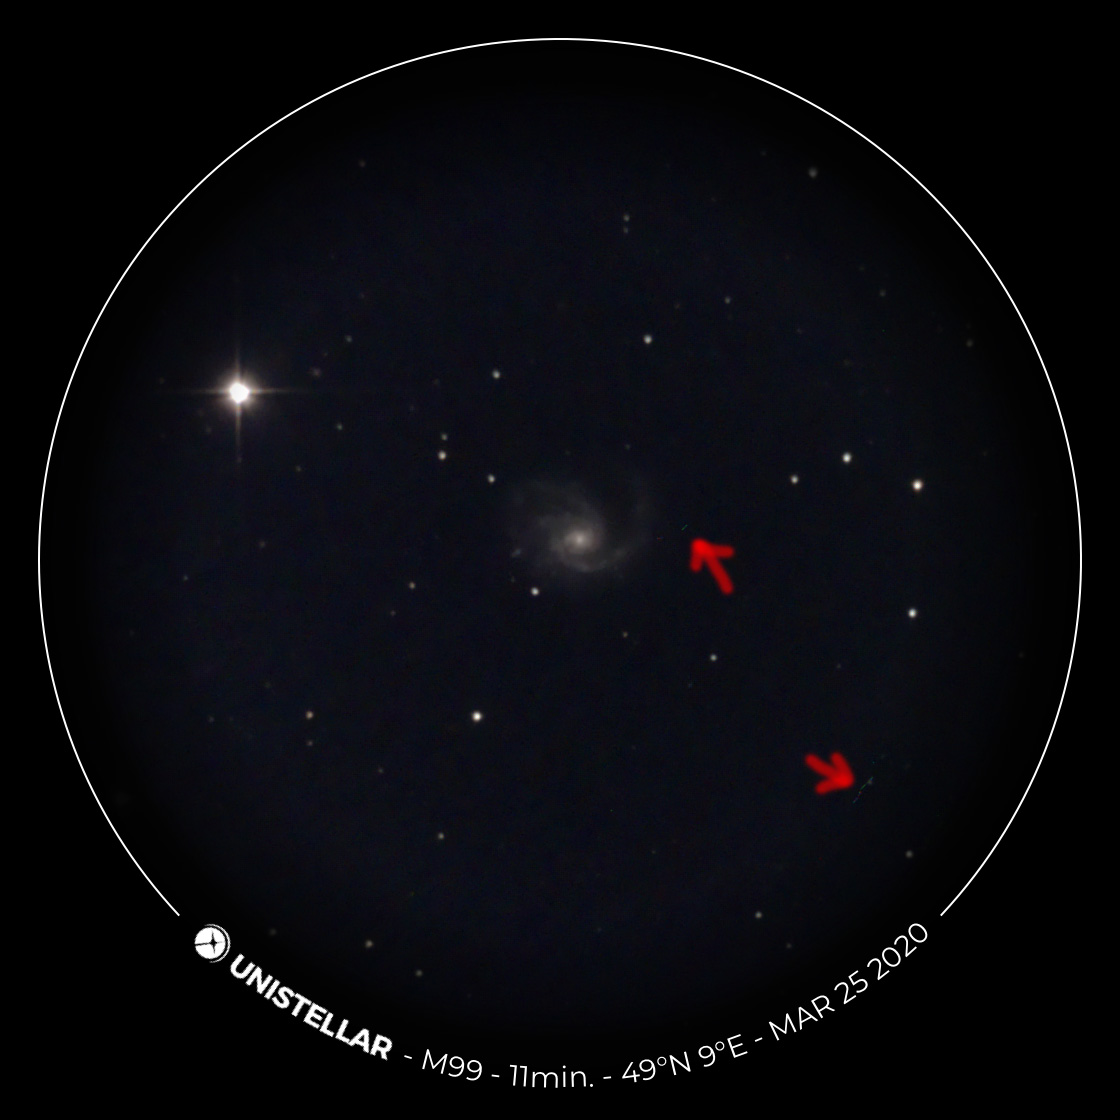
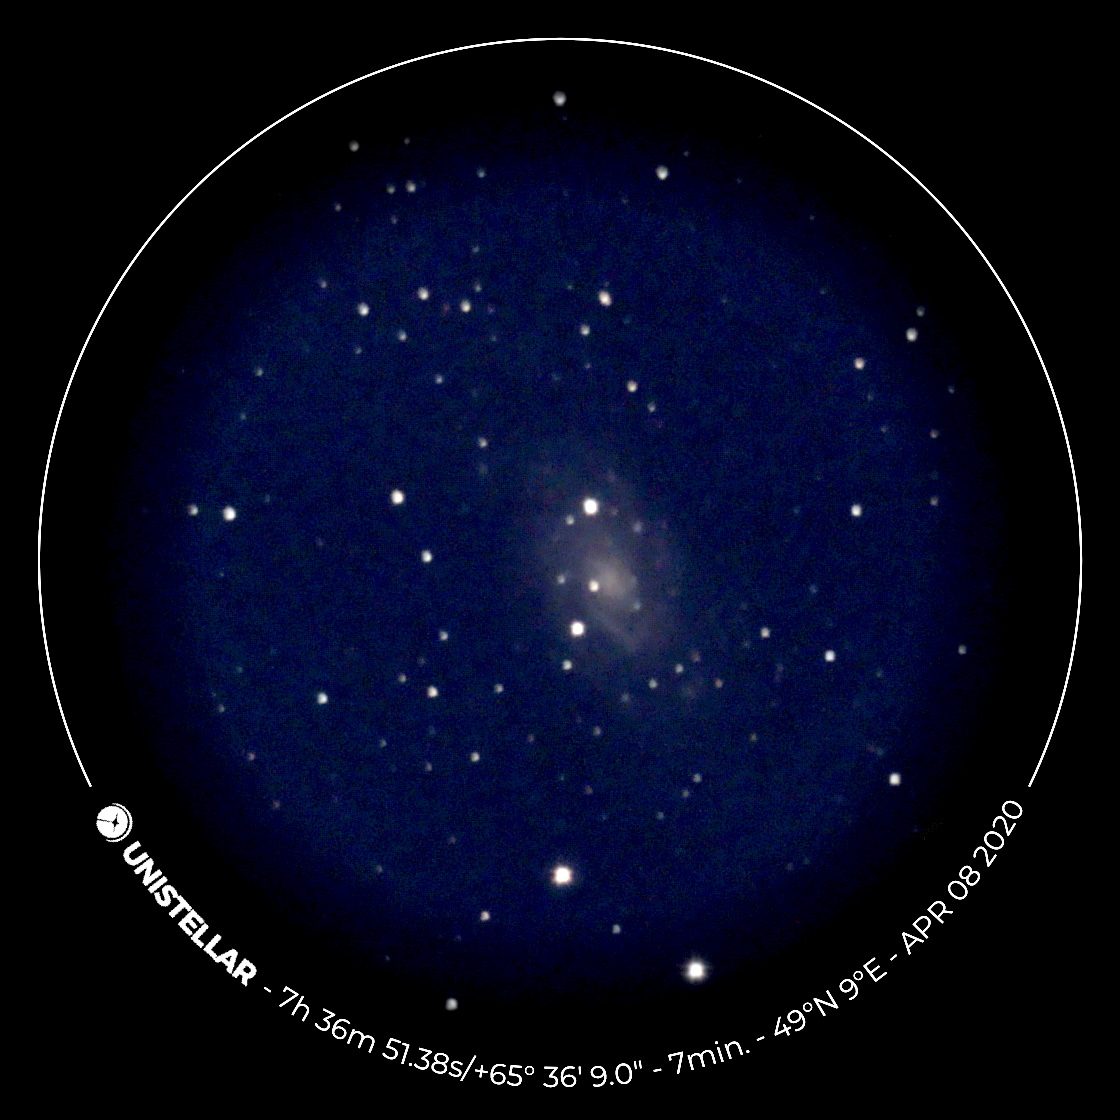
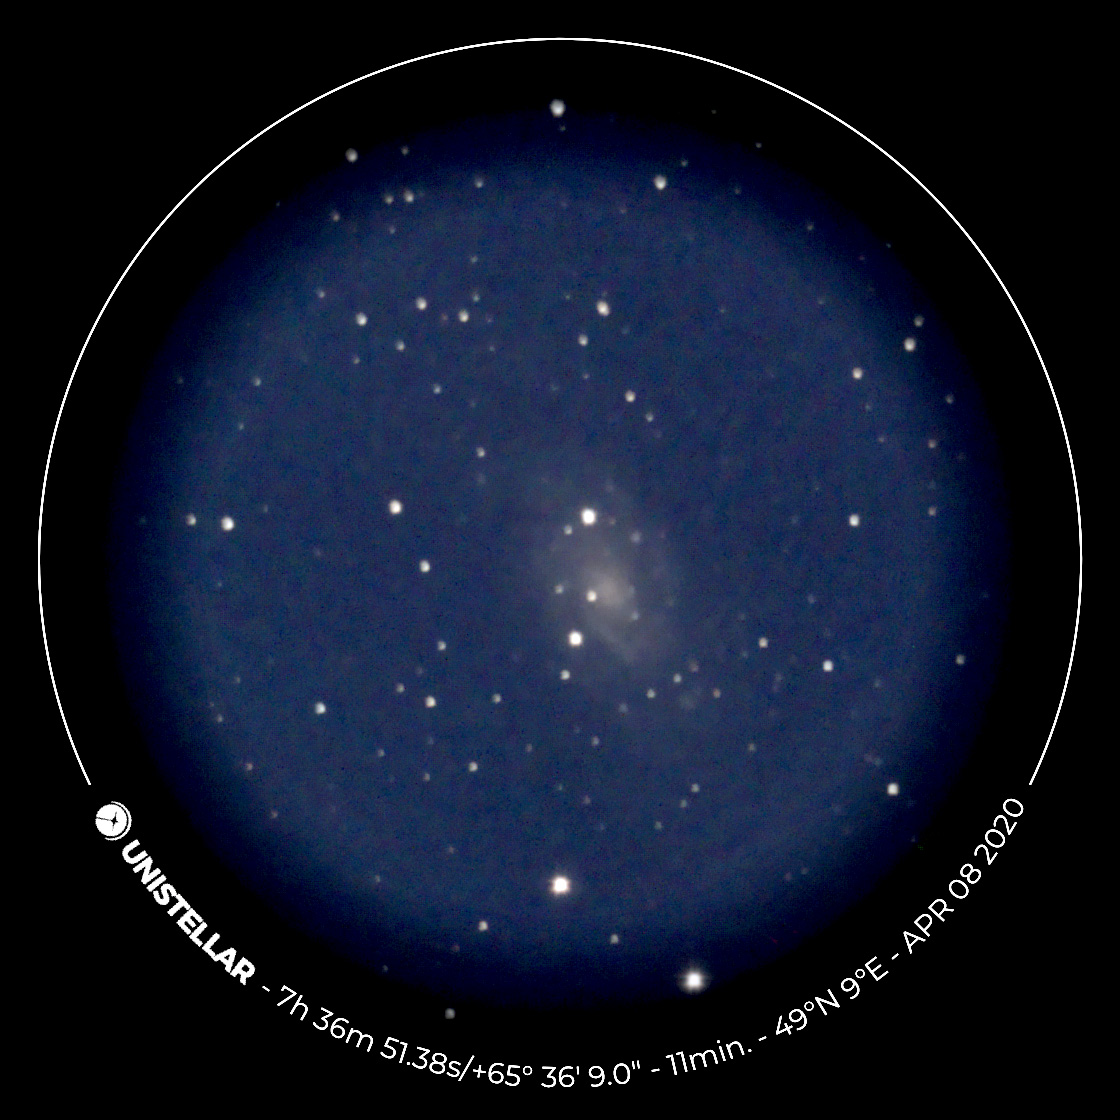
The following example photos showing M 99 demonstrate how two hot pixels appeared during observation in "Enhanced Vision" mode, one of which made a larger movement after a longer observation time. Please click on the previews to view the original photos!
 |
 |
 |
||
M 99 - Mar 25, 2020 - 3 minutes |
M 99 - Mar 25, 2020 - 5 minutes |
M 99 - Mar 25, 2020 - 11 minutes |
Unistellar advertises that the eVscope can be used under light-polluted skies. However, Unistellar advises against using the eVscope around the time of a full moon and write: For better results, avoid a full moon. This left me with the question of whether the eVscope, like any other telescope, benefits from a darker sky, or whether it does not, or does so only slightly. My subjective experience was that the eVscope does indeed benefit from a dark sky, at least if you want to achieve optimal photo quality. For purely visual observations, this is not so crucial, especially since the image on the smartphone often looks better in the dark than the corresponding photo later on the computer.
Note: If you want to demonstrate DSO on the eVscope to other people, you should keep in mind that they do not need the last "ounce" of quality and that their patience is usually already exhausted after a dwell time in the "Enhanced Vision" mode (= waiting time) of 2-3 minutes.
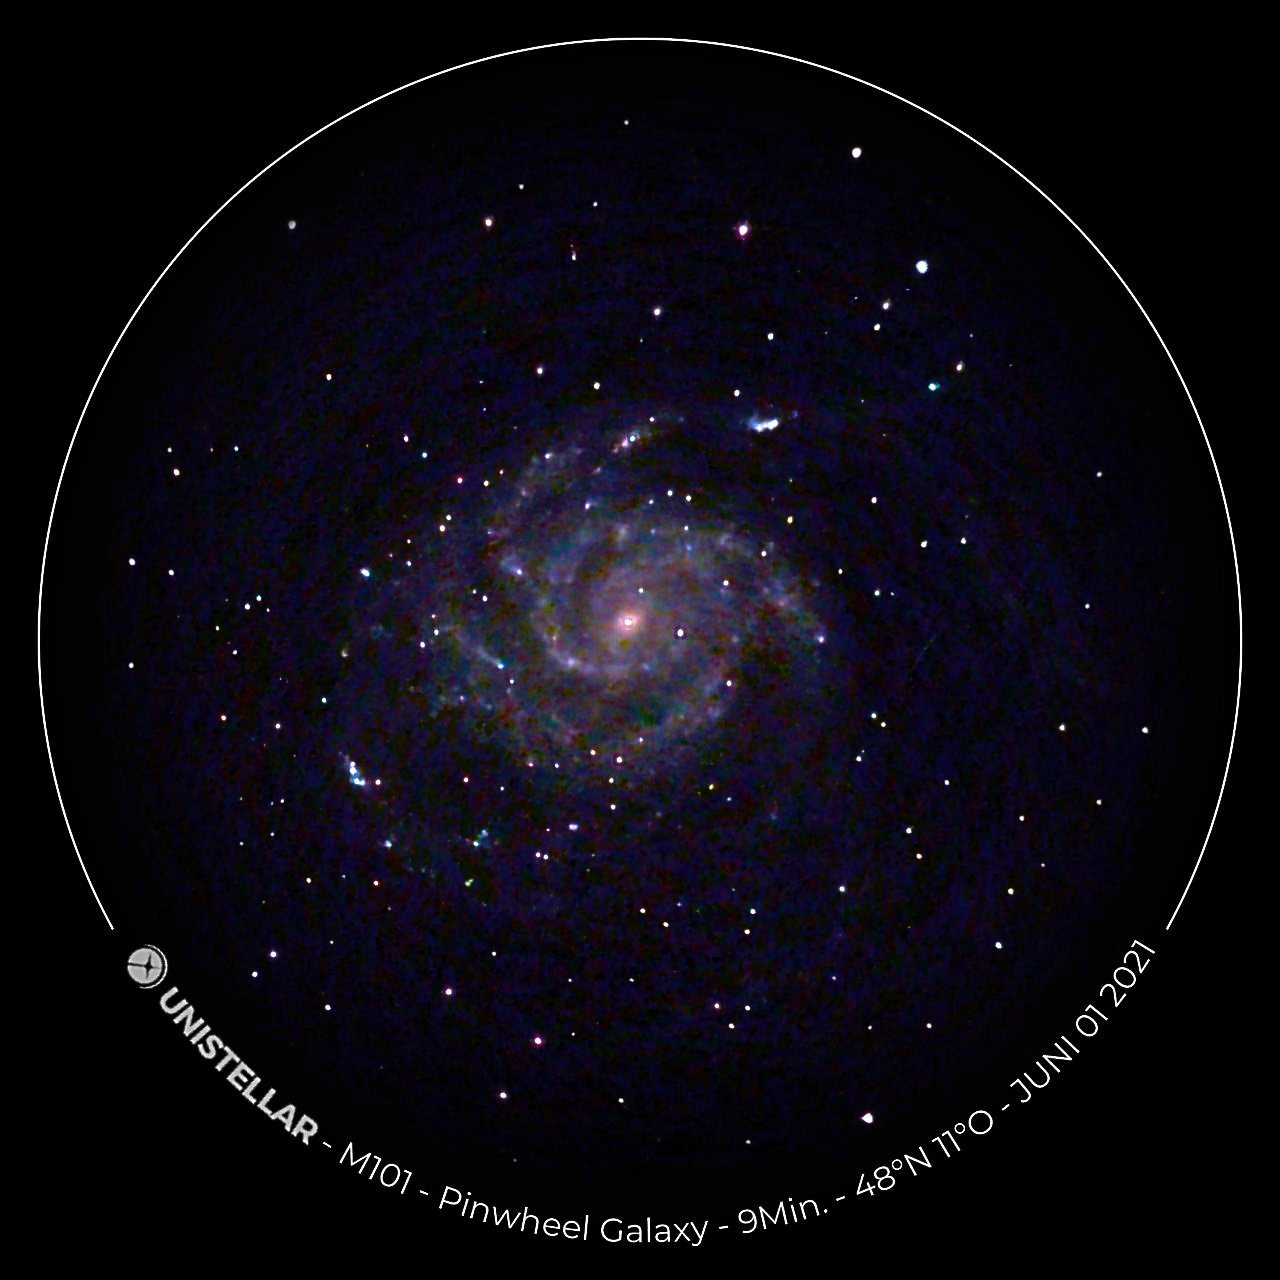
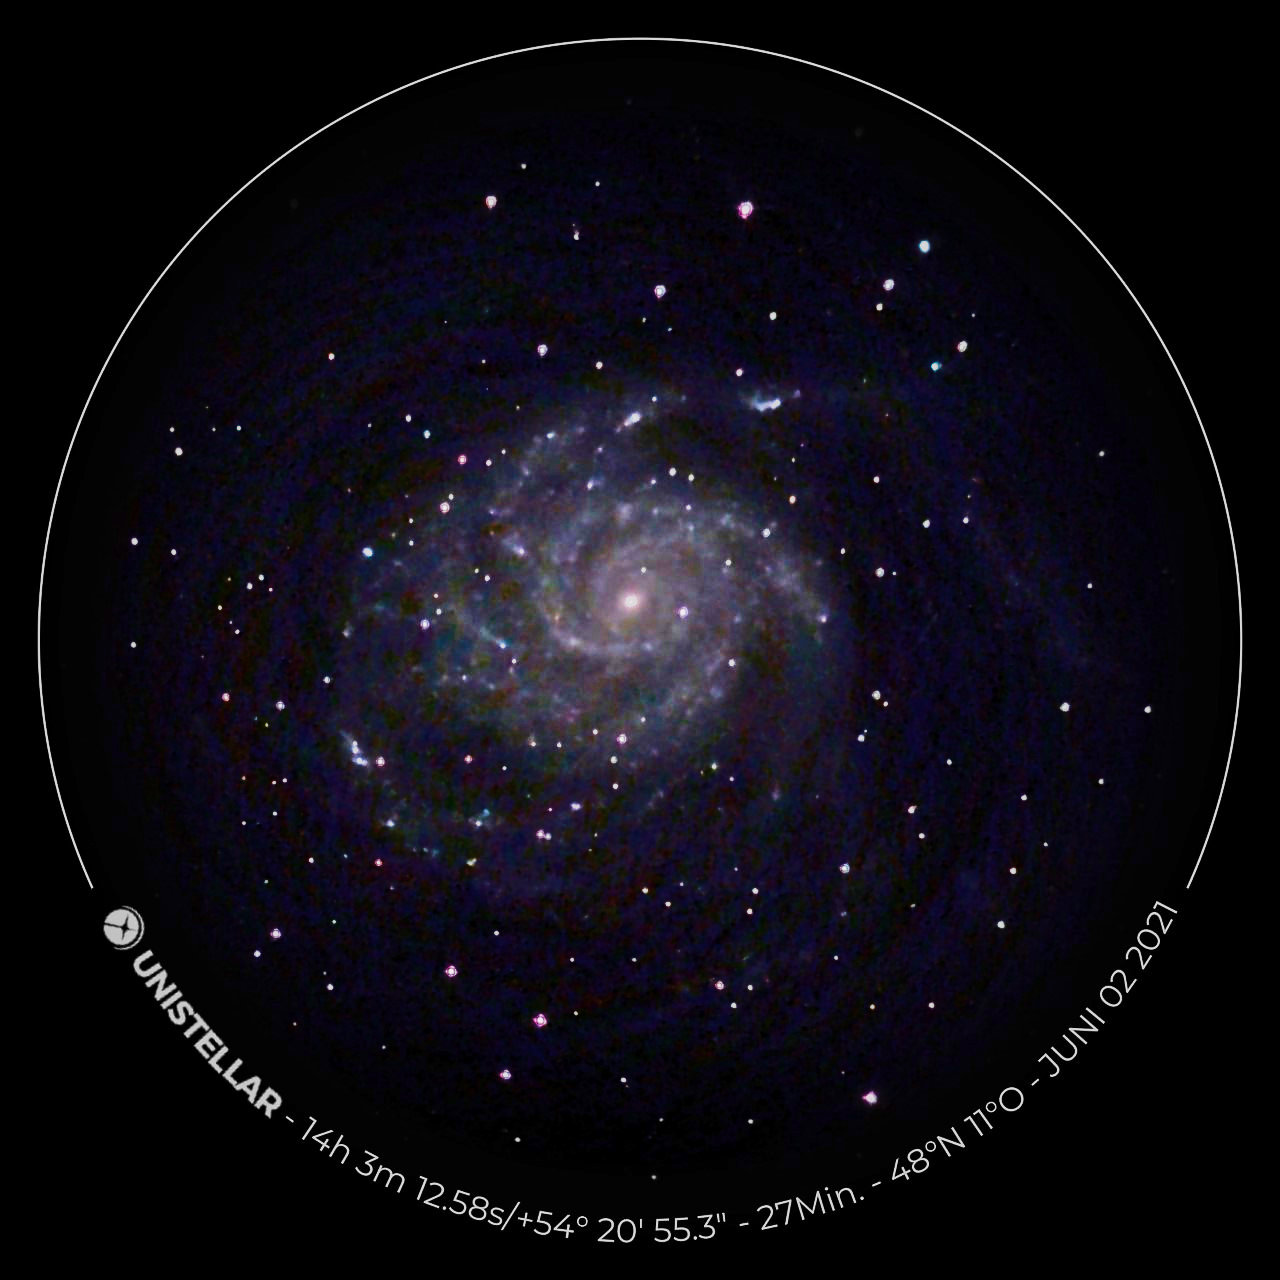
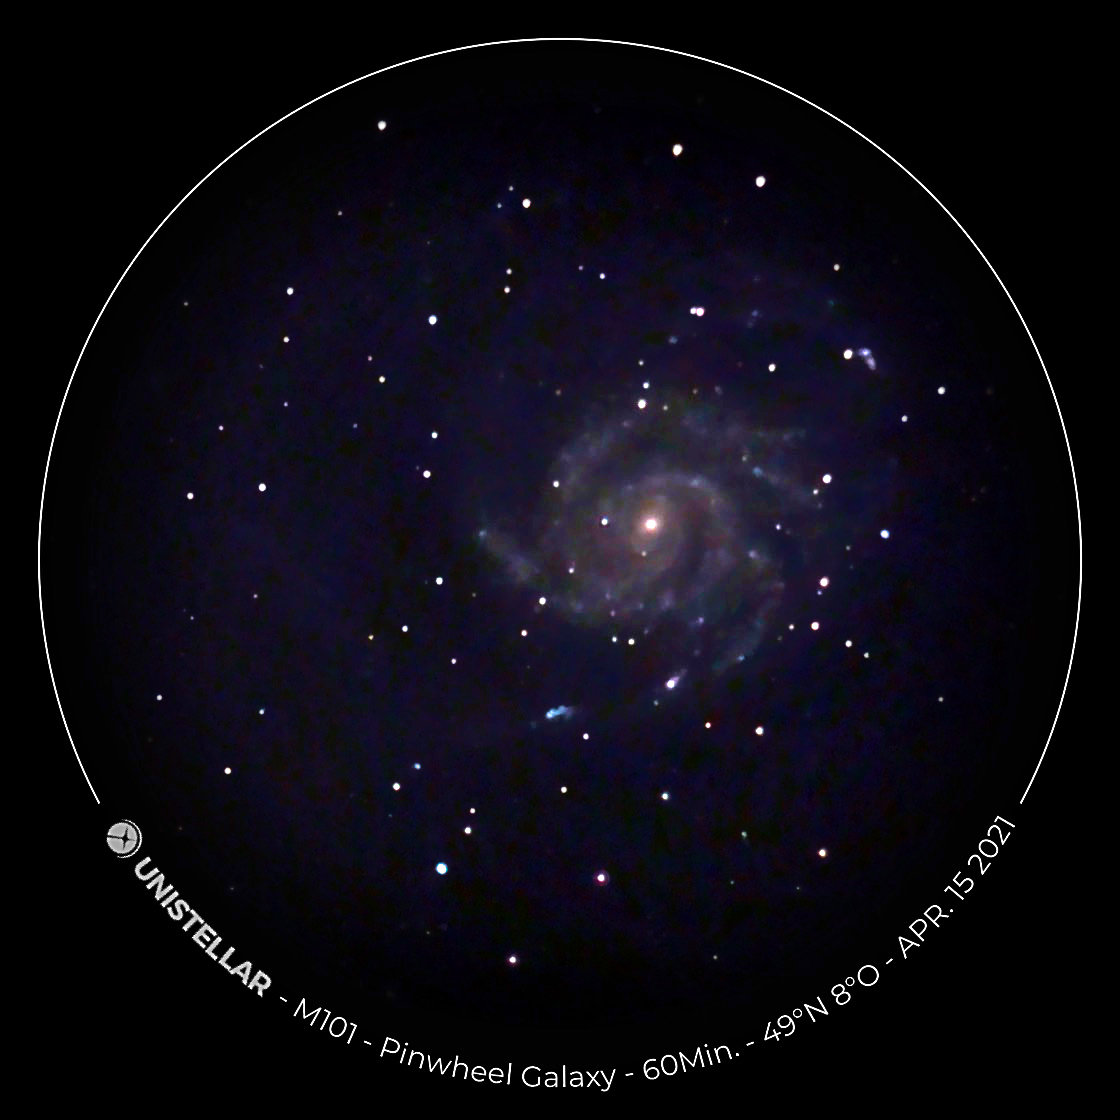
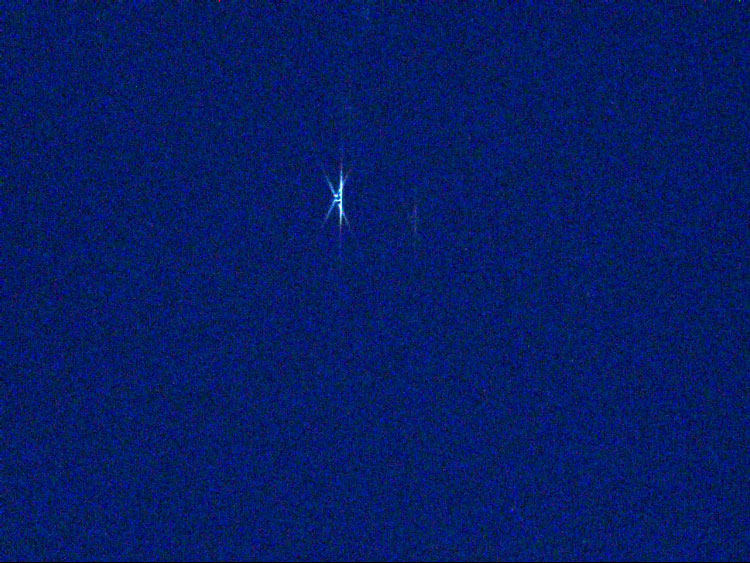
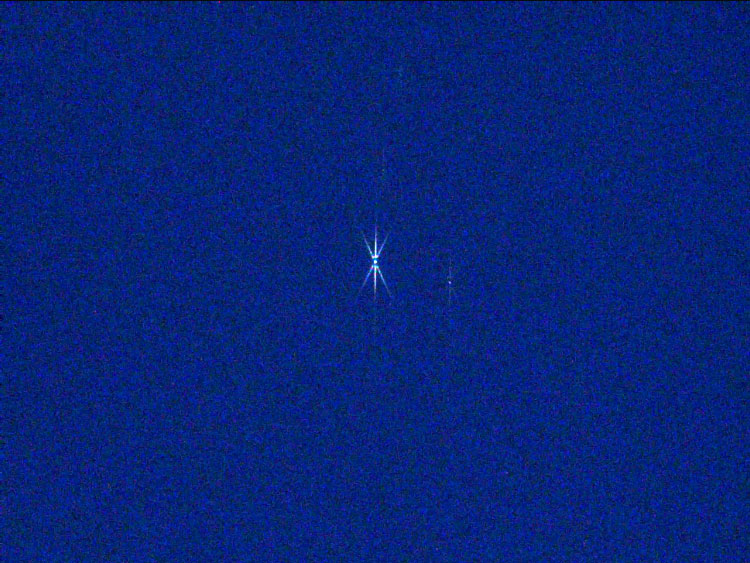
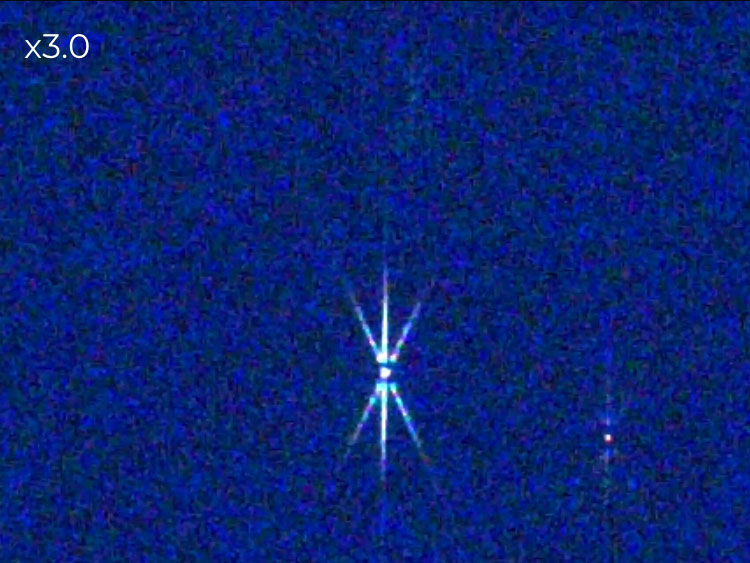
On page Photo Comparison - Poorer versus Better... I present photo examples of different quality, but from this it is not clear how a darker sky affects image quality in comparison to a brighter one, especially since the respective dwell time in the "Enhanced Vision" mode is not indicated. My star friend Timm Deeg owns a Sky Quality Meter and performed tests on M 101 under tweo different skies of defined quality and also varied the dwell time in the "Enhanced Vision" mode (see the following figures):
 |
 |
|
M 101 - Jun 1, 2021, 3 min, SQM 21.5 (Murnau) |
M 101 - Jun 1, 2021, 9 min, SQM 21.5 (Murnau) |
|
 |
 |
|
M 101 - Jun 1, 2021, 27 min, SQM 21.5 (Murnau) |
M 101 - Apr 15, 2021, 60 min, SQM 20.0 |
He writes:
By the way, with sufficiently dark skies, it seems that the image quality does not get better after a few minutes of dwelling in "Enhanced Vision" mode, but rather gets worse. At least, this is what some eVscope testers have written. I myself cannot confirm this, probably because the sky is not dark enough where I live (SQM 20.5).
Clear nights are fairly rare, and sometimes, also the full moon shines when the sky is clear. Should I take the eVscope out in such a night and observe, or should I refrain from observing? In the Quick Start Guide, Unistellar clearly states: "For better results, avoid a full moon."
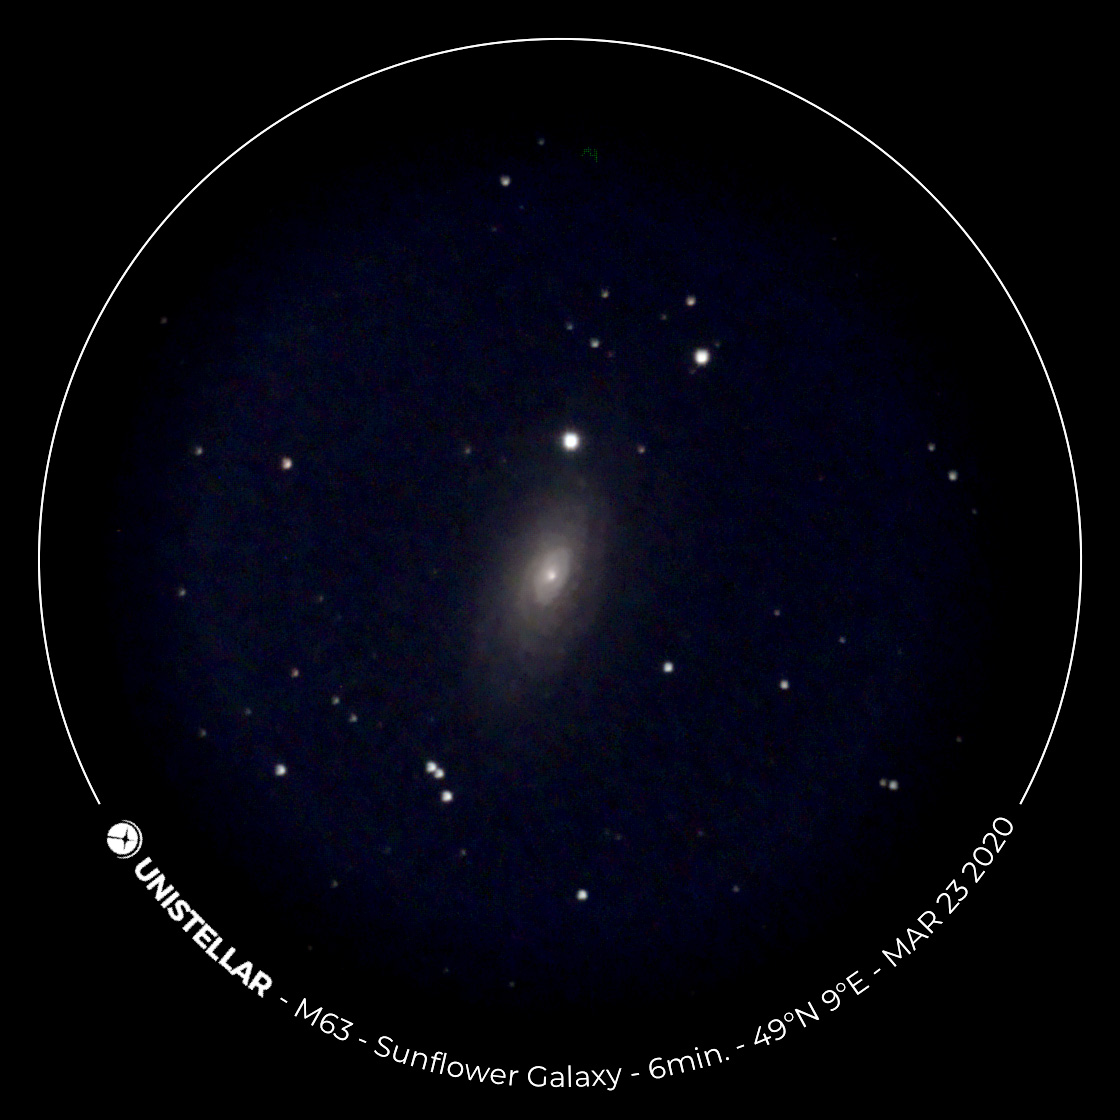
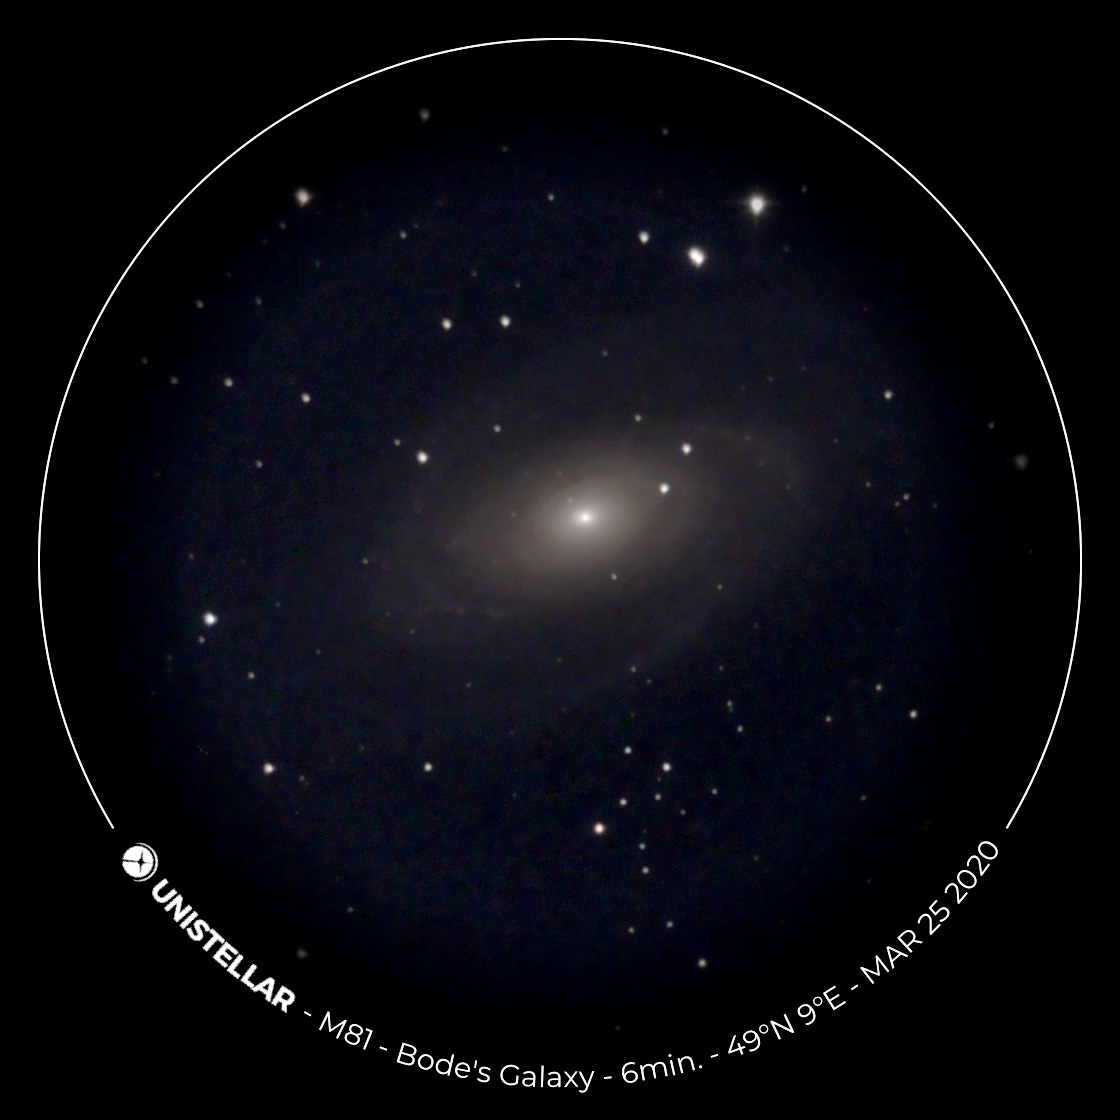
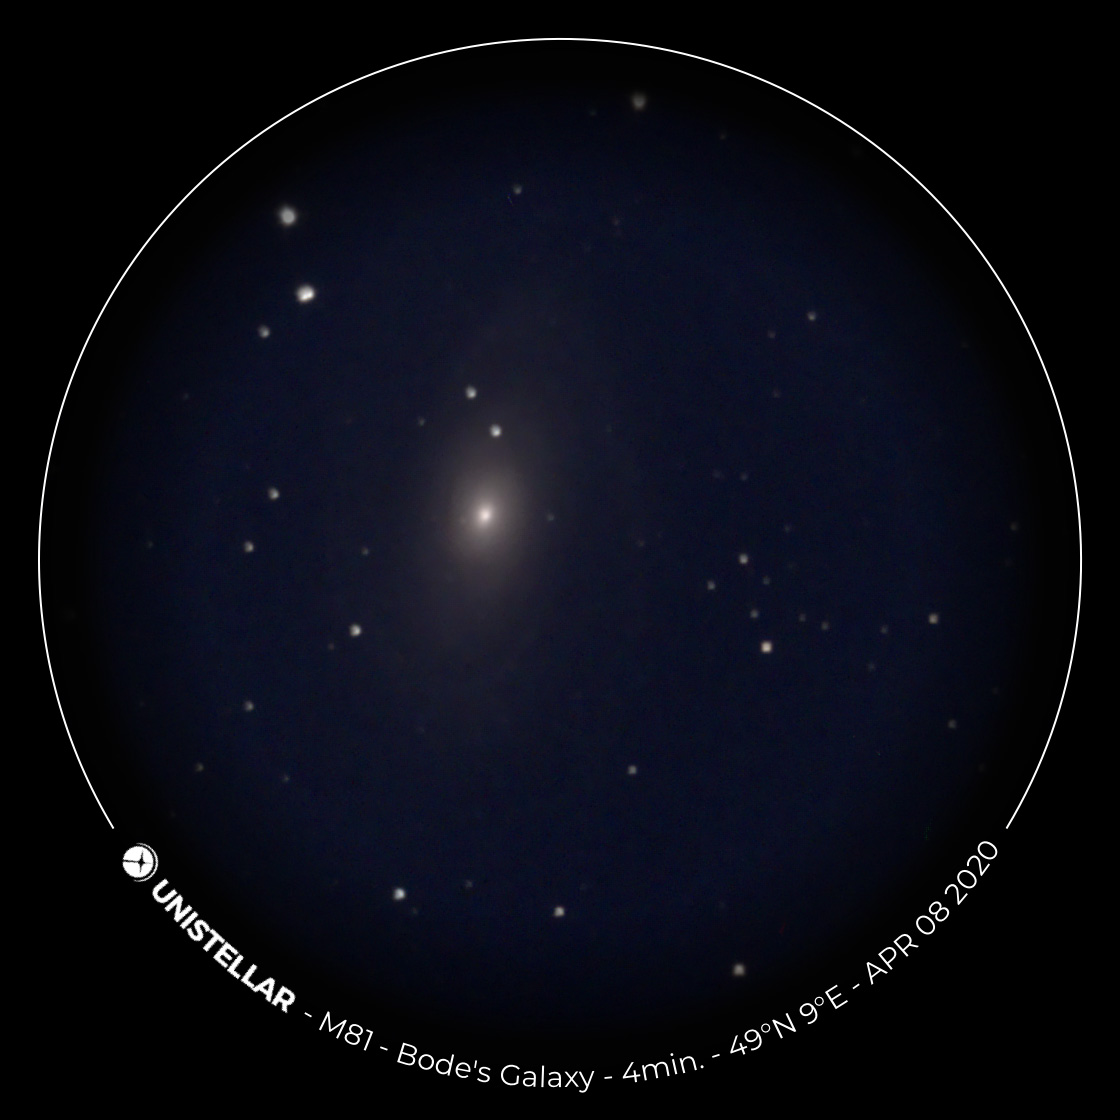
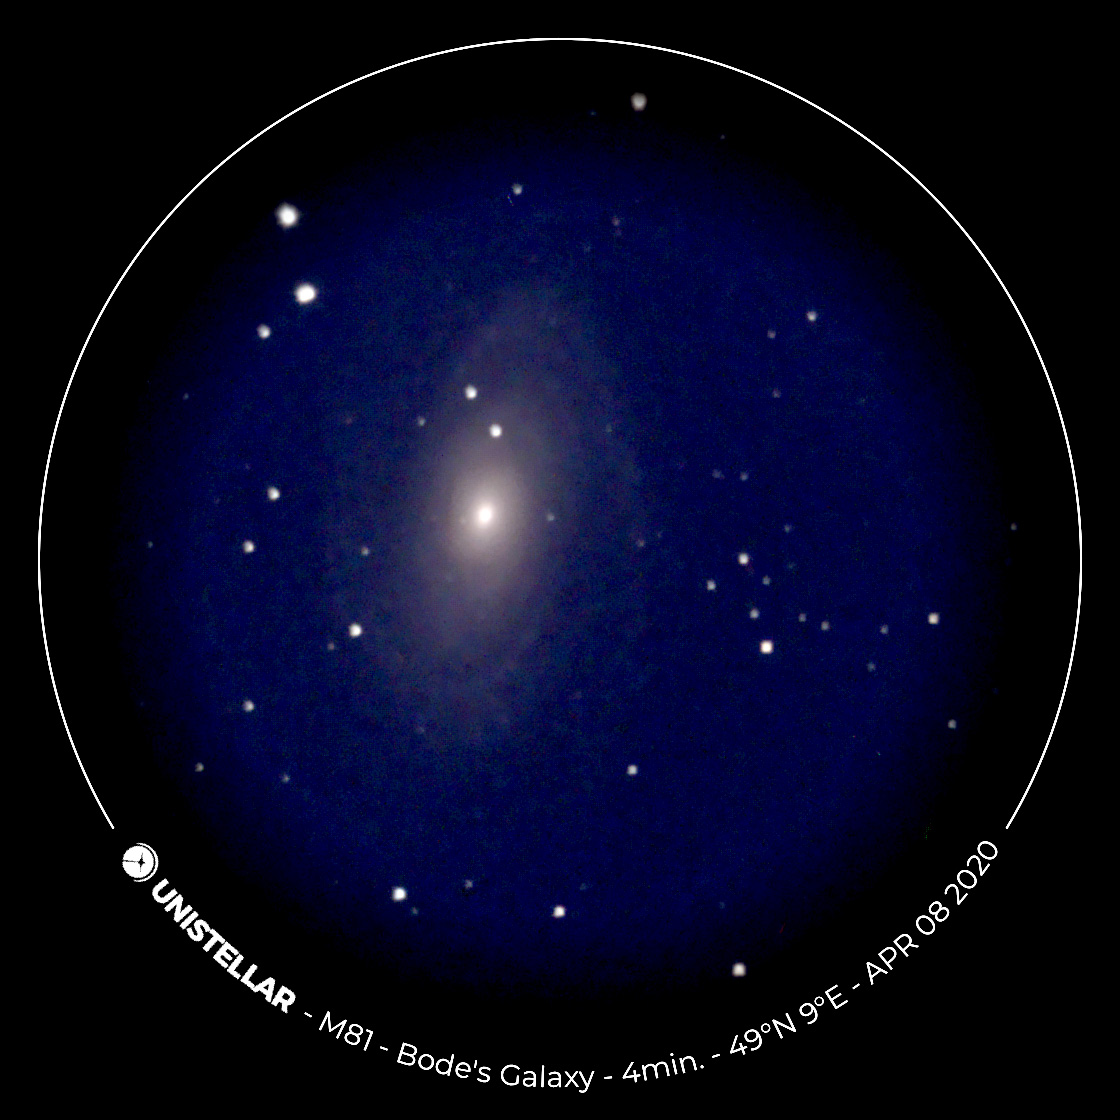
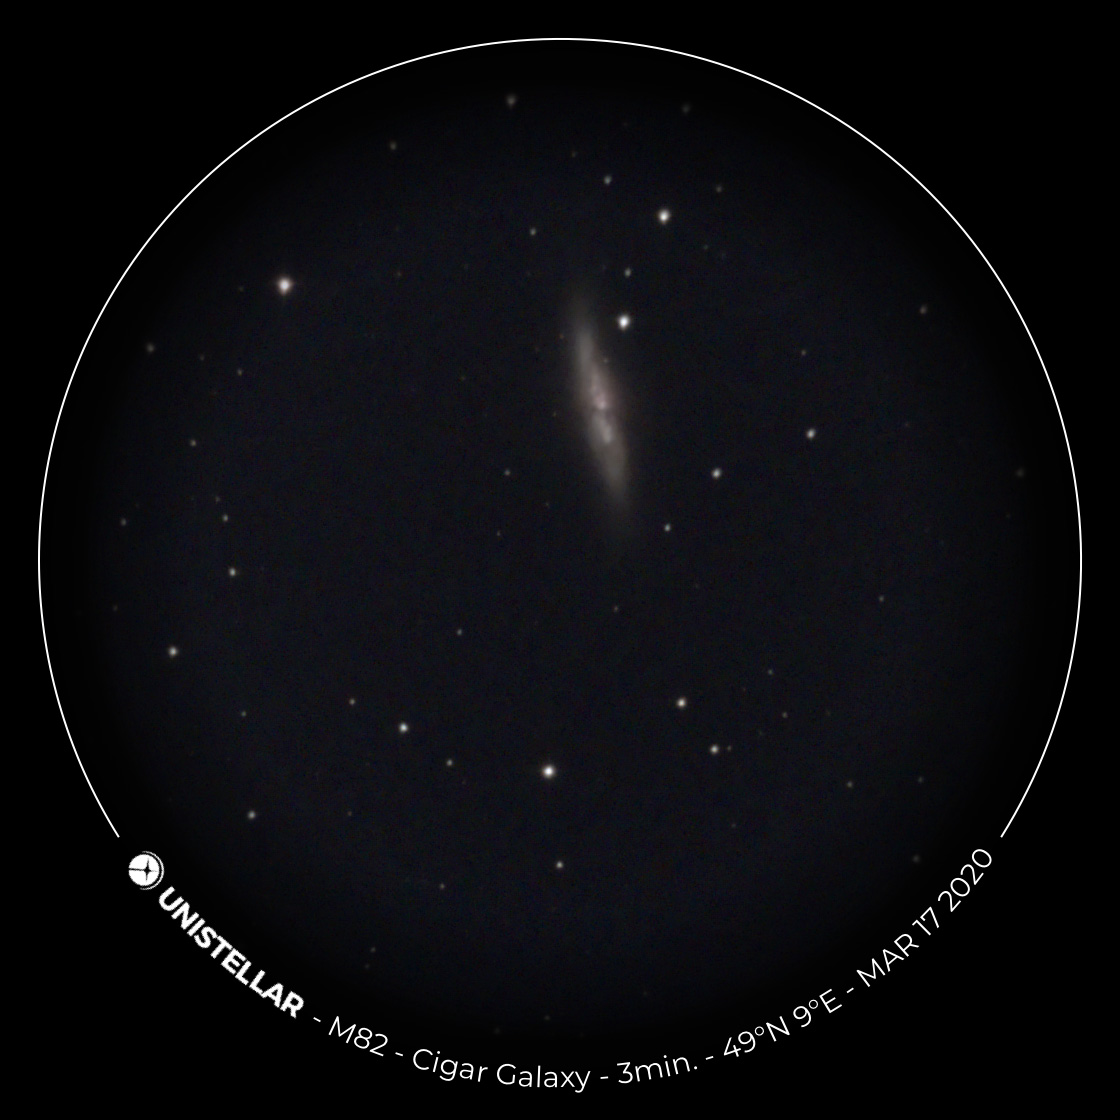
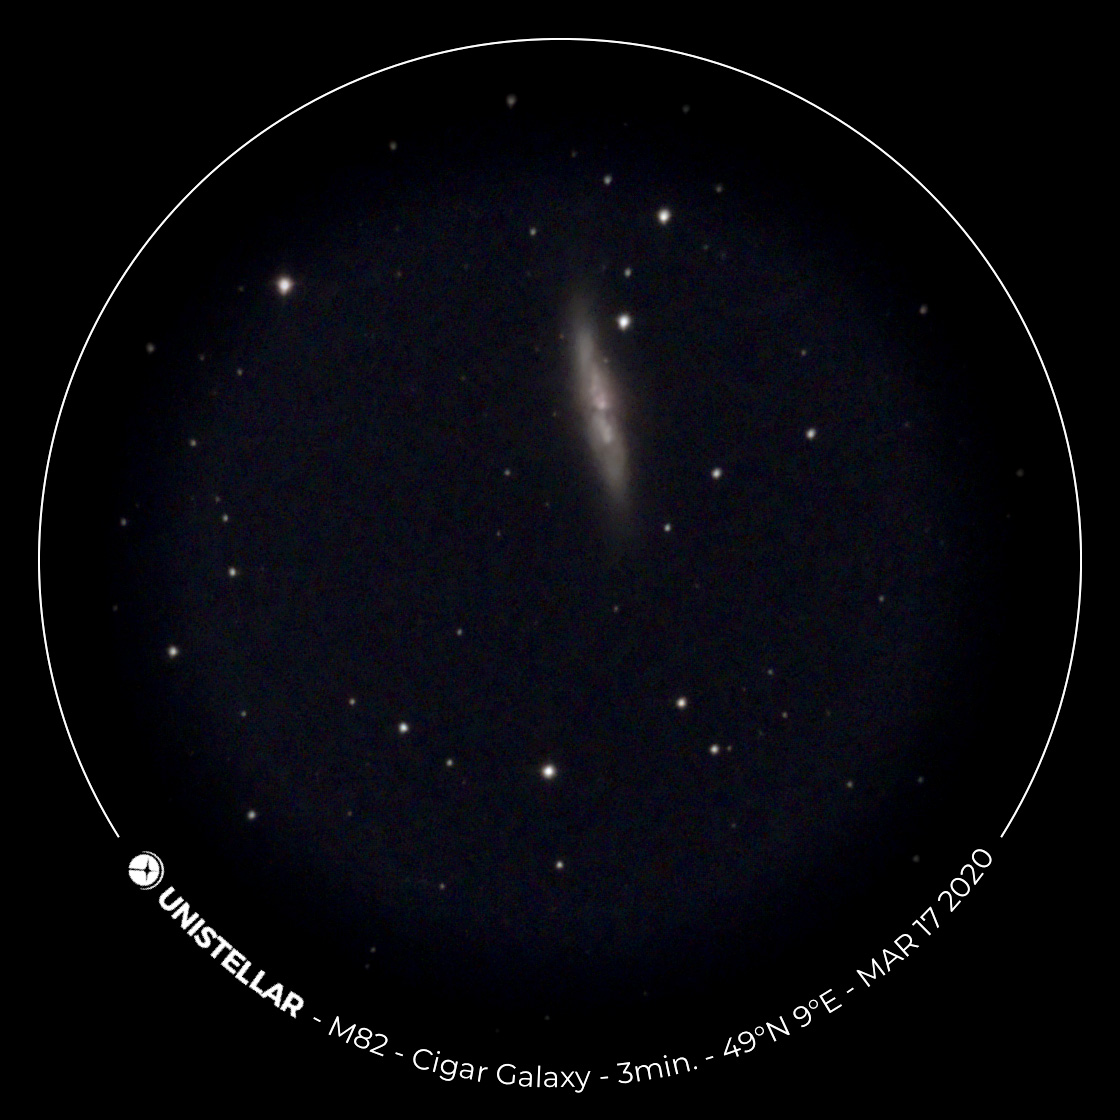
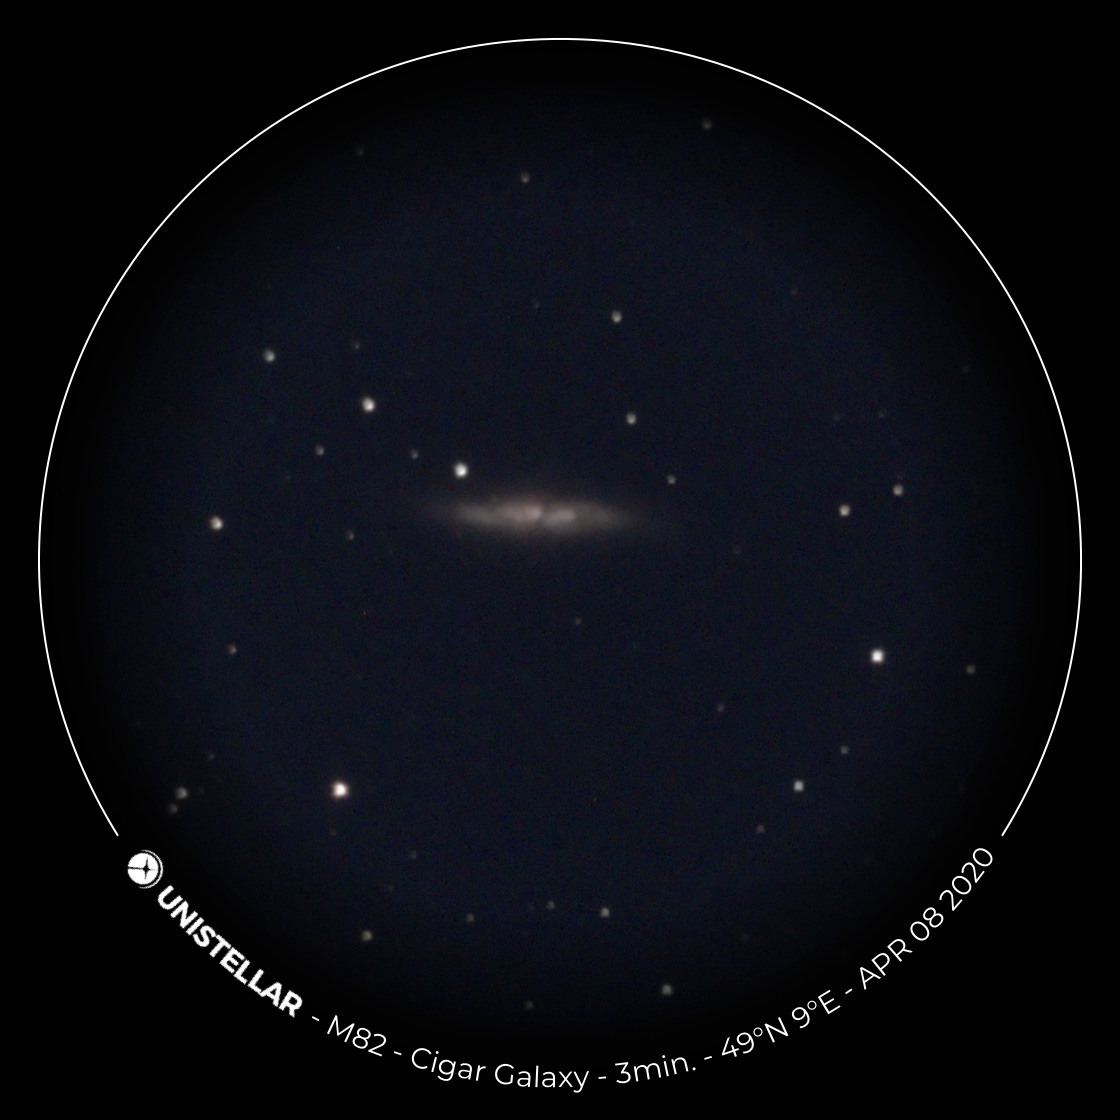
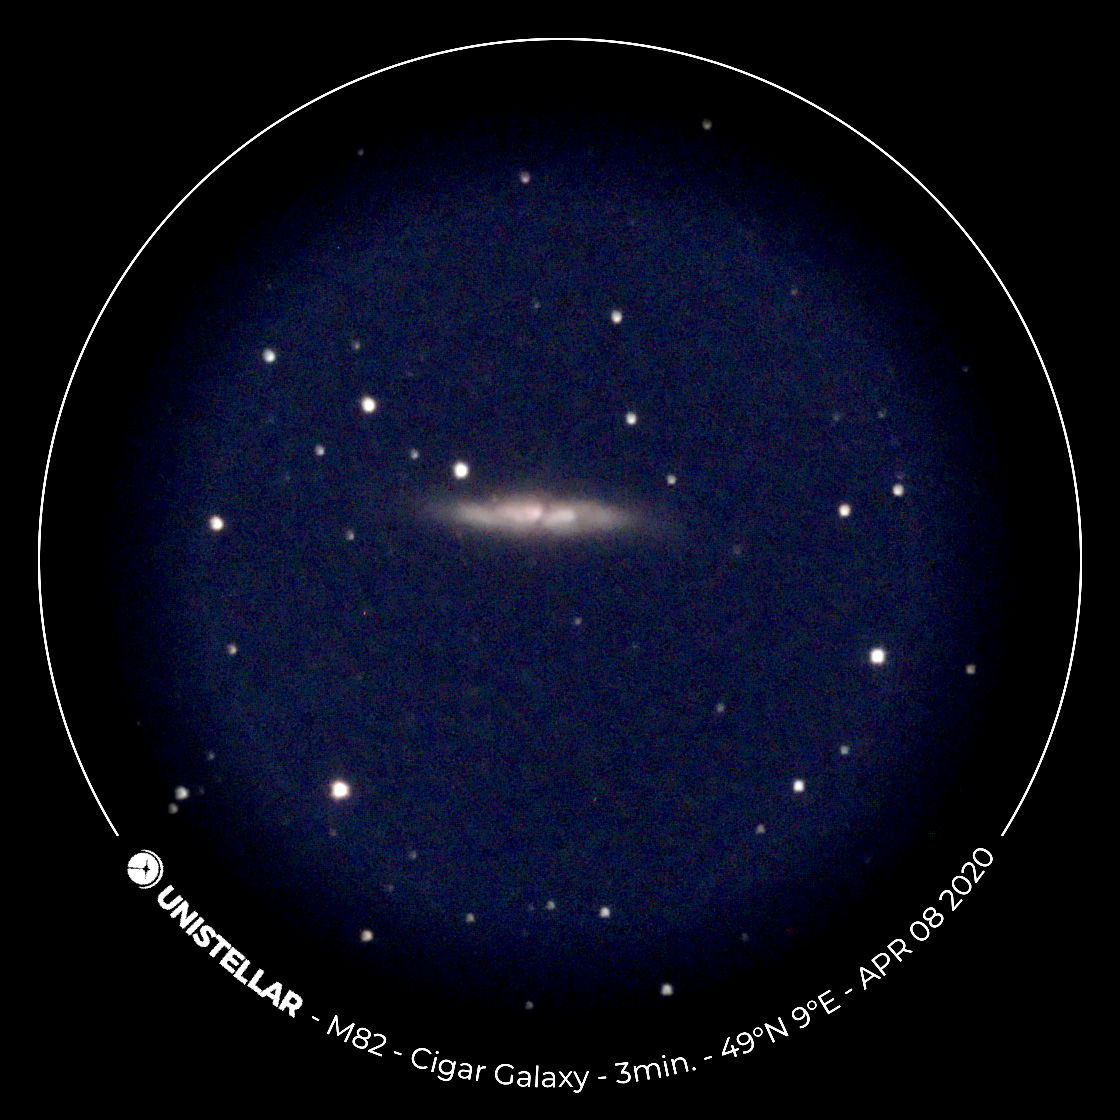
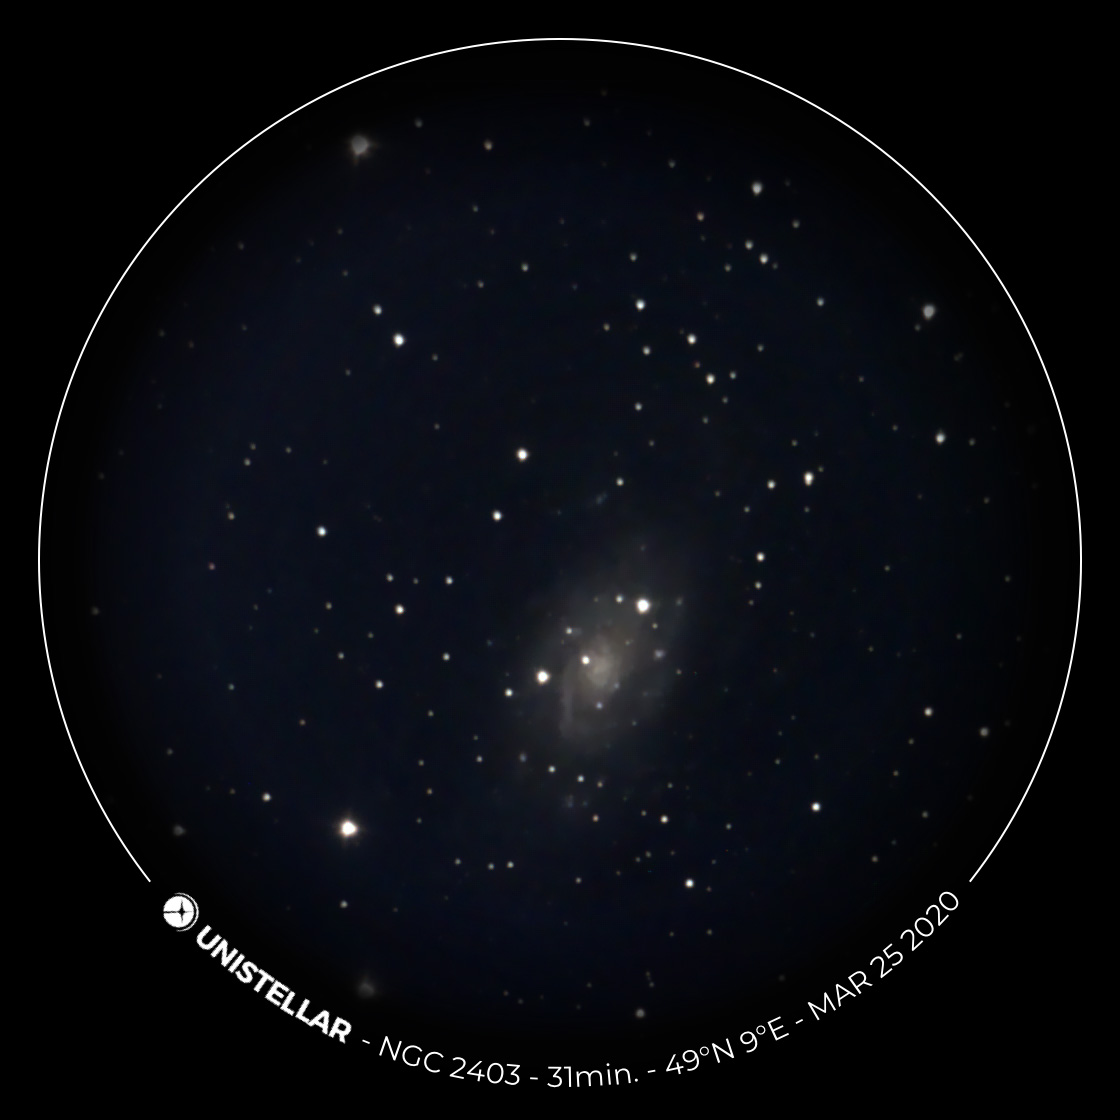
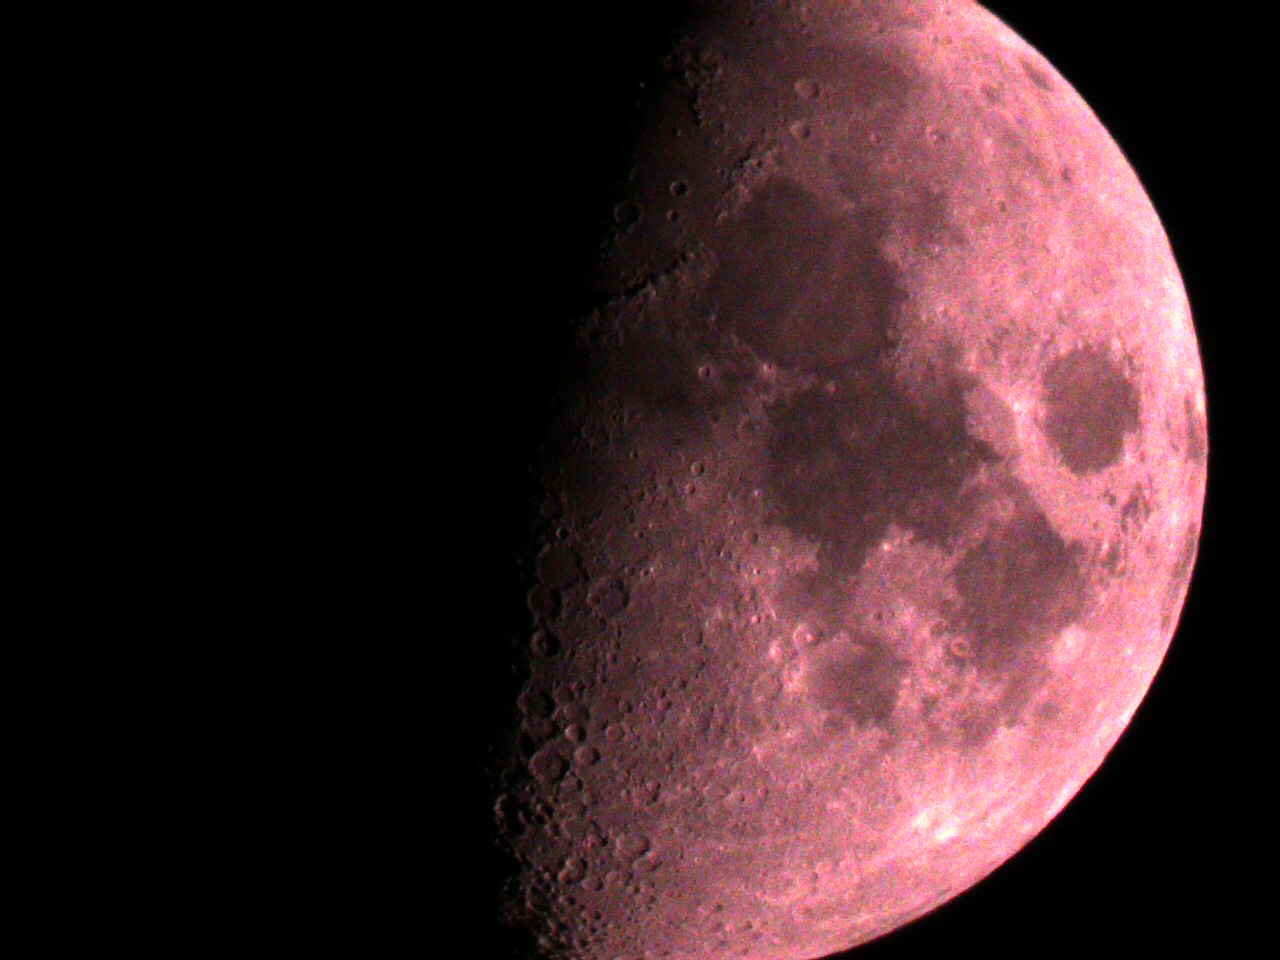
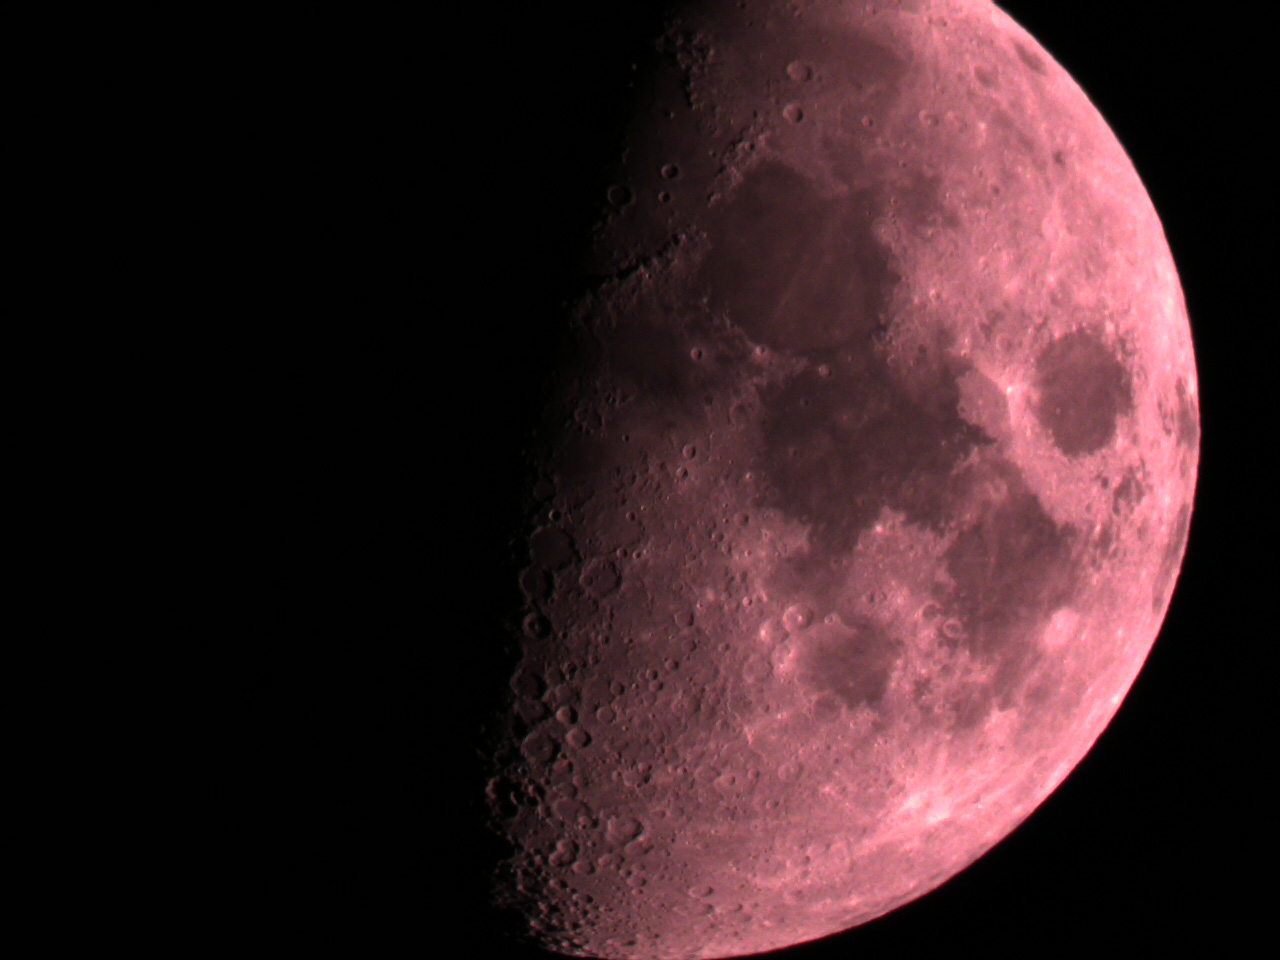
I observed some objects at full moon on April 8, 2020 and can second Unistellar's statement. First I observed M 51, and the sky was very bright and noisy in "Enhanced Vision" mode. Even after a longer observation time in this mode it hardly improved. I then observed other objects (M 63, M 81, M 82, NGC 2403), and the same was valid for these as well. I present some results below (the best ones; mostly original and processed versions), and compare them with photos that I took under more favorable conditions, partly around the new moon. All in all, you can observe in full moon, but as Unistellar states, you will not get the best results...
 |
 |
 |
||
M 51 - Mar 23, 2020, 1 day before new moon |
M 51 - Mar 23, 2020, processed (photo left) |
M 63 - Mar 23, 2020, 1 day before new moon, processed |
||
 |
 |
 |
||
M 51 - Apr 8, 2020, full moon |
M 51 - Apr 8, 2020, processed (photo left) |
M 63 - Apr 8, 2020, full moon, processed |
 |
 |
|
M 81 - Mar 25, 2020, 1 day after new moon |
M 81 - Mar 25, 2020, photo left processed |
|
 |
 |
|
M 81 - Apr 8, 2020, full moon |
M 81 - Apr 8, 2020, photo left processed |
 |
 |
|
M 82 - Mar 25, 2020, 1 day after new moon |
M 82 - Mar 25, 2020, photo left processed |
|
 |
 |
|
M 82 - Apr 8, 2020, full moon |
M 82 - Apr 8, 2020, photo left processed |
 |
 |
 |
||
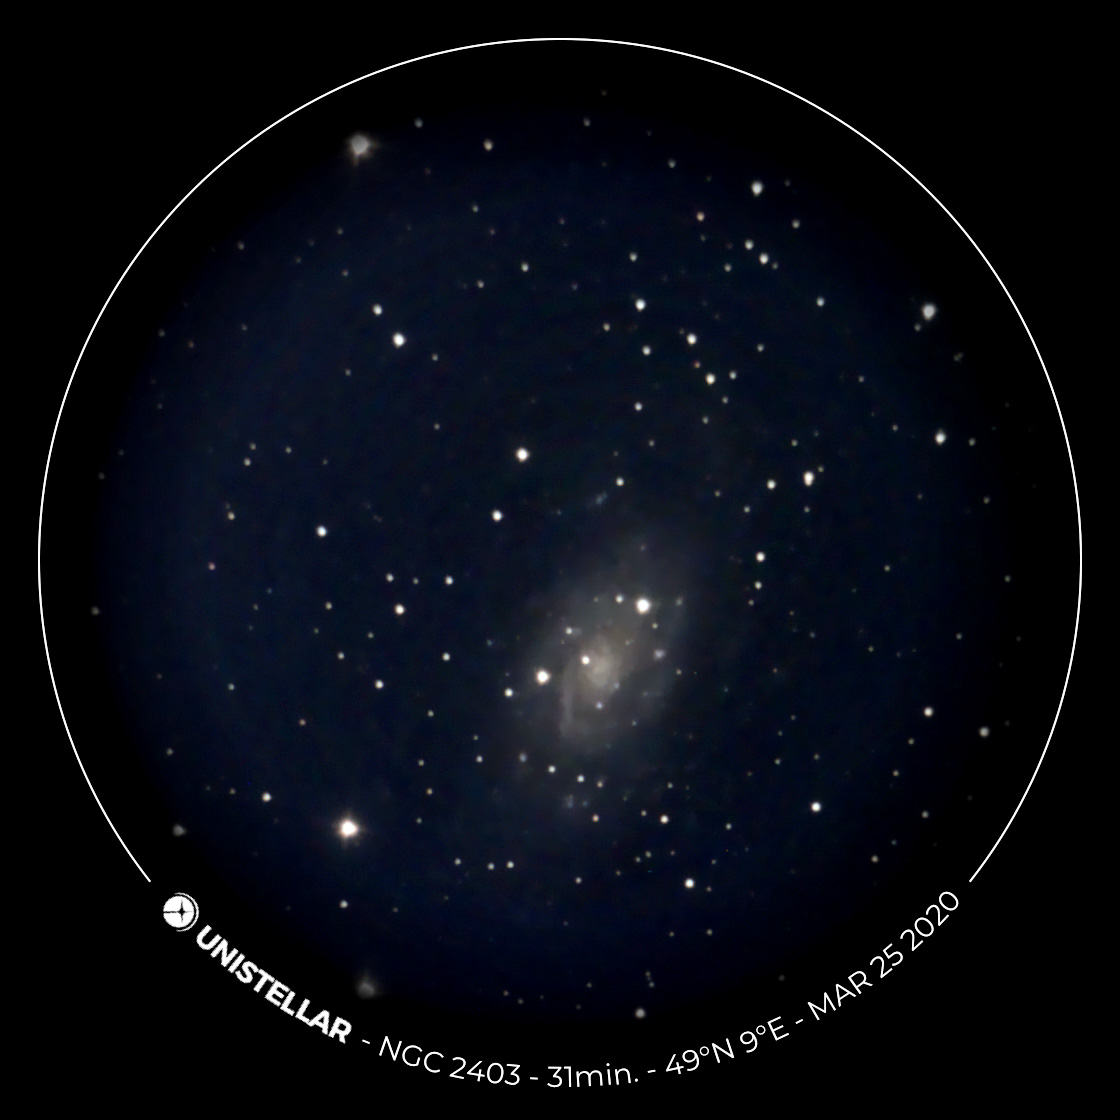
NGC 2403 - Mar 25, 2020, 1 day after new moon |
NGC 2403 - Apr 8, 2020, full moon |
NGC 2403 - Apr 8, 2020, full moon |
||
 |
 |
 |
||
NGC 2403 - Mar 25, 2020, photo above processed |
NGC 2403 - Apr 8, 2020, photo above processed |
NGC 2403 - Apr 8, 2020, photo above processed |
Perhaps, the following information is useful for eVscope owners whose eVscope refuses to charge. At the beginning, I stored my eVscope overnight in the winter garden, where it was quite cold. When I wanted to charge it in the morning, the blue charge indicator, however, did not flash. Only after the eVscope had warmed up a bit in the kitchen I was able to charge it.
According to the Unistellar Knowlege Base (What is the recommended temperature range for my eVscope?), the eVscope can only be charged between +10°C and +40°C; this also applies to charging the eVscope while observing. From Unistellar (Yann), I received the following information on February 6, 2020:
This confirmed what I had observed. I cannot say at the moment from my experience, whether the new app version really brought any changes. The information for app version 1.0 promises improved battery life in cold weather, which is in line with what Yann wrote. On the other hand, the information regarding the temperature range in the Unistellar Help Center has not been updated yet. And even with the new app version, my eVscope once refused to charge because it was too cold (I did not measure the temperature)...
Addendum: Sometimes, my eVscope does not start to charge, after I inserted the USB-C power supply plug, although it is warm enough. I then switch the eVscope on and off again, usually this works. Sometimes, I also unplug the USB-C plug of the power supply and plug it back in...
After purchasing the Atik Infinity camera to "pre-experience" the eVscope experience, I quickly realized that besides a reliable GoTo, focusing is very important. When using the Atik Infinity camera, I had some problems with the focusing because I did not have a focus mask. And when I finally had one, I had stopped using the camera...
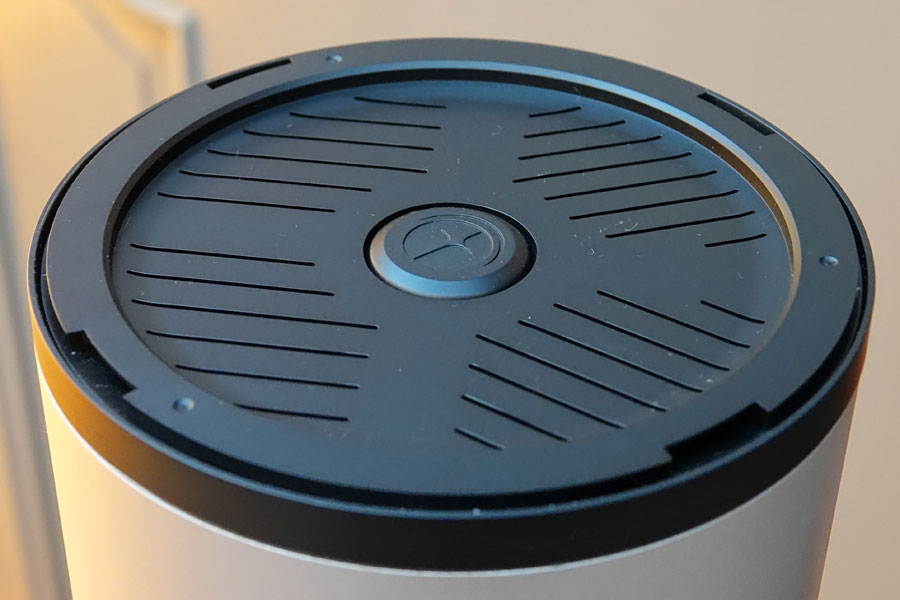
For the eVscope, the same applies in principle with respect to focusing! Basically, Unistellar writes that for coarse focusing, it is sufficient to align the focus mark with the upper collimation screw (see the photo below, where the mark is not aligned):
 |
||||
Photo: The right arrow shows the focus mark; for rough focusing it is sufficient that the mark points to the upper collimation screw; I, however, recommend using the Bahtinov mask for focusing. |
However, I recommend using a Bahtinov mask for focusing. Fortunately, Unistellar has integrated such a mask into the lid of the telescope. And with it, focusing works very well according to my experience. Instructions can be found in the Unistellar Help Center (How to use the Bahtinov mask?), so I will not write anything else about it here. Furthermore, a video tutorial on the topic Focus has been made available that users of the eVscope can watch.
 |
 |
|
Bahtinov mask inserted in the telescope lid |
Bahtinov mask next to the telescope lid |
|
 |
 |
|
Ditto, other side |
Bahtinov mask put on the eVscope tube |
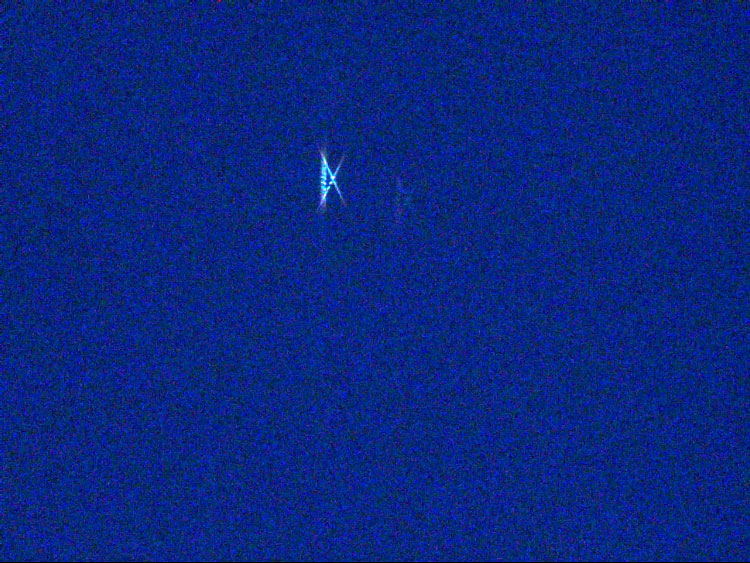
Here are examples of sharp and fuzzy settings when using the Bahtinov mask (brighter star accessed, Live View mode):
 |
 |
|
Blurry |
Blurry |
|
 |
 |
|
In focus |
In foucs, enlarged (tap the screen twice) |
It looks as if Unistellar were working on another solution (there was a questionnaire about this...), but from my point of view this would not be necessary. I was also able to focus in "Live View" mode based on star shapes, but this does not work as reliably as with the Bahtinov mask (the result was acceptable, though...).
Unistellar also introduced an eyepiece focusing aid (called eyepiece focus helper) with App version 1.0, which is helpful, but certainly not "essential":
 |
 |
|
The eypiece focus helper: a pattern is displayed in the eyepiece that can be used for focusing |
The timer for the eyepiece focus helper (to the right of the button text) |
At the beginning; I was looking for a possibility to set the magnification of the eVscope. And recently a new eVscope owner asked me this again. The answer is: nowhere. At first I thought, because this possibility does not exist. But then I found out that it does exist and that the magnification is controlled by gestures:
Unistellar describes the collimation of the eVscope in the Unistellar Help Center in article Collimation. Furthermore, a video tutorial on this topic has been made available that users of the eVscope can watch. At my first collimation attempt, however, I made things only worse (which I had expected...). My second attempt was more successful.
After I had always bungled with the collimation so far, I wanted to know it exactly and once again read through the article and watched the video. Thereby I had the impression that some changes were made to the article, which facilitate my understanding (in any case, the last change was not long ago...). And so I would like to offer my own quick-and-dirty collimation instructions:
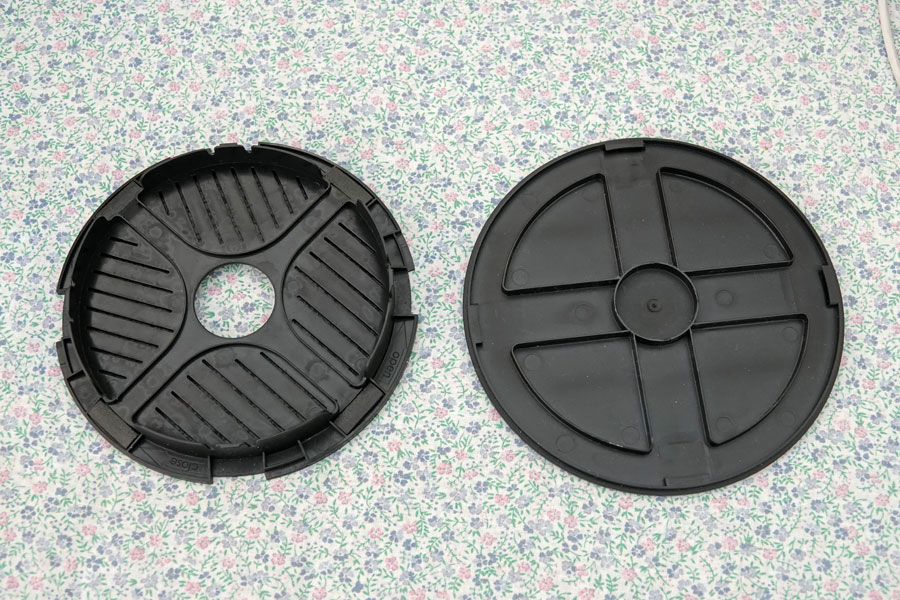
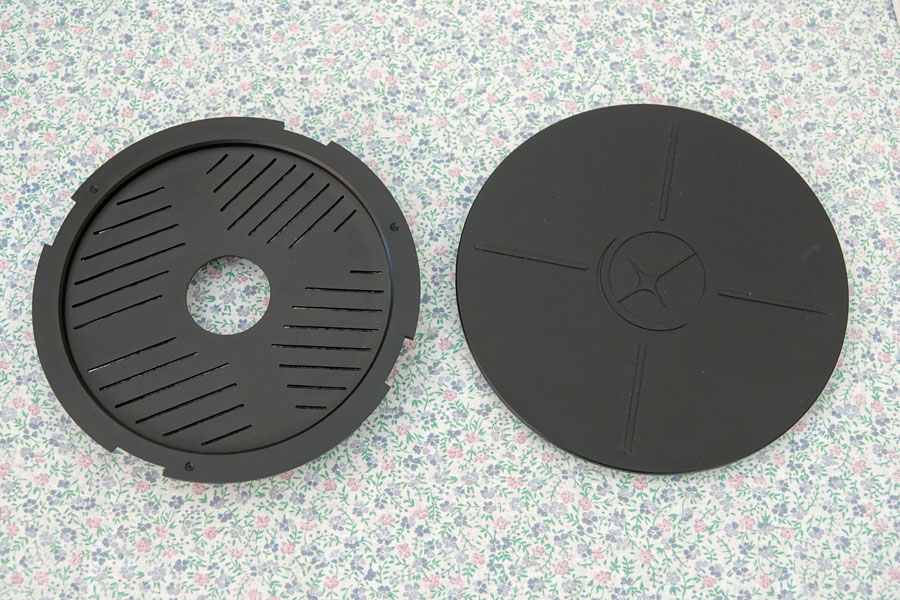
The following figures (source: Unistellar) show the collimation screws and help clarify the collimation process. Since the cross is too high in the middle figure, the star image must be moved to the top of the image with the joystick and then moved back to the center with the collimation key:
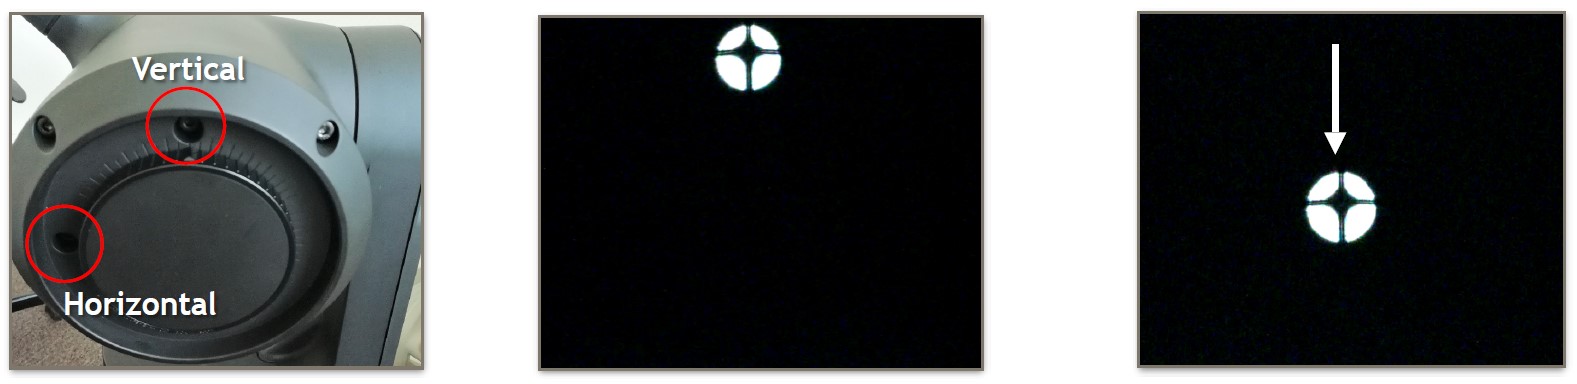
Here I show again the collimation key and the directions of movement for the collimation screws:
 |
 |
 |
||
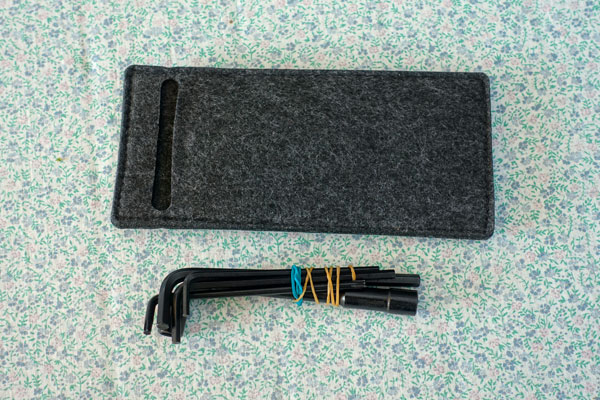
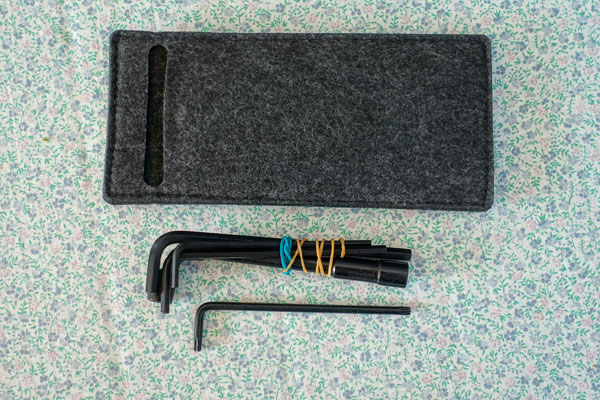
Tool bag |
tools taken out of the tool bag |
Collimation key shown |
||
|
||||
The right arrow shows the focus mark; for rough focusing it is sufficient that the mark points to the upper collimation screw; I, however, recommend using the Bahtinov mask for focusing. |
||||
One reason for a poor collimation might be that the cross that the collimation star creates is not correctly centered, although it seems to look centered (but it is not...). So how can I attack this problem? I found out that rotating the smartphone by 90° immediately reveals if the cross is not truely centered. However, only for just a second before my iPhone rotates the display, and then nothing is gained. So I had to find out how I can prevent my iPhone from rotating the display. David Kerr told me what do do (there is no switch for this like on my iPad): Swipe the screen from the bottom and you will see a screen like this where you can block the display rotation:
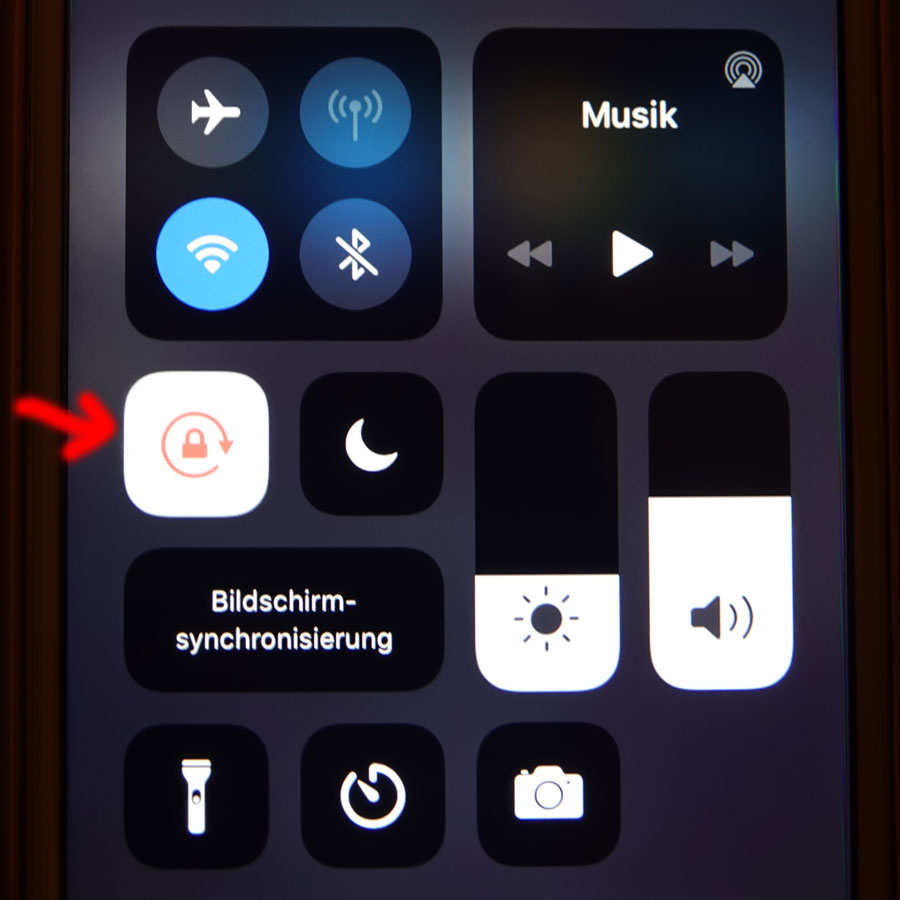
After you blocked display rotation, you can rotate the smartphone and immediately recognize whether the cross is truely centered.
Attention: The following description refers to app version 1.0. For the new app version 2, Unistellar has provided a new article or updated the old version of it: Sensor calibration / Dark-Frame: How and Why. I therefore recommend to read this article instead of my instructions!
Unistellar describes in the Unistellar Help Center in article How to take a Dark Frame? exactly what the title of the article says. I will therefore not repeat here what they write and only add a few things from my own experience.
Update: In the meantime, a new article, entitled Taking a Dark-Frame: How and Why, was released, which offers further interesting information. Read more below!
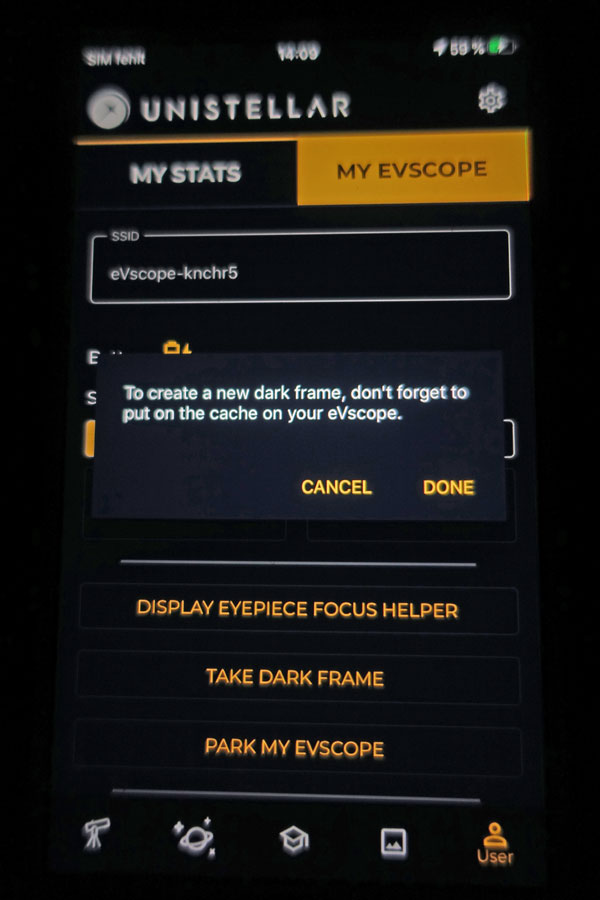
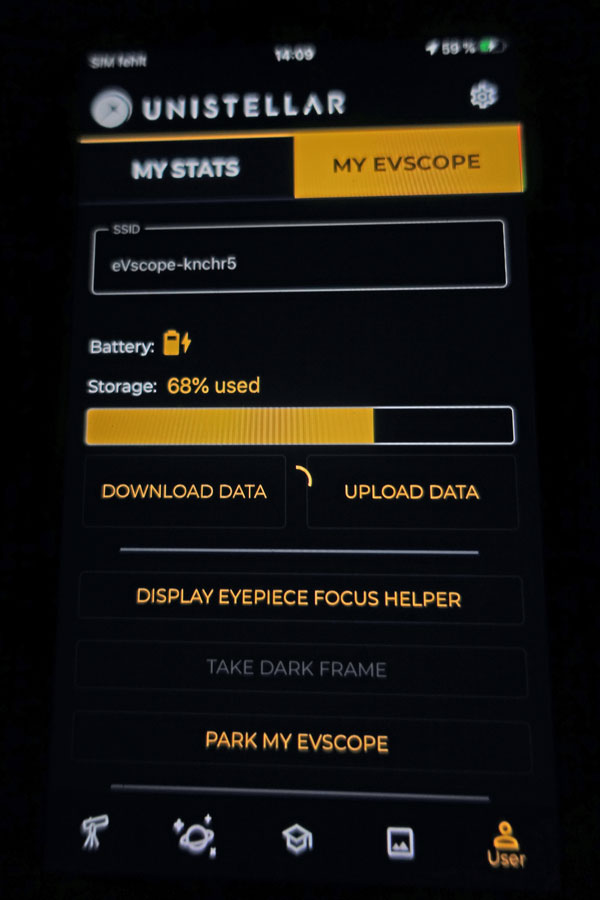
After the update of the Unistellar app to version 1.0, my first action was to take a dark frame:
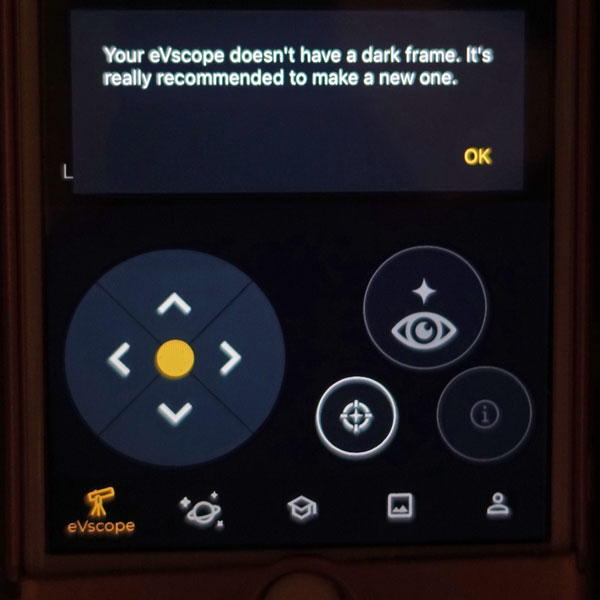
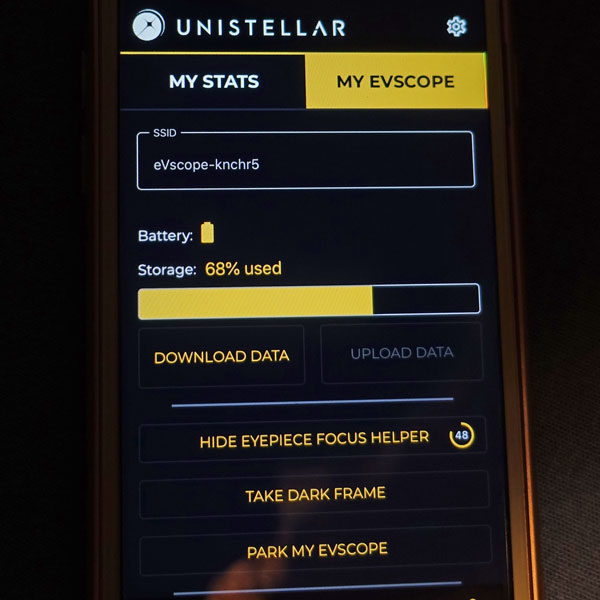
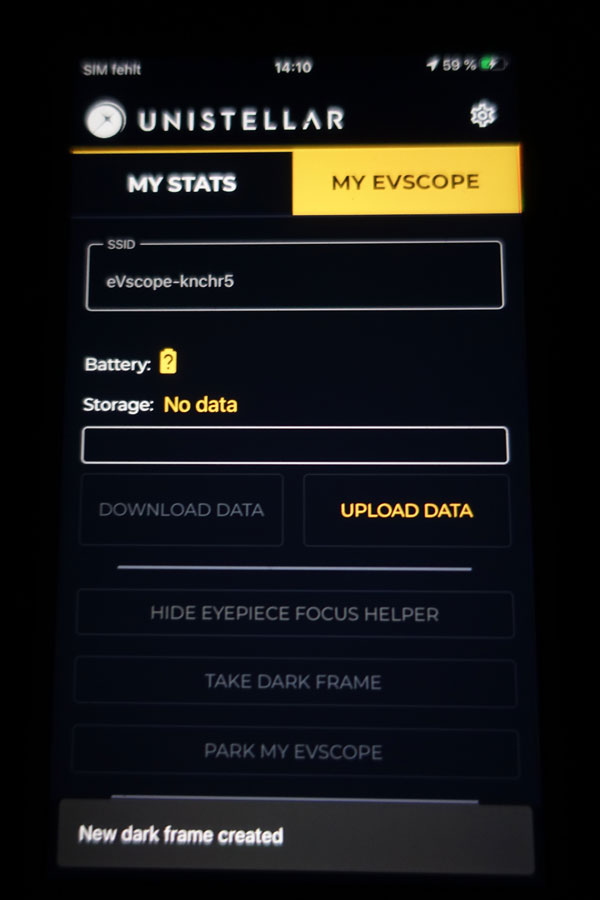
After the update, the app "noticed" that there is no dark frame yet and recommended to take one. I then switched to the "User" tab and clicked "Take Dark Frame" (see photo further above). |
 |
 |
||
First, a message appears that reminds you to put the telescope cap on; you should also do all this in a dark room. |
The dark frame is taken... |
|||
 |
 |
 |
||
Ditto |
Ditto, it takes a while... |
Finished! Connection to eVscope interrupted. |
On that same evening, I was able to take a few photos and at least found that the hot pixels were drastically reduced. I do not know yet wether they disappeared completely. It seems, however, that when you observe in "Enhanced Vision" mode for a longer time, some hot pixels are appearing.
After I had found two larger hot pixels, I took new dark frames at the end of May 2020. My first attempt ended with an error message, my second one ran suspiciously fast. Only later, I noticed that I now had a lot of hot pixels in the images again, as if I had not made a dark fame. Another attempt in early June 2020 was successful.
Why did the two dark frames fail? I assume that they failed because I did not take them in a dark room (the lid was on the tube). See also Further Tips!
In the article Taking a Dark-Frame: How and Why, Unistellar offers further interesting information on the topic of dark frames (from the arcticle for the old app version 1.0). Here, I present only the most important things, further details can be found in the article.
Because hot pixels and dark frames are linked to the telescope temperature, Unistellar recommends:
Procedure for taking darkframes:
Note: If you get an error message, please try again in darker surroundings and make sure your telescope was left outside for 15 minutes. Don't forget the cap and try to add a dark piece of fabric onto your eVscope.
*) I do not know, when the article was published.
Note: This tip is valid for app version 1 only!
In the app's user settings (User > General > Add an overlay when saving an image) you can add an overlay to the photo or not (see figure below):
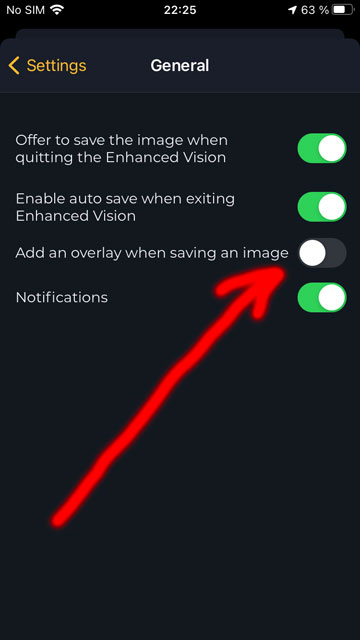
With an overlay, the photo has a square format, without it, it is rectangular and larger. It was not mentioned by Unistellar that the image size changed from 1120 x 1120 pixels with overlay to 1280 x 960 pixels (sensor format) without one; since app version 1.3, Unistellar has doubled the dimensions...
Note: You have to turn off the overlay in order to set the rectangular format.
Note: This tip is valid for app version 1 only!
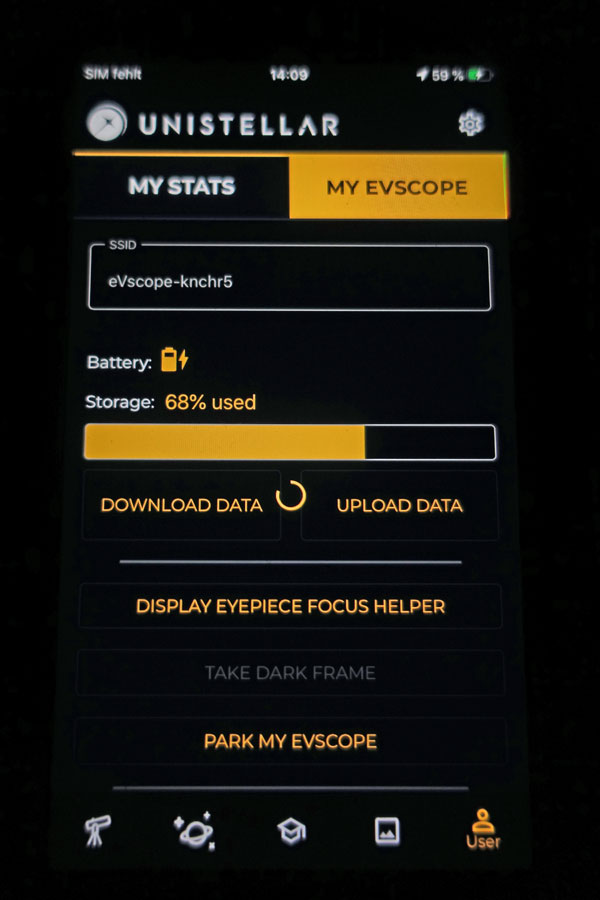
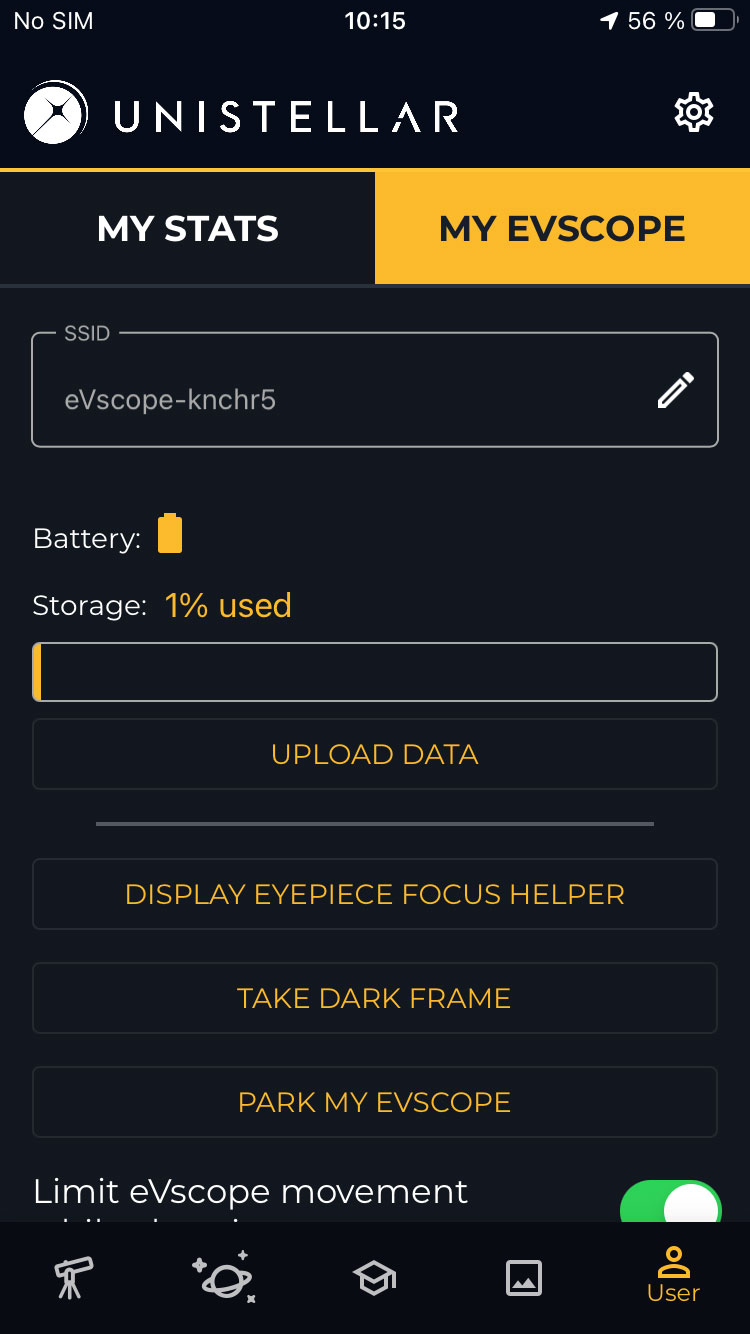
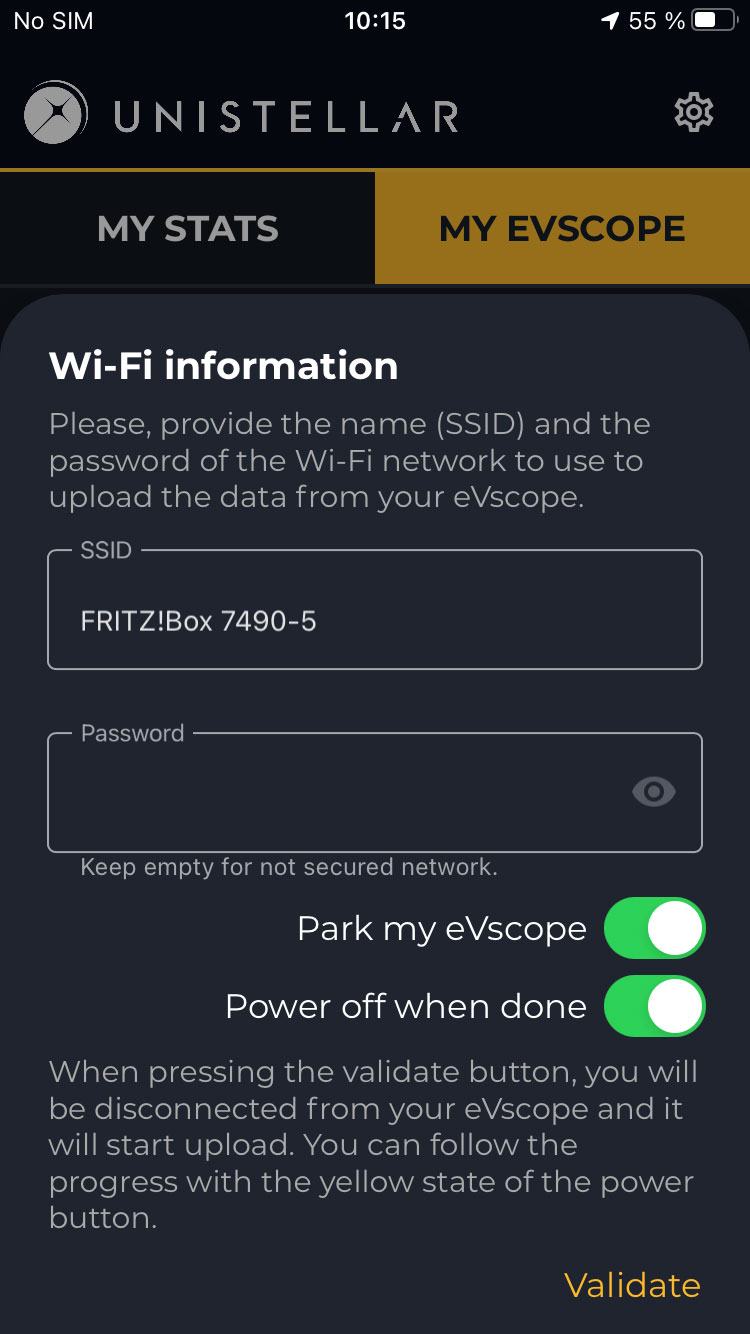
Note: With app version 1.1 (for me functional from version 1.1.1 on), Unistellar has fundamentally changed the procedure to transfer data from the eVscope to the SETI server. Therefore, only the new upload procedure is described here! While before the data was first transferred to the smartphone and sent from there via the internet to the SETI server (therefore, 12 GB of free memory was needed on the smartphone for 100% data), the smartphone is now only needed for starting the data upload. Then, the eVscope connects to the Internet and sends the data directly to the SETI server. The new process is described in the Unistellar Help Center in the article eVscope Data Storage & Memory: Uploading Data and will therefore only be briefly described here. Unfortunately, the LED colors are given wrongly in the article (both in the text and in videos). In the following, I describe the successful upload process and what happens if the upload fails.
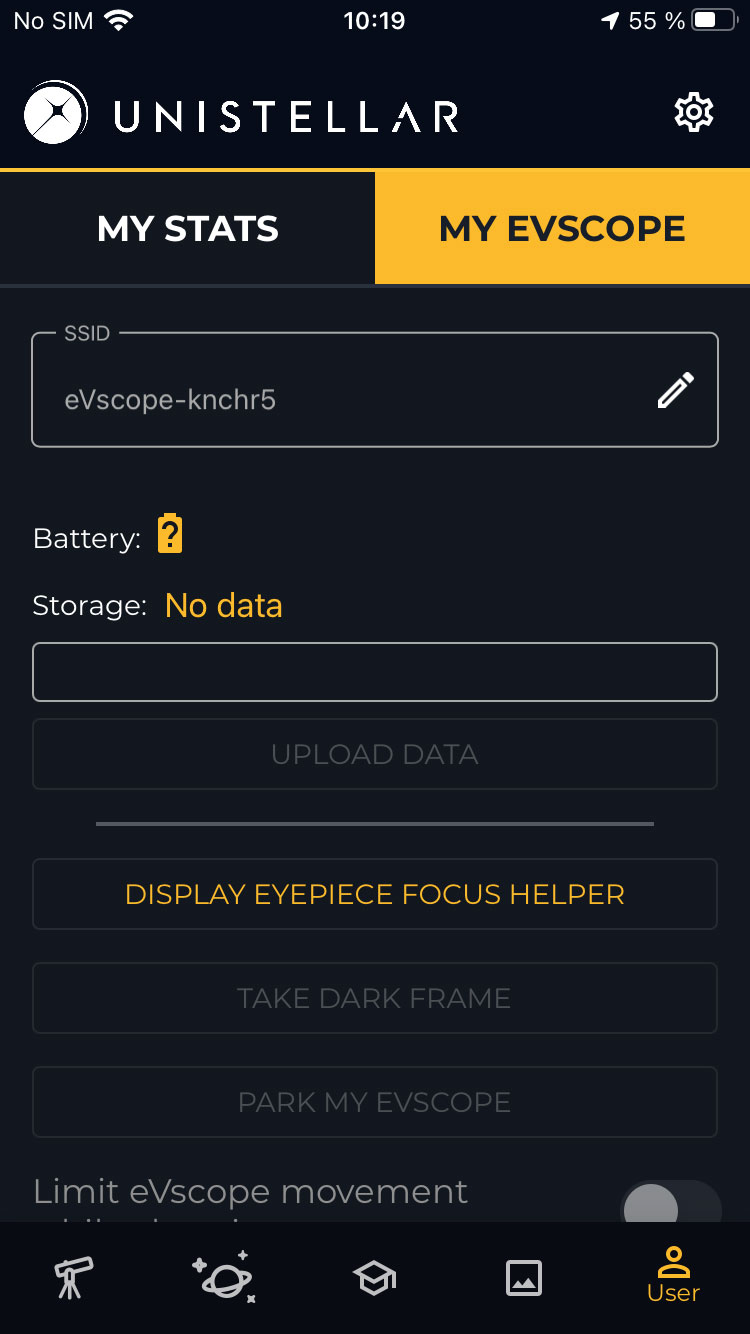
Switch on the eVscope, start the app, and connect to the eVscope. Go to the "User" tab. After pressing the "UPLOAD DATA" button, a dialog box appears with the connection data (SSID, password = network key) and settings (switch the eVscope off after transmission, park the eVscope). After pressing the "Validate" button, the eVscope searches for the Wi-Fi connection. During this process, the LED on the on/off switch flashes yellow (search for WLAN connection).
Then, depending on the setting, the LED turns red (the eVscope stays on) or briefly turns purple (turning off the eVscope software; may not always be visible) and then turns off (the eVscope turns off).
 |
 |
 |
||
State before the data upload* |
Popup with connection data and setting options** |
Connection to eVscope interrupted after the upload started |
*) Here only 1% data is shown, which is actually the state after an upload
ended successfully.
**) The dialog only mentions the yellow LED; actually, the LED blinks green
during the data upload...
According to the article, a failed connection in 80% of cases is due to incorrect connection data (SSID, password = network key). The network key is a long string of numbers that one only see as "bullets". Therefore, a wrong connection data input is very likely! I have, however, the suspicion that errors may arise later even after a correct data input, inadvertently by the observer or by the system...
With one object the answer should be: By accessing the object using GoTo. In fact, the object does not always appear at the same position in the field of view (its position can also change slightly while in "Enhanced Vision" mode). In case of doubt, the only way to make an object to appear in the field of view is to move it manually with the direction buttons of the joystick in the app (or to repeat the GoTo in the hope that the next attempt will be more successful). At the beginning, I had huge problems with moving an object in a controlled way with these buttons. But in the meantime, I have learned to move an object in small steps by slightly tapping the direction buttons.
There is, however, a restriction with moving: You cannot move an object in "Enhanced Vision" mode. Therefore, you have to abort this mode and move the object in "Live View" mode. But in this mode, you usually do not see the object anymore, at best a few stars. You have therefore to choose stars, the position of which you can track while moving the screen (or tube). After that you need to return to "Enhanced Vision" mode and check whether the position of the object has improved. This does not always work at first go, and sometimes it is a bit tedious to move an object to the desired position. In addition, the position sometimes jumps when switching between the two modes. Last but not least, in "Enhanced Vision" mode, the object can wander a bit and thus, move back to a less favourable position.
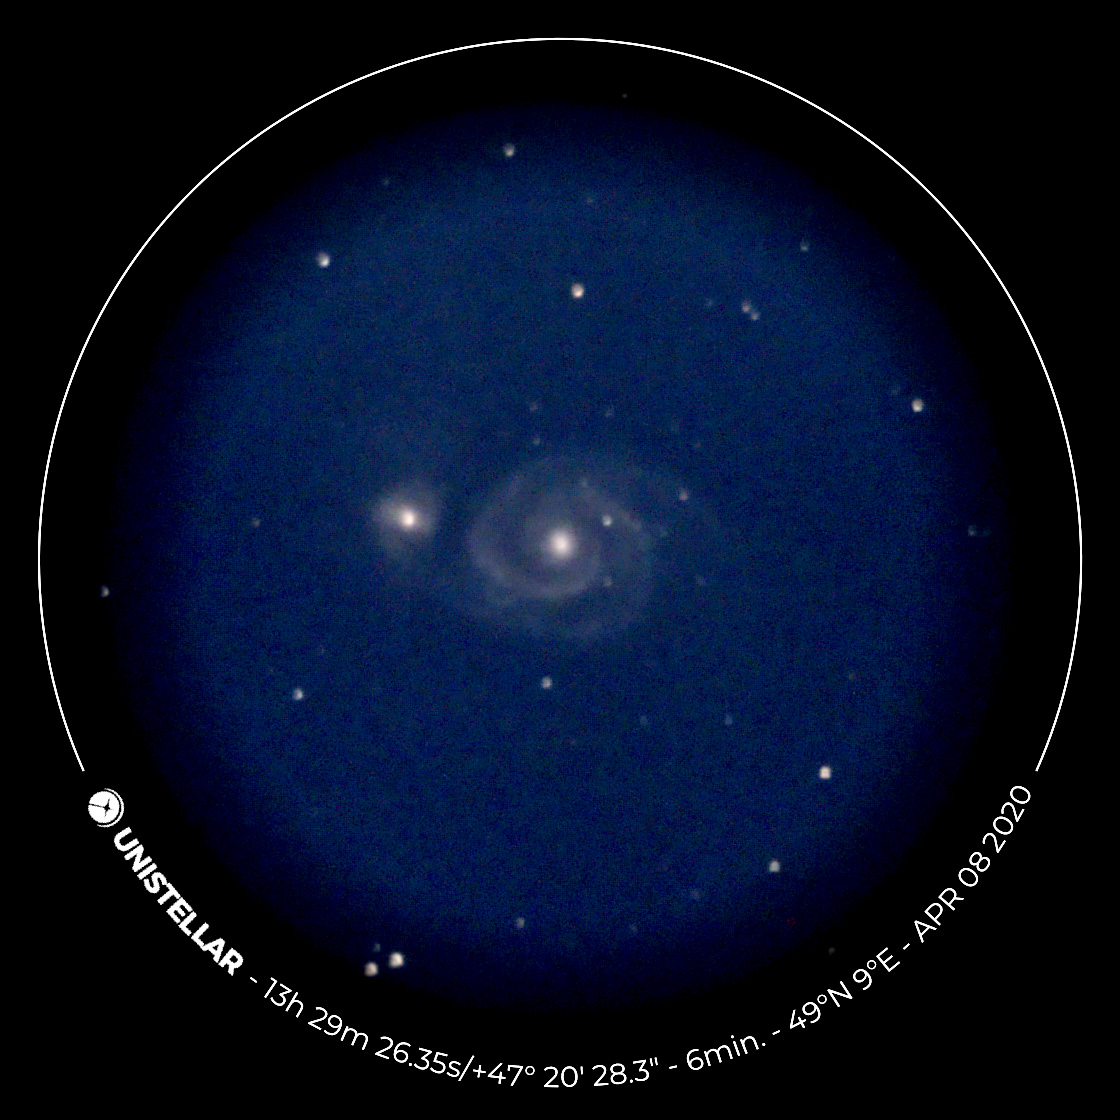
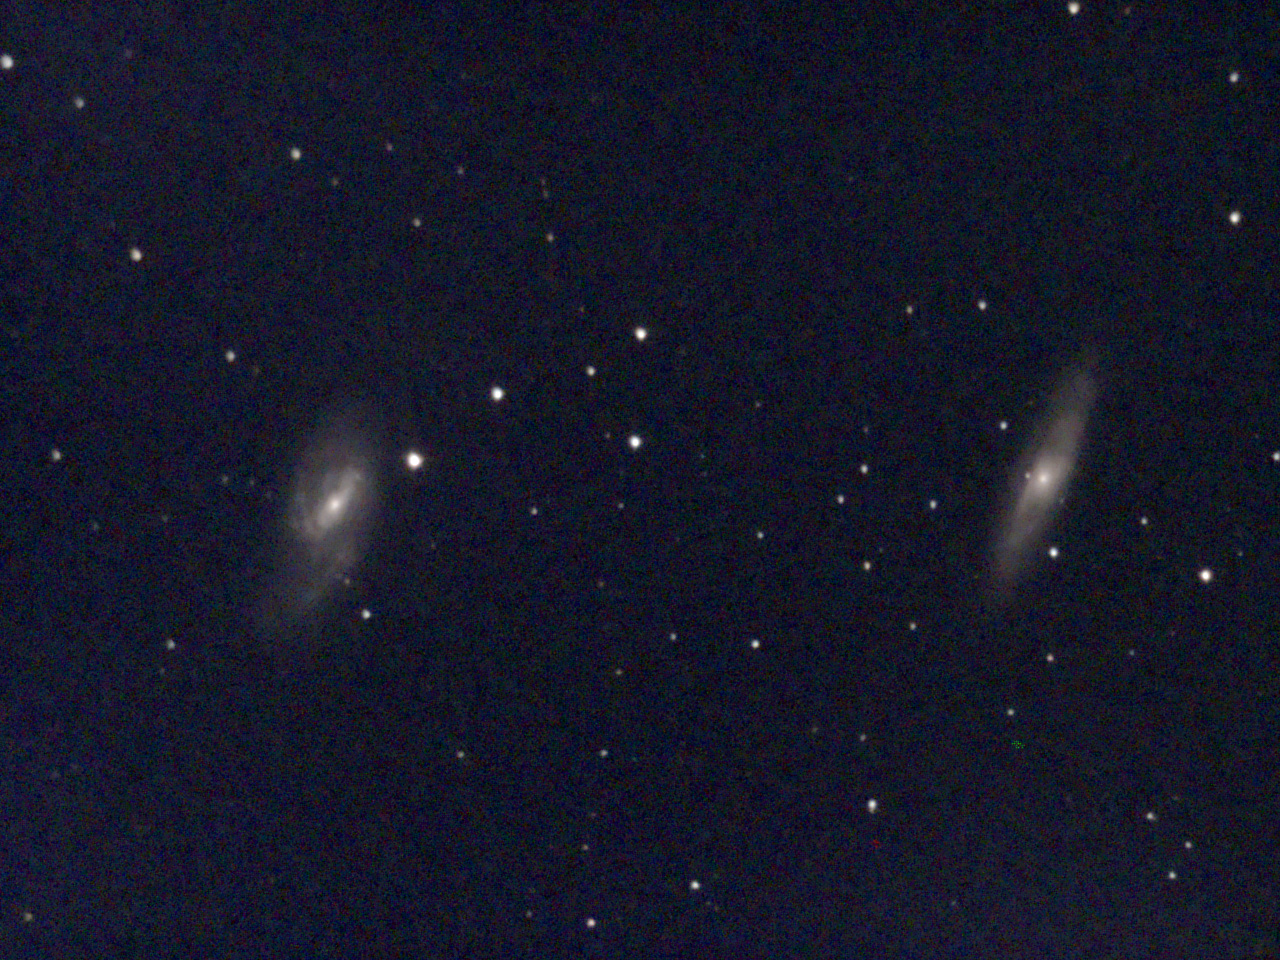
What is it like when you want to observe and photograph several objects, such as M 65/66 or M 84/86? First of all, you have to select one of the objects for the GoTo if you do not want to enter the center position using coordinates (this would require an astronomy application to determine the coordinates). Ideally, the selected object is at the center of the field of view after the GoTo, but this is rarely the ideal position for observing several objects together. So you have to move the group of objects "manually" to an ideal position, as described above. This is definitely more laborious than for only one object.
With all this, an additional complication comes into play when using the square overlay: On the rectangular smartphone screen, however, you cannot see whether everything fits into the round photo section that is bordered by the overlay (with version 1.0, Unistellar has enlarged this section slightly). You can only see this when you look through the eyepiece. So when you move an object and particularly when you mode a group of objects, you always have to switch between eyepiece and smartphone screen to place it optimally, which is a bit cumbersome.
Since app version 1.0.3 was published, you can also choose a rectangular image format in sensor size instead of the overlay. This corresponds exactly to the image on the smartphone screen, which makes the placement of objects much easier. It also gives you more space for the objects, which is very useful in a lot of cases (M 65/66, for example, only fit together very tightly in the square field of view).
Example: For M 65/66, the overlay makes it a quite tight fit, without overlay both fit well into the image:
 |
 |
|
M 65 & M 66 - March 22, 2020, processed |
M 65 & M 66 - April 23, 2020, processed |
Objects appear relatively small on the smartphone display. This makes it difficult for me and others to judge the expected quality of a just taken photo. You can enlarge the current view (with a screen gesture), but you could not move it around in the first app versions; this is possible now. Here, using the "Gallery" tab comes to your rescue: As soon as you saved a photo, it appears as the first image in the gallery and can be enlarged and moved there. You can also quickly switch to other photos. Then simply return to the "eVscope" tab.
 |
 |
 |
Figures: Unistellar app, "Gallery" tab selected; here you can find your photos that you took (left); photo selected (center); photo enlarged (right)
On the iPhone, you can also switch to the "Photos" app instead and view the album "Unistellar". The last photo you took will, however, appear in the last position and is therefore more difficult to find. The "Gallery" is much more convenient!
By the way, I got the tip to check your photos in the "Gallery" tab from David Kerr, a Canadian eVscope owner.
Initially, it was not possible to photograph objects that were observed in "Live View" mode, such as the moon and the planets. Since version 1.1.0 (October 2020) it is now also possible to save photos in "Live View" mode. By default, the eVscope exposes automatically, and thus also in "Live View" mode, when observing the moon. When the moon is in the field of view, the automatic exposure will settle down to settings that make the moon look "properly exposed". It is, but the setting is still not optimal, which I only realized when I looked at the photos that I took more closely: The automatically exposed photos were much too noisy!
When I checked the automatic exposure on a sample photo, I noticed that the exposure time was extremely low at about 0.3 milliseconds (about 1/2700 s) - and the gain (the amplification) was correspondingly high to ensure a correct exposure. The strong noise that I found on the photos, was a consequence of this high gain!
I have not yet been able to investigate this phenomenon conclusively, but I recommend exposing the moon manually with exposure times between 1/1000 and 1/100 s, and adjusting the gain so that bright structures are not yet washed out. If the gain cannot be reduced further, the exposure time must be shortened accordingly.
 |
 |
|
About Half Moon - Oct 24, 2020; automatic exposure (1/2700 sec) |
About Half Moon - Oct 24, 2020; 1/1000 sec |
Photos: The first photos where I noticed a difference in noise; differences can only be seen if you click the preview images to get the full-size versions.
For details, see page Moon Photos! Unistellar offers the following tips for optimum photos of the moon:
*) According to my experience, this navigation is done in small steps, preventing me from being able to center the moon exactly in the field of view.
The Unistellar Help Center article How to Optimize Your Observations with the right Settings? points to a new video with the same title that describes the function and the use of these sliders.
In Live View mode, use the (1) Gain and (2) Exposure controls. For this purpose, the automatic mode must be switched off!
The Live View sliders are controls that you set virtually BEFORE shooting (explains the video...). They are important for taking pictures of the moon and planets, and on the eVscope 2 also for making the colors of the stars stand out.
In Enhanced Vision mode, you use the (1) Brightness and (2) Background sliders. To do this, again the automatic must be switched off!
The Enhanced Vision sliders are controls that you adjust sort of AFTER you take the picture (explains the video...). They are applied to the composite image "after the fact" (while Gain and Exposure were automatically fixed before).
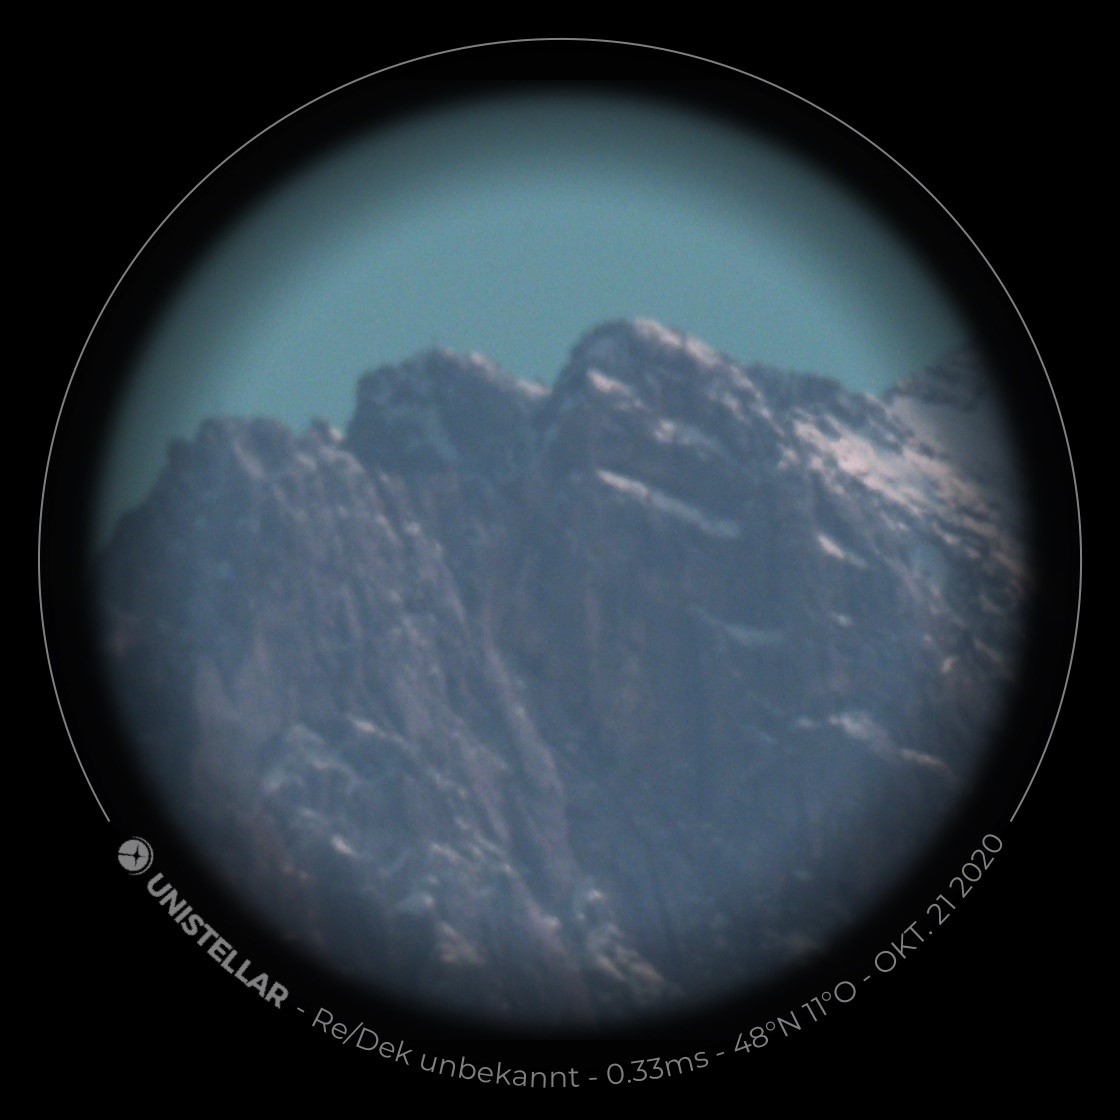
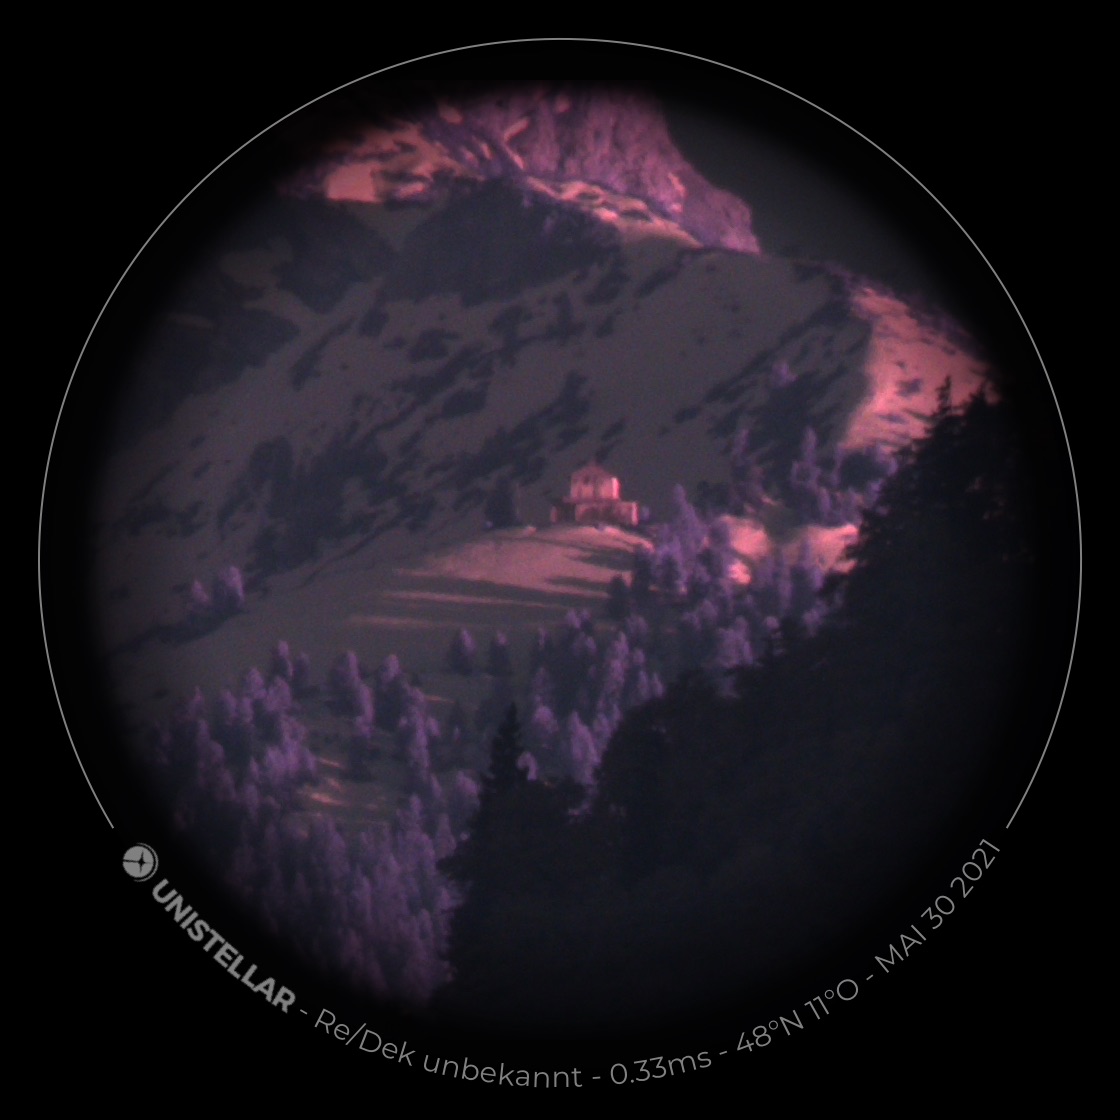
I was was asked this question in March 2022. I have not tried this myself yet, but my star friend Timm Deeg has already successfully photographed motifs during the day with the eVscope (and also nocturnal terrestrial motifs). In the following, I present with his permission some of his photos!
Important: Set the Live View mode and, if necessary, adjust the gain and exposure time manually (as with moon and planets).
 |
 |
|
Dreitorspitze - Oct, 21, 2020 (Murnau - Dreitorspitze 27 km) |
Schloss Schachen - May 30, 2021 (Murnau - Schloss Schachen 27 km) |
|
 |
 |
|
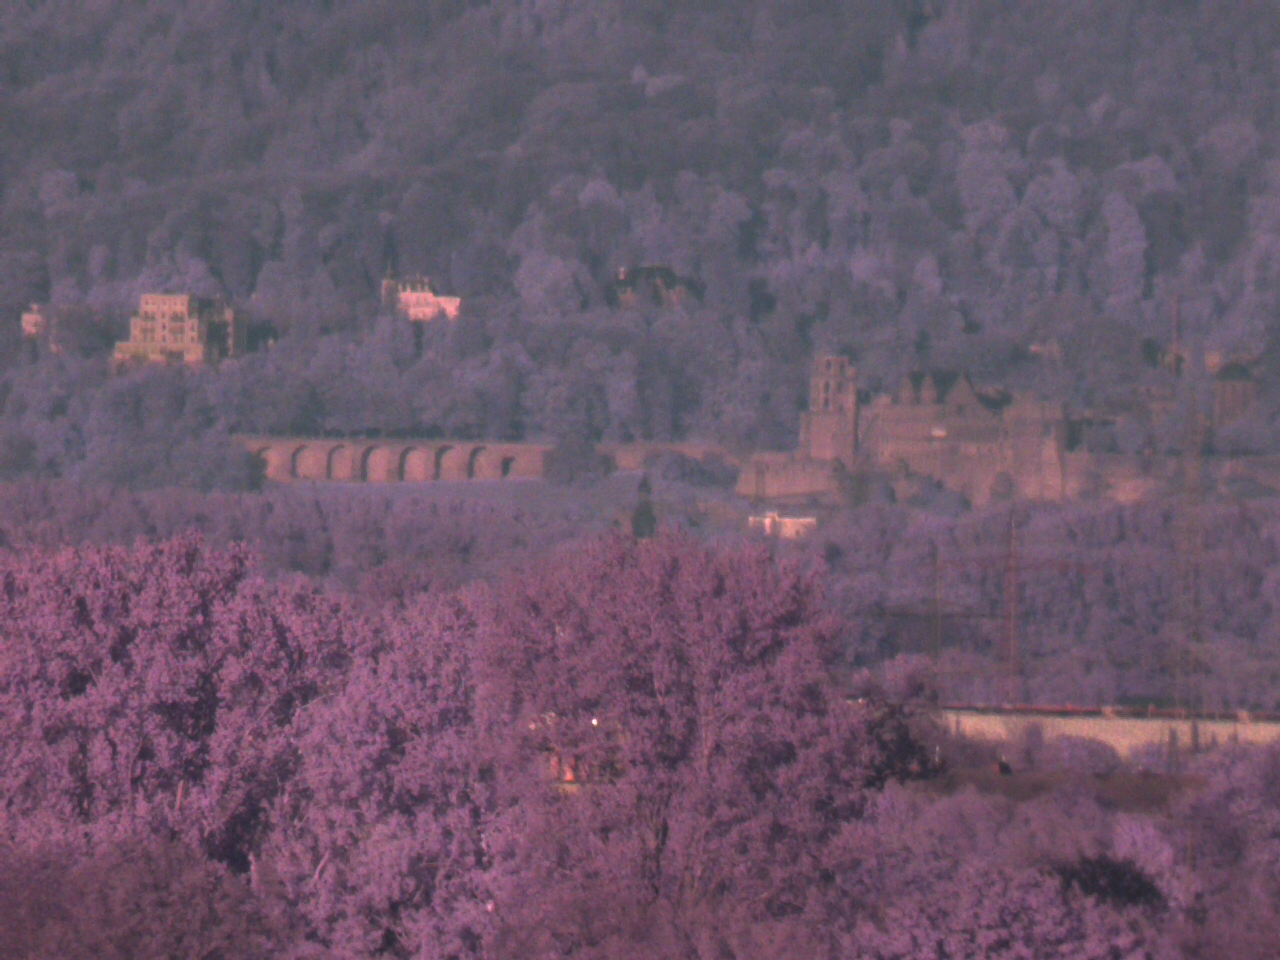
Heidelberg - May 8, 2021 (Wachenheim/Weinstraße - Heidelberg 37 km) |
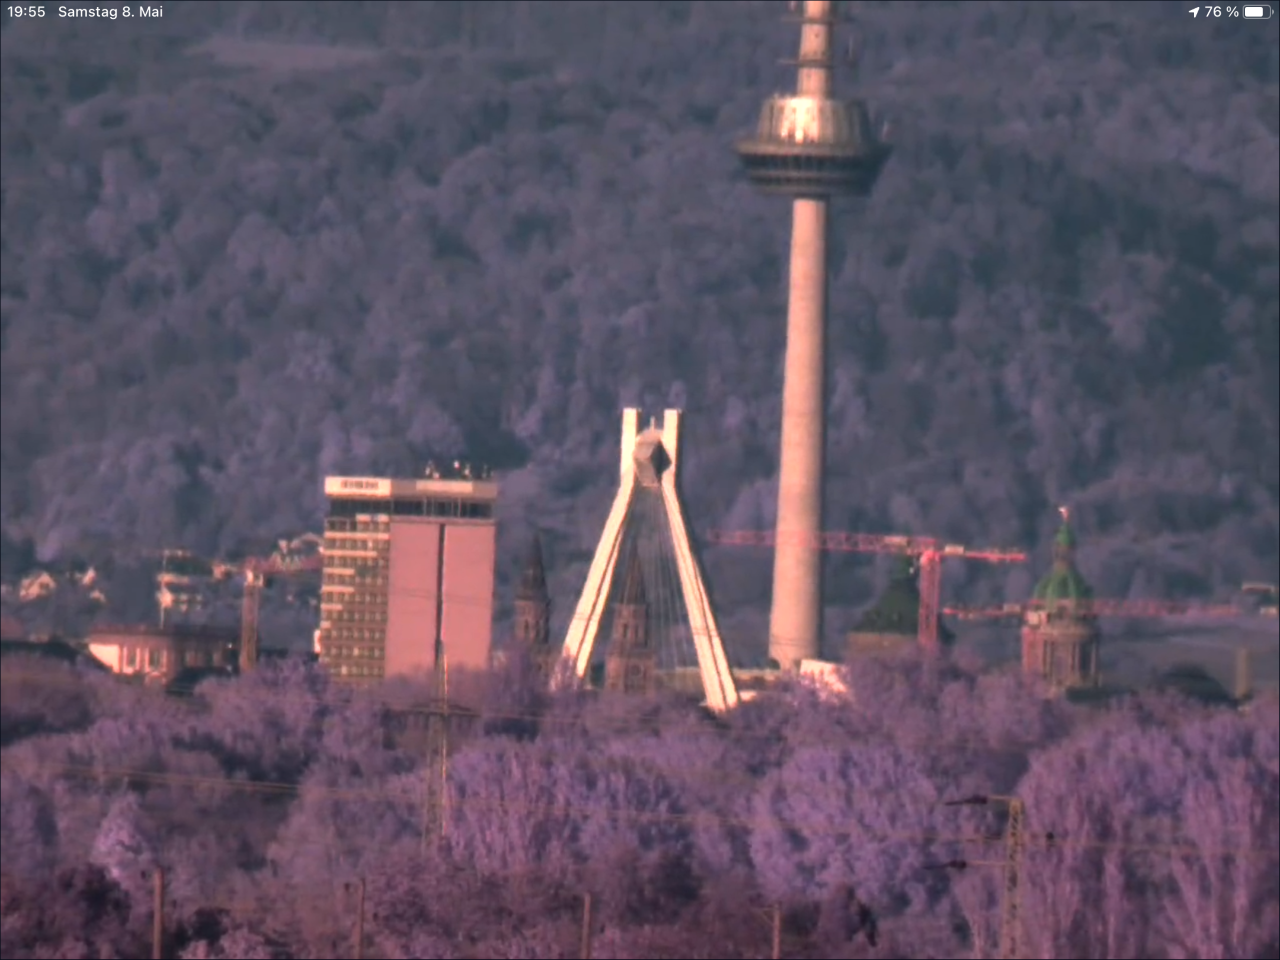
Mannheim - May 8, 2021 (Wachenheim/Weinstraße - Mannheim 22 km) |
|
 |
||
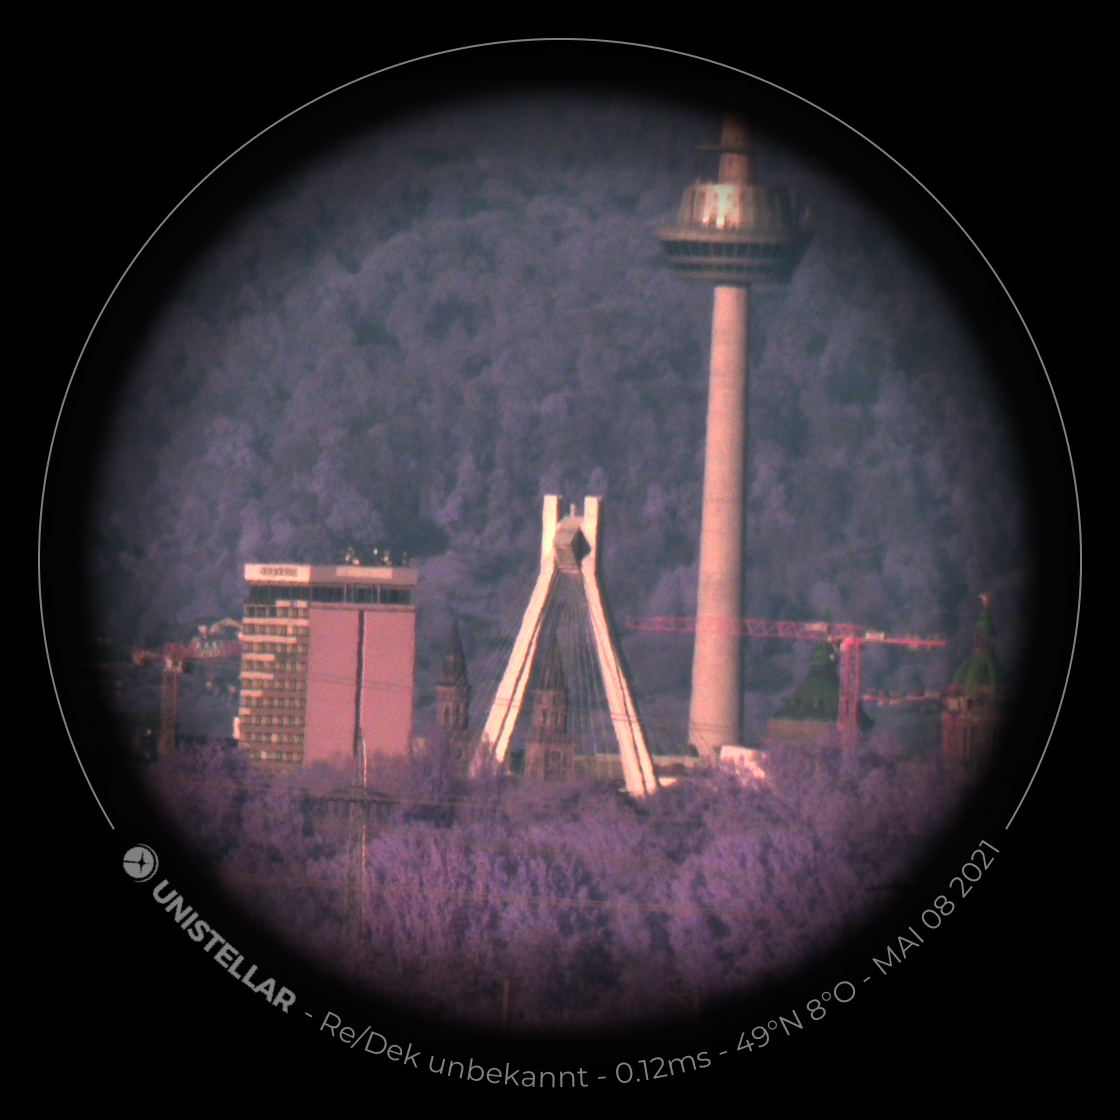
Mannheim - May 8, 2021 (Wachenheim/Weinstraße - Mannheim 22 km), image format with overlay for comparison purposes |
||
 |
 |
|
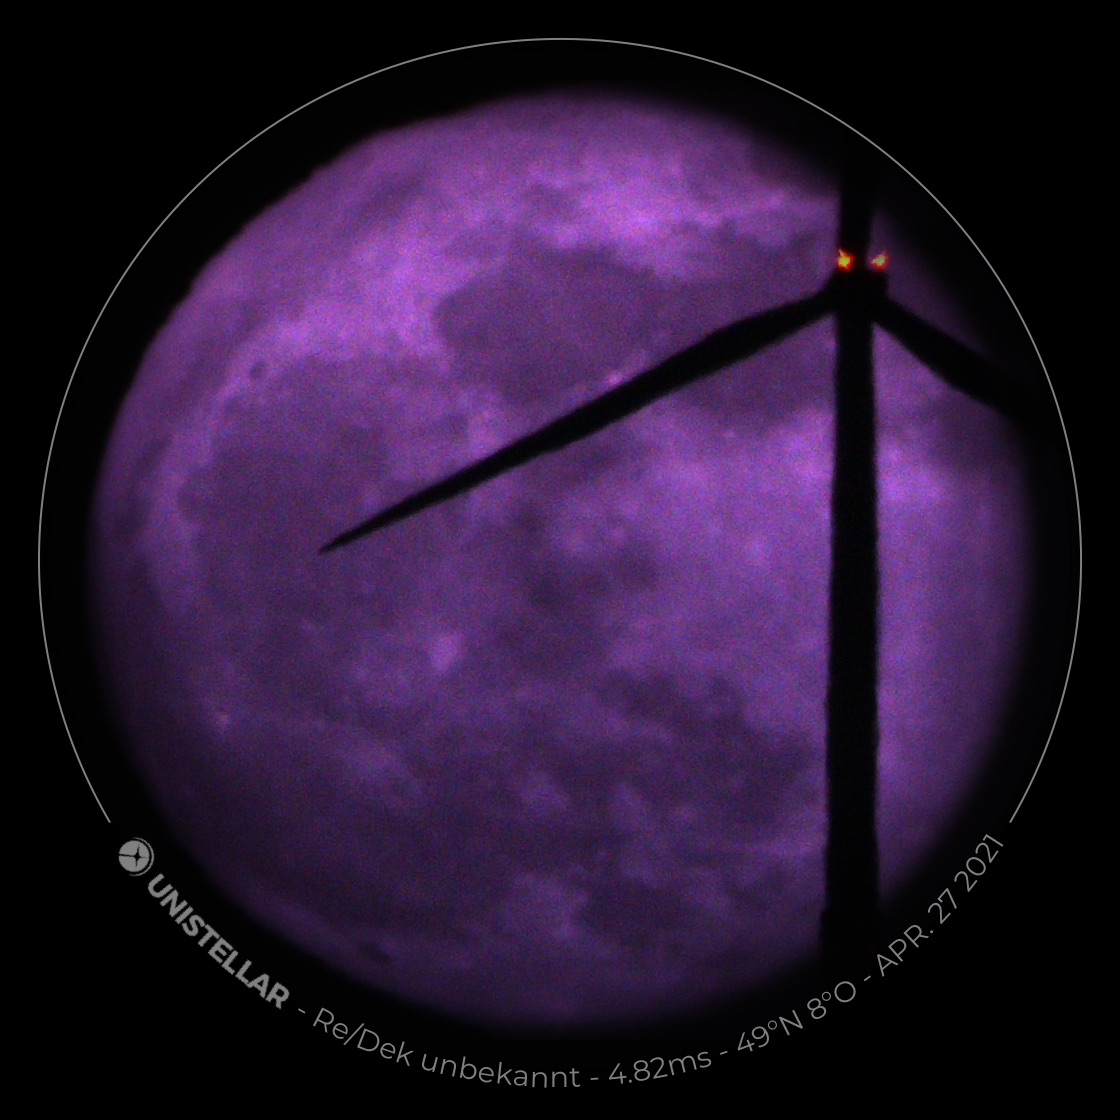
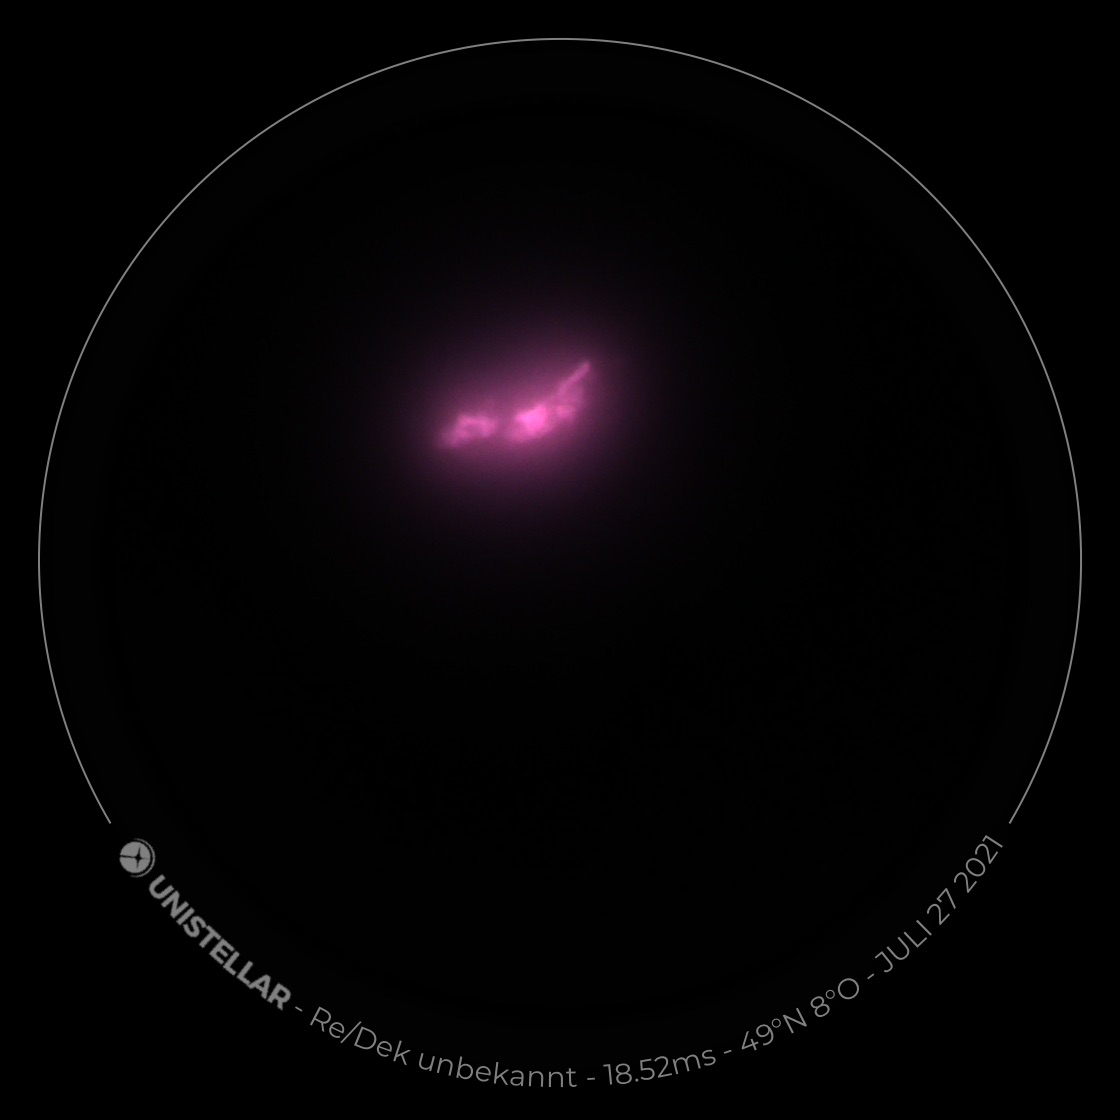
Moon with wind mill - April 27, 2021 |
Flare of the BASF Steamcracker - July 27, 2021 |
The eVscope (2) comes with its own custom-made tripod, which has sometimes been criticized for not being stable enough. So the question arises, whether the eVscope (2) can also be used on other tripods, particularly more sturdier ones. In June 2022, I got an e-mail from a, probably Italian, eVscope user sharing the information that the eVscope can be used with some Gitzo tripods. He wrote: There are two flat top plate sizes, about 7.5 cm for series 2, 3, and 4, and larger for Series 5. The eVscope has a diameter of about 7 cm at the base, so it fits up to Series 4, for example, with the G1348, that the user owns (but not with his G55 series tripod).