Vaonis Vespera - Saving, Transferring Photos, and More...
Introduction | What Is Saved when and where? | Transferring Photos to the Computer | What to Do with the Various Data/Photos? | Exposure Information | Conclusions | Links || Appendix: "Manual" and Automatic Saving | Appendix: Transfering Files to Your Computer Using FTP | Appendix: Deleting Data on the SD Card | Appendix: Enabling and Disabling of the Saving of Different File Types (Singularity App)
Archive
On this page, I describe how and where my electronic 2" refractor telescope Vaonis Vespera 50 mm/200 mm (f/4) saves photos and how you can transfer the photos to your own computer. I also describe how you can delete data on Vespera's SD card in order to free memory space for new data.
Notes:
- I can only describe the possibilities of the Apple computer platform, because I only use devices of this platform.
- See also page Vaonis Vespera - Information.
- See also page Vaonis Vespera - First Observations.
- See also page Vaonis Vespera - FAQ.
Note: In June 2024, I sold my Vaonis Vespera smart telescope. I therefore cannot report any further experiences with it here. |
Introduction
 |
 |
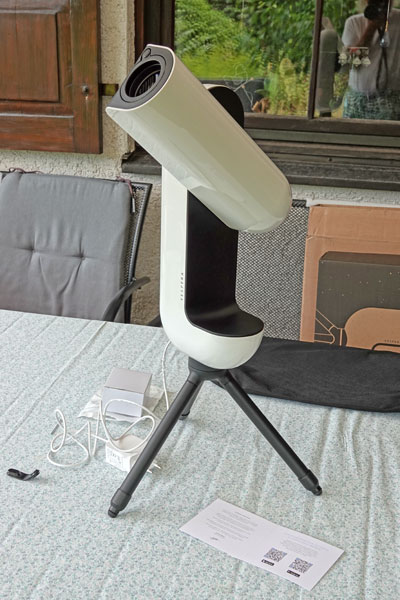 |
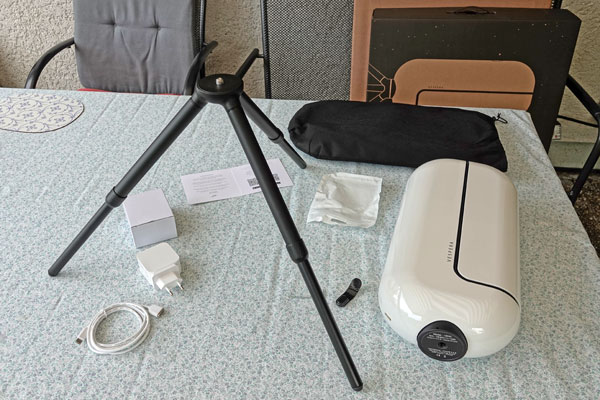
Photo: My Vaonis Vespera (end of July 2022)
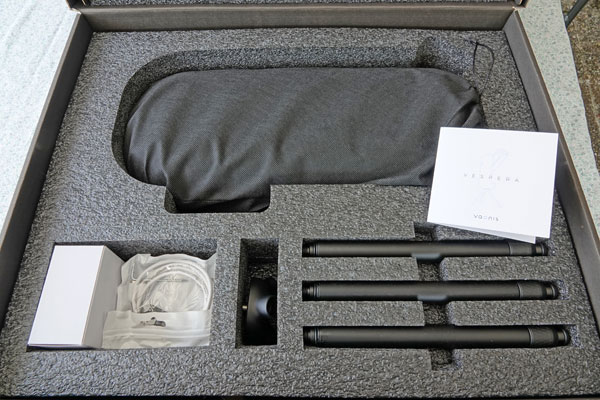
Vespera is the second telescope that the French company Vaonis developed. For this purpose, the company started a Kickstarter campaign on October 1, 2020, which I backed very early to get an early-bird offer - and I succeeded (I received my Vespera telescope on July 29, 2022). This page is about saving the photos taken, which is possible in different formats and locations, transferring photos to the computer, and freeing up space on Vespera's SD card to make room for new data.
What Is Saved when and where?
Now that I had been able to do some initial observations, the question arose about the results that Vespera saves in different formats and in different places. So the question was, when are which files saved where and for which purposes. I should perhaps mention that I rewrote this page several times depending on the "state of my knowledge"...
First of all, Vespera on the one hand saves photos after certain user actions ("manually"), and on the other hand automatically at certain points in time. The former is probably intended for beginners, the latter for advanced users who want to work with the single images (automatic saving fills the SD card up very quickly...). For details on the different save options, see Appendix: "Manual" and Automatic Saving.
Furthermore, there are three file types that can be saved: FITS, JPG, and TIFF files. The saving of these different file types can be switched on and off by the user, whereby one can or has to act in two places in the case of TIFF files. This enabling/disabling of the save options is explained in the Appendix: Enabling and Disabling of the Saving of Different File Types (Singularity App) with the help of screenshots.
And finally, photos are saved in different locations: (1) the smartphone/tablet that is used to control the Vespera and that runs the Singularity app, and (2) Vespera's SD card. For transferring files to one's own or other people's computer or smart device, one can use the "Share" functionality of one's smartphone/tablet or wireless FTP using a computer. For the latter, see Appendix: Transfering Files to Your Computer Using FTP.
The following table provides an overview of the options:
| Image Format | Saving Photos |
||||
Manually (Beginners) |
Automatically (Advanced Users)* |
||||
How? |
Where? |
Where further? |
Where? |
Where further? | |
| JPG | Camera symbol on observation screen | Gallery of the Singularity app (smartphone/tablet) | "Save" in Photos app > Share function of the Photos app "Share" = Share function of the smartphone/tablet > Computer |
Vespera's SD card | FTP > Computer |
| Share symbol on observation screen | Shared files are not stored on the smartphone/tablet | Share function of the smartphone/tablet > Computer | |||
| 3-dot menu on observation screen | "Singularity" album in Photos app (smartphone/tablet) | Share function of the Photos app > Computer | |||
| TIFF | TIFF files are not stored on the smartphone/tablet | "Export TIFF" = Share function of the smartphone/tablet > Computer | Vespera's SD card | FTP > Computer | |
| FITS | --- | --- | --- | Vespera's SD card | FTP > Computer |
*) All three file types are stored in the same "observation" folder for one observation. The folders can only be transferred via wireless FTP to one's own computer.
The "Save" and "Share" functions as well as the TIFF export allow you to transfer just one file at a time. The Photos app allows you to select images and transfer them together.
For details on the different save options, see Appendix: "Manual" and Automatic Saving.
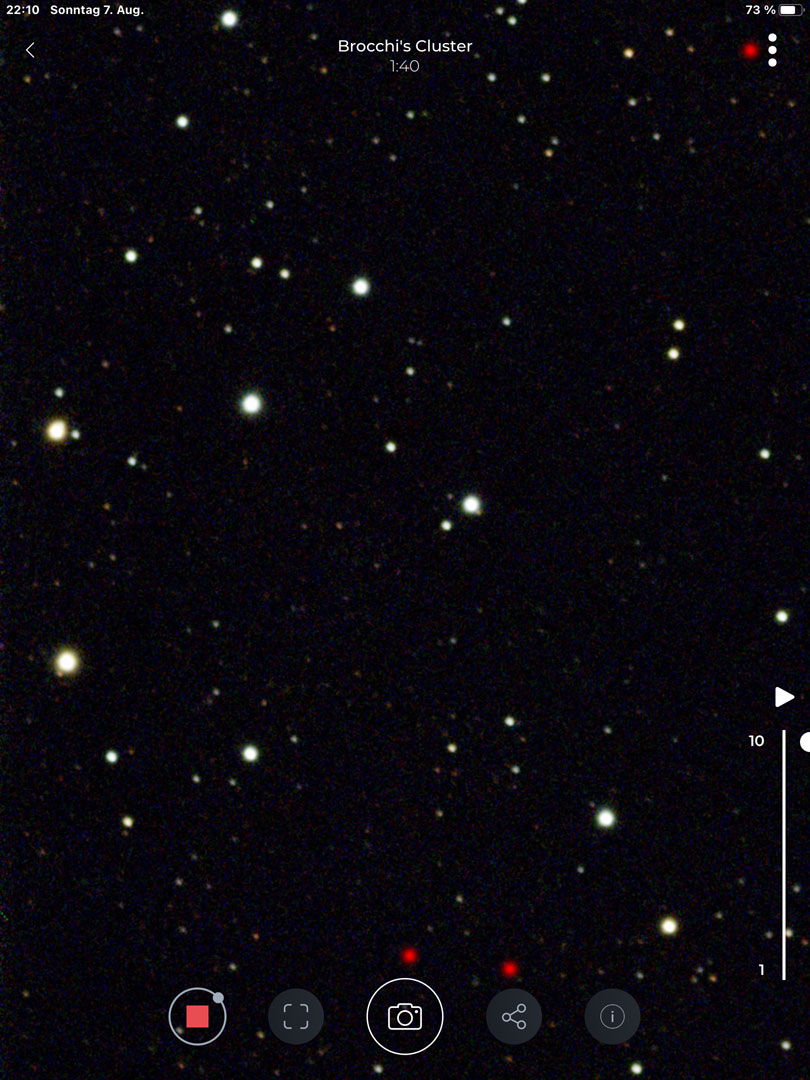
The most simple way to save images manually is to click the camera icon on the observation screen, which saves images to the Gallery in the Sigularity app. From there, you can either save photos in the Photos app (Save in Photos) or transfer them directly, for example, to your computer (or devices of other people) using the "Share" functionality of your smartphone or tablet.
 |
 |
|
Figure: The three icons on the observation screen: Camera, Share, 3-dots (top right) |
Figure: In the Gallery, you can save single images to the Photos app or share them (e.g. via Airdrop) |
Transferring Photos to the Computer
Transfer via "Share" Functionality (Manually Saved Photos) - from Smart Phone/Tablet to Computer
The manually saved photos are "single" photos. Technically, they are the state of the images stack at a certain point in time. They are saved in JPG format, or in TIFF format, provided that the user activated this option (see Appendix: Enabling and Disabling of the Saving of Different File Types (Singularity App)). User actions are clicks on the camera symbol, the Share button or the 3-dot menu, all located on the observation screen. Depending on the button pressed, the photos are stored in the Gallery of the Singularity app, shared (not stored), or stored in album "Singularity" of the Photos app (see the table above).
These photos are typically later exported to one's own computer via the "Share" functionality of the respective computer platform. In most cases, one's own computer will be the target for those images, but also devices of other people are possible targets.
Transfer via FTP (Automatically Saved Photos) - from SD Memory Card to Computer
To transfer the photos from the SD card to your computer, you need to connect your computer to Vespera wirelessly via FTP; for this, the computer's WiFi has to be connected to the Vespera network. On Apple devices, select the appropriate server to be able to transfer the images. For instructions with screenshots, see Appendix: Transfering Files to Your Computer Using FTP.
Note: In my experience and in contrast to what the Singularity tutorial states, you can copy/transfer the folders from the SD card to your computer, but you cannot delete folders on the SD card. Deleting has to be done (at least, for me...) via the Singularity app. See Appendix: Deleting Data on the SD Card.
The Folders on the SD Card (Automatically Saved Photos)
In the following, I describe the folder structure of the SD card. It is flat, meaning that each observation generates an "observation folder". The folder where an observation is placed on the SD card of Vespera gets a date/time stamp in its name; also the name of the observation object appears in the folder name (if one has selected one before, I suppose; see figurs further below).
Note: On my very first observation evening, I already used up almost 3 GB of the 10 GB available on the SD card. So the SD memory card can be filled quickly! Then the only thing that helps is to connect Vespera to the phone/tablet, start the Singularity app and delete directories from the card that are no longer needed (Vaonis also recommends this)!
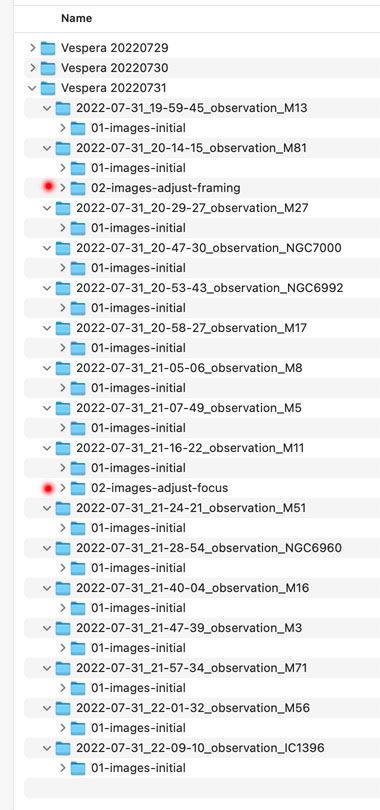
Initially, there was always only one folder named 01-images-initial in the observation folder; this folder contained the observation data in FITS, JPG and possibly TIFF format (depending on what you activated...). But after I changed the image framing once and updated the autofocus once, new folders appeared in the observation folder (02-images-adjust-framing and 02-images-adjust-focus) (see figure below left). What else may appear in the observation folder I do not know yet; but at least, this way one's own proceeding is documented.
Thus: If you do not make any changes, all data of an observation are stored in the folder 01-images-initial; if you change the sky section or restart the autofocus, new folders are created (see red dots).
View of the folder structure of the observation data:
 |
 |
Figures: When you renew the focus or change the image section, a new folder is created for the photos (see red dots; figure left); the folders contain, if selected, all FITS, JPG, and TIFF files (figure right).
What to Do with the Various Data/Photos?
Vaonis probably assumes that most Vespera (and Stellina) owners only use the photos that are manually saved in the Gallery or in the Photos app (on Apple devices). After all, that is quite sufficient in principle to collect your results or to show them to others. And you do not fill up your hard drive (and SD card) with lots of photos that you never use...
I tried to think about what I can do with all the other photos. But maybe that most Vespera owners can simply ignore the following thoughts...
FITS Files
The automatically created FITS files contain all the images taken during an observation. They can be used for stacking with other external applications (e.g. Deep Sky Stacker). You can select any set of photos that you want, including those that Singularity did not use for stacking. Everyone can try it out for him- or herself - and find out, whether the results are better than those of Singularity.
With external applications (e.g. ASI FITS Viewer), you can also look at the FITS images and check why certain photos were not included in the stack or whether the conditions have changed during the observation. This is useful for clouds and other disturbances, such as buildings or trees slowly "drifting" into the image...
You can also convert the FITS images to JPG format (e.g. with GraphicConverter) to create short movies and let the observation pass by in fast motion. For this purpose, I use the program Glimpses on the Apple Macintosh:
- Here is an example movie with an observation of M 13: Movie
- And here is an example of an observation of M 13 with many clouds: Movie
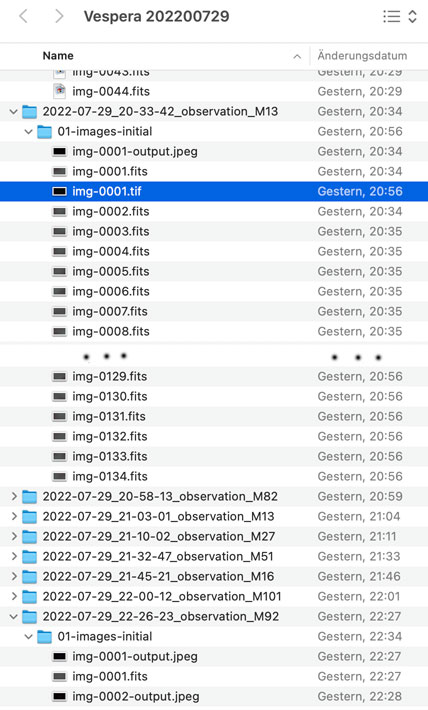
output-JPG Files
The automatically created output-JPG files represent the state of the image stack over time. They are created as soon as a new image is placed on the stack. The first file consists of one image, the last one of the sum of all the images that were placed on the image stack. Basically, you only need this last file, because it usually looks best (unless you also saved photos manually). However, if you make a movie of these files with the program Glimpses, you can follow the evolution of the stack - and see, for example, how the object gets brighter and brighter, but also that stars get larger and larger.
- Here is an example of the same observation of M 13 (first observation without clouds): Movie
Note: During the observation, you can browse the image stack or watch an animation of its state changes.
TIFF Files
The TIFF files are conceived by Vaonis only for further processing, not for viewing. Irrespective of whether generated manually or automatically, they have a greater bit depth (16 bit) compared with JPG files (8 bit) and are not compressed. In suitable image processing applications (capable of handling 16-bit files), they therefore should be better editable and thus, lead to improved results.
- Here an example of M 13 with the output-JPG file for comparison: TIFF, output-JPG
However, the TIFF files that I have saved so far are very dark and I have had problems with "getting anything out of them". But I learned that this is correct and that you can get results out of them when using the right software and the right procedure. Vaonis offers a tutorial on the processing of TIFF files using Affinity Photo, and I was able to make the image brighter when following the steps of the tutorial (tone mapping).
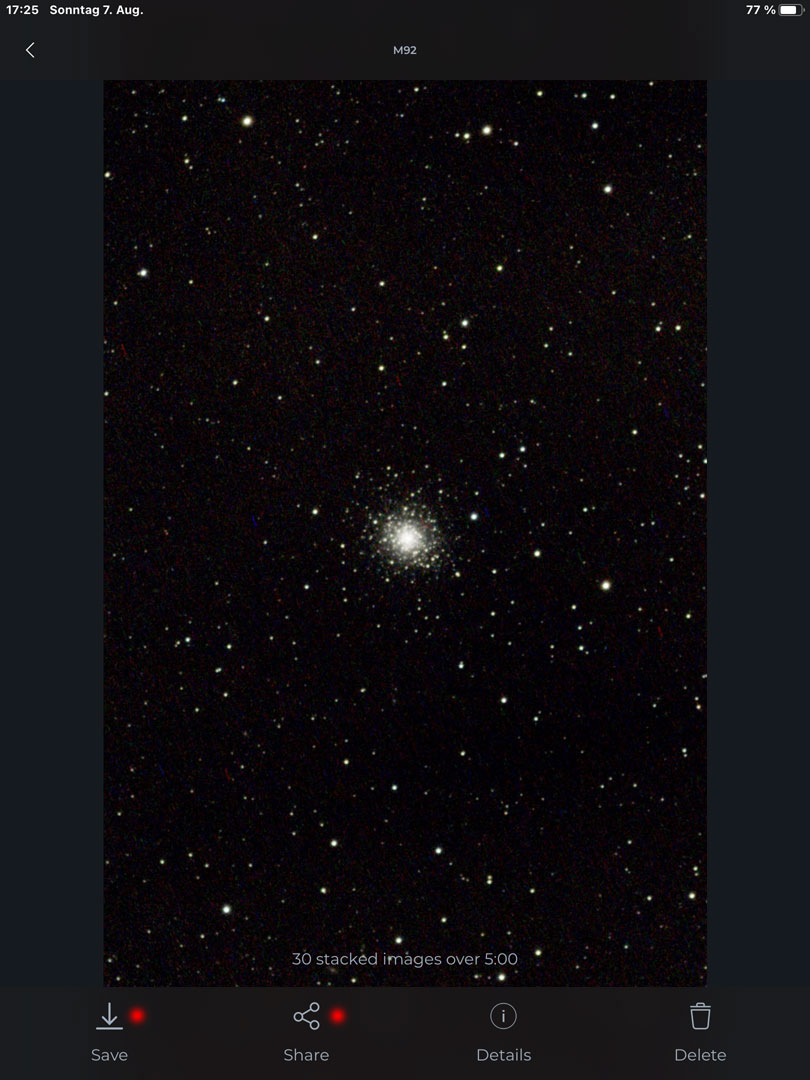
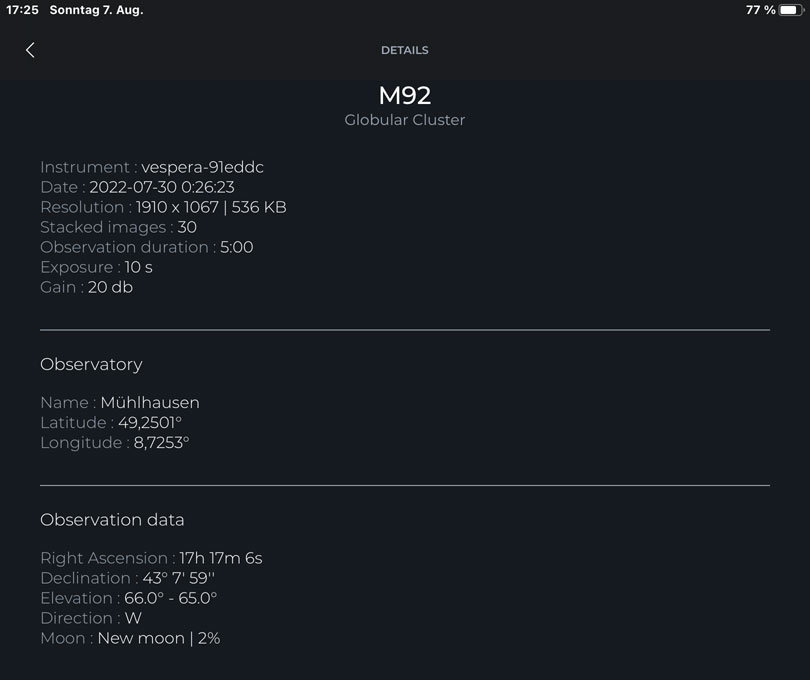
Exposure Information
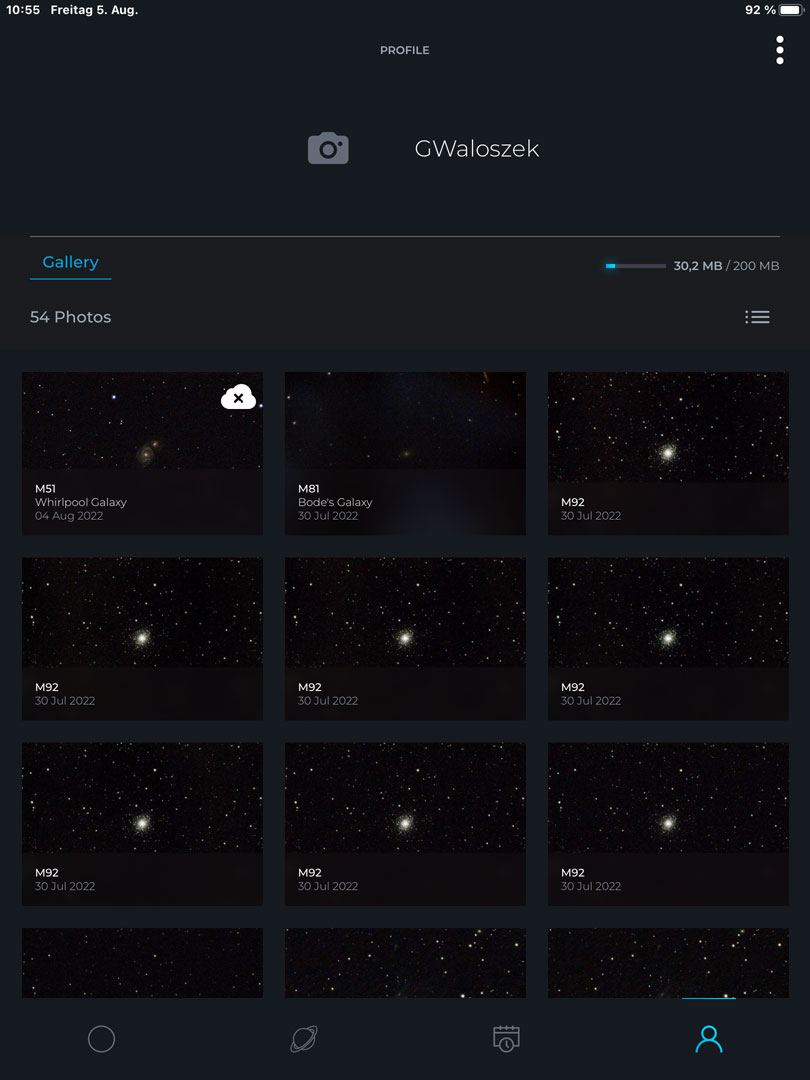
The files in the Gallery contain exposure information (see figure below) that I would like to keep:
However, since an upper limit of 200 MB is shown for the Gallery, I will soon have to delete photos there in order to be able to enter new ones (maybe, old photos will be deleted automatically...). So how can I keep this information? Or are exposure data stored in other places or files?
EXIF Data
As I found out, some of the exposure information is written into the EXIF data of the photos and passed on with them. However, some information (gain, offset, exposure time of the single shot, etc.) is only found in the EXIF data of the FITS files.
By the way, the manually saved JPG files do not differ in EXIF data from those in the Gallery or those on the SD card. So, when I later want to check the EXIF data of a file, it does not matter whether the file is from the album, the Gallery or the SD card. But it should be the original version of the file, so that the data is not possibly overwritten when editing.
In the Gallery, the position of the captured sky object is also indicated; so far I was not able to find this information in the EXIF data. Possibly, proprietary EXIF tags are used when saving the data (and different for FITS than for JPG and TIFF...).
File Names versus EXIF Data - Who Counts Correctly?
At first, I thought that the names of the files on the SD card would be a reliable measure for the number of frames (or the exposure time). But this is only true if no frame is discarded. Otherwise, this number only indicates the total number of shots taken; these are saved as FITS files and can be viewed later (after downloading them to your own computer). In this way, you can check what the conditions were like when you took the picture, for example, if clouds obscured the object you were looking for. Since such images do not make it to the stack, it is otherwise impossible to see what was actually going on during an exposure.
But there is another problem: Even if all files were put on the stack, there is a discrepancy between the file names that start with "1" from the first shot and the EXIF data that start with "1" from the second shot (exposures); accordingly, the total exposure times are then always 10 seconds shorter than the file name would suggest. So there are e.g. 10 files (= 100 seconds) on the stack, but the last exposure is the 9th exposure and only an exposure time of 90 seconds is given instead of 100 seconds. Why this is the case is unknown to me so far.
Conclusions
I have worked on this page much longer than I had expected. I hope that it has become reasonably understandable and clear.
Note: In June 2024, I sold my Vaonis Vespera smart telescope. I therefore cannot report any further experiences with it here. |
Links
- Vaonis: vaonis.com/fr/ (FR), vaonis.com (EN)
- Vespera Kickstarter-Kampagne: www.kickstarter.com/projects/vaonis/vespera-the-new-way-to-observe-the-universe/description
- Vespera/Stellina comparison page: vaonis.com/stellina-vs-vespera (EN)
- Vespera FAQ: support.vaonis.com/portal/en/kb/faq/vespera (EN)
- See also my page offering Astronomy Links.
Appendix: "Manual" and Automatic Saving
Vespera saves photos on the one hand after certain user actions ("manually"), and on the other hand automatically at certain points in time. The manual options are probably conceived for beginners, whereas advanced users might want to save photos automatically, such as all the shots taken during an observation, for further editing. These options, however, quickly fill up Vespera's SD card and from time to time require users to delete older observations. In the following, I would like to describe both options in a little more detail.
"Manual" Saving (after User Action)
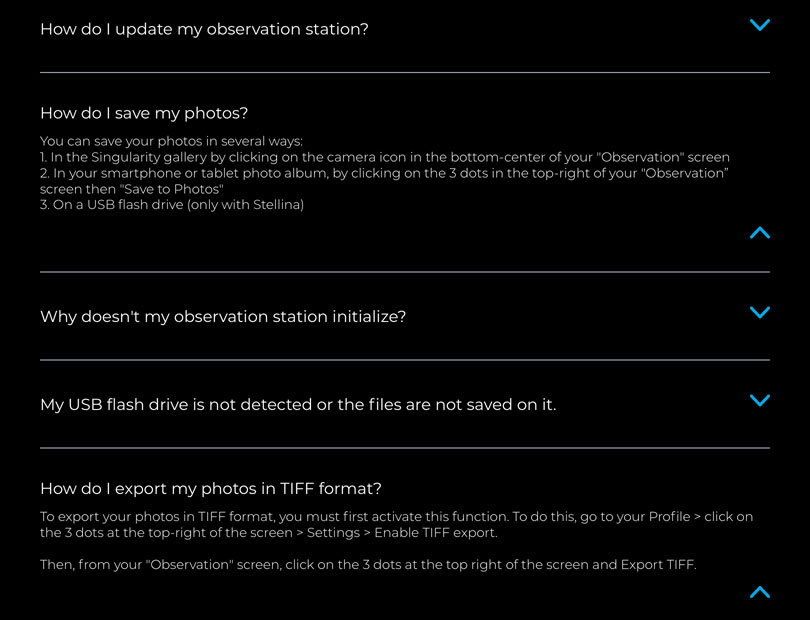
"Manual" ways to save photos are described in the Singularity help ("Help"):
- on the one hand, in the Gallery of the Singularity app (there you can save, share, or delete the photos),
- on the other hand, in the "Singularity" album of the Photos app (on Apple devices).
See "How do I save my photos?" below! At the bottom of the screen is also described how to "manually" save TIFF files ("How do I export my photos in TIFF format?").
Manually saved photos are stored on the smartphone or tablet computer used to control the Vespera via Singularity app. On the observation screen, there are three icons for this purpose:
- One can drop photos in JPG format into the Singularity app's Gallery by clicking on the camera icon (see left figure below).
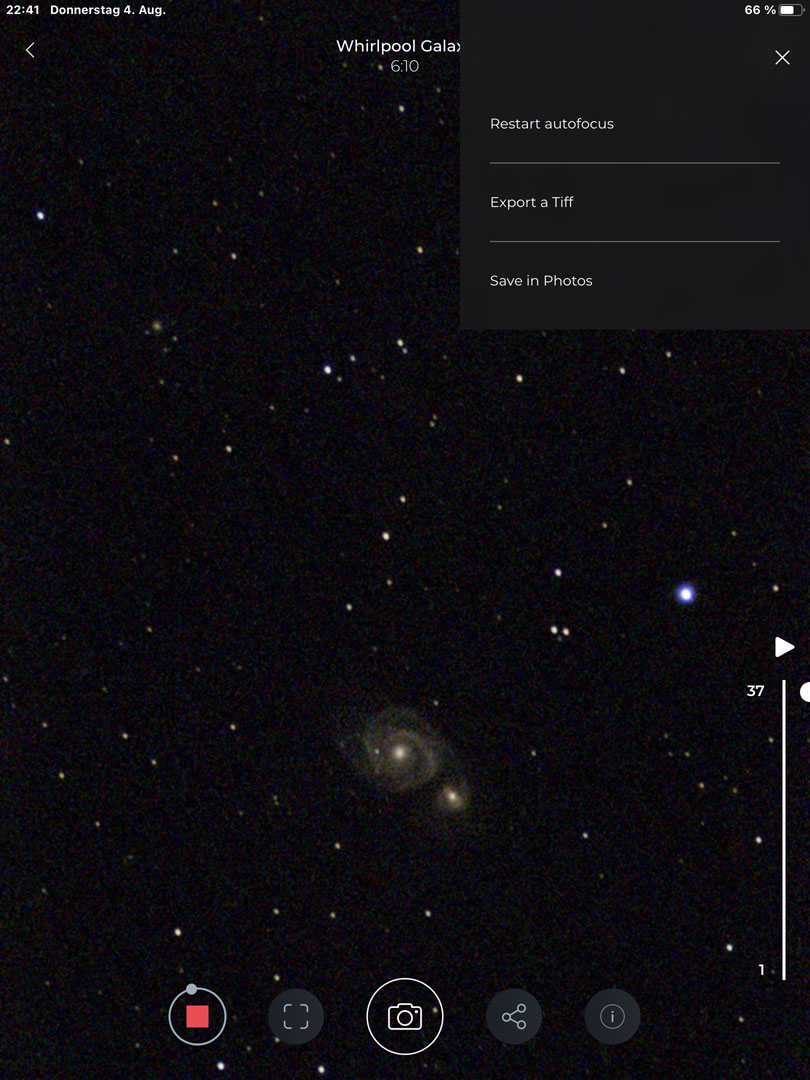
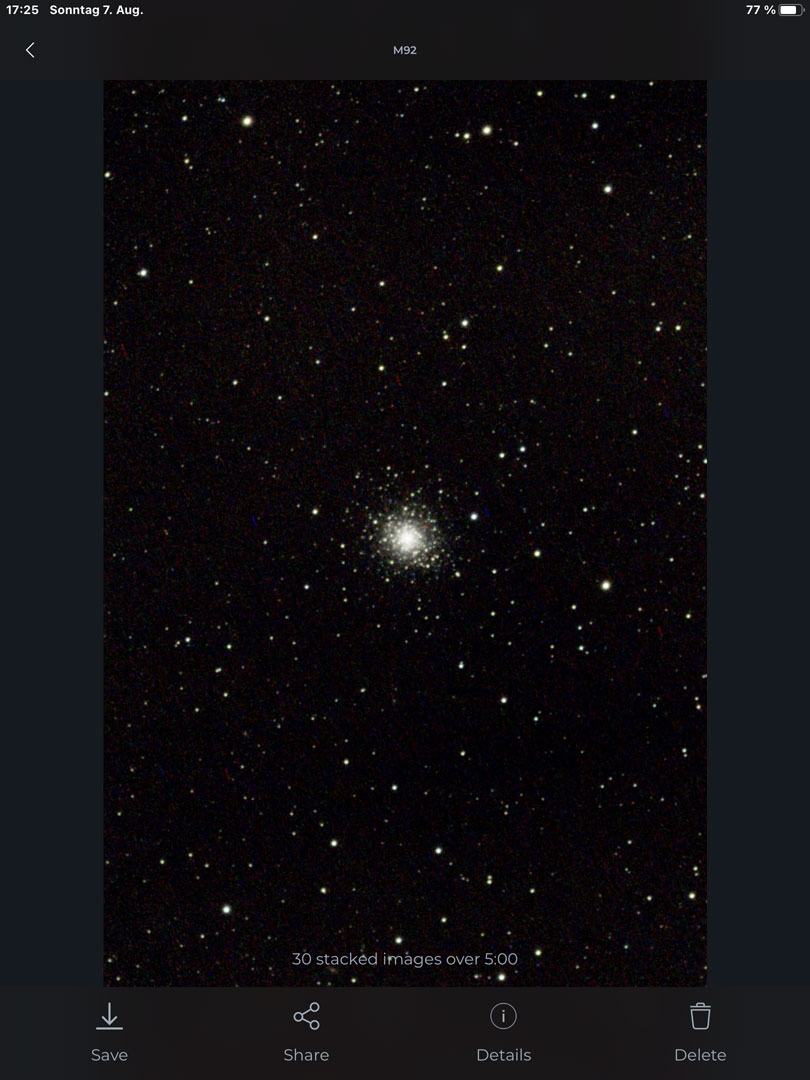
In the Gallery, you can save individual photos with "Save" in the Photos app or share them with "Share" (for example send to one's computer via Airdrop; see right figure below). - JPG and TIFF files can be saved after clicking the 3-dot icon (top right, not visible) and selecting the appropriate file type:
- Single JPG files ("Save in Photos") are stored in album "Singularity" of the Apple Photos* app (other platforms analogously...),
- Single TIFF files ("Export a TIFF") can be shared (which is probably platform-dependent); you can, for example, send them via Airdrop to an Apple computer (one by one...).
- There is also a "Share" button for a direct JPG export of the current image (see figure left below).
*) Note that the photos in an Photos album can all be selected and transferred together via Airdrop to an Apple computer.
 |
 |
|
Figure: The camera icon on the observation screen serves for saving images of the stack to the Gallery; the 3-dot-symbol at the top right (not shown) opens a menu (shown) allowing you to export TIFF images or to save JPG images in the Photos app. |
Figure: In the Gallery, you can save single images to the Photos app or share then (e.g. via Airdrop) |
Manually saved JPG images correspond to the current state of the stack. Manually saved TIFF images correspond to the associated (= same frame number) JPG images, but in 16 bits and without compression loss (see further down).
Automatic Saving (at Certain Points in Time)
Certain types of images are saved automatically if the user has enabled this (see this Appendix for the activation). Automatically saved images are stored on the SD card of the Vespera and must be downloaded to one's computer via FTP* if one wants to view and further edit them.
*) FTP: I had a lot of trouble with downloading the photos from the SD card several times, because the Finder repeatedly reported errors when copying. Apparently, the WLAN was then interrupted (or another network had taken hold in my iPad).
The following file types (if saving is enabled) are automatically saved on the SD card of the Vespera:
- FITS images are saved as soon as a new photo is taken (exposure time 10 seconds); thus, they represent the individual shots.
- JPG images (-output.jpeg) are saved after a new photo is packed onto the stack (i.e. it is good enough for stacking); they cumulatively represent the current state of the image stack.
- Automatically saved TIFF images represent the last saved state of the stack. This state also corresponds to the last saved output JPG file, but in 16 bits and without compression losses. The TIFF file thus has a higher quality than the corresponding output.jpeg file and is better suited for post-processing than the latter. Only one TIFF file is saved per observation!
Manually saved TIFF files, on the other hand, represent the current state of the stack at the time of capture.
*) Automatically saved TIFF images are, at first glance, saved at the end of the observation. But this is not always true. Ionce have observed a case where the first image was saved as a TIFF file. And in this case also only one output-JPG file was created, namely the first one (see figure below). Thus, the TIFF file always corresponds to the last saved output-JPG file.
Figure: Here the TIFF file is at the very beginning, because in total only one file was included in the image stack; thus the TIFF file corresponds to the last state of the stack. The figure shows the first observation of M 13, which was heavily disturbed by clouds and therefore aborted by me.
The TIFF files were too dark across the board on the first two days of observation - and much darker than the corresponding output JPG files; I did not save them on the third day of observation. But later I read that it is quite normal that the TIFF files are so dark! By the way, Vaonis advises to save the TIFF files only if you want to post-process the photos. But even if the TIFF files are considerably larger than the corresponding output.jpeg files, they do not "weigh" so "heavy", because only one TIFF file is saved per observation. The TIFF files occupy over 10 MB (variable), the FITS files a fixed 4.2 MB, and the output.jpeg files a good 0.5 MB (variable).
Appendix: Transfering Files to Your Computer Using FTP
Vespera only allows users to transfer data from its SD card to their own computer wirelessly via FTP. Since most users will not use this data, this may not be a major limitation. In the following, I describe how data are to be transferred from Vespera's SD card to an Apple computer.
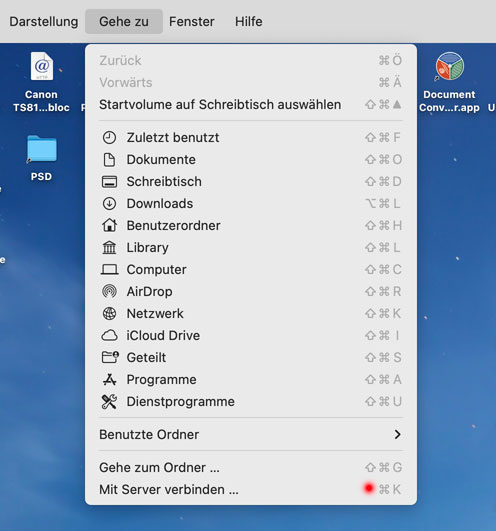
First, Vespera has to be turned on and the computer has to be connected to Vespera's wireless network. The following steps are described using the screen shots taken on my computer:
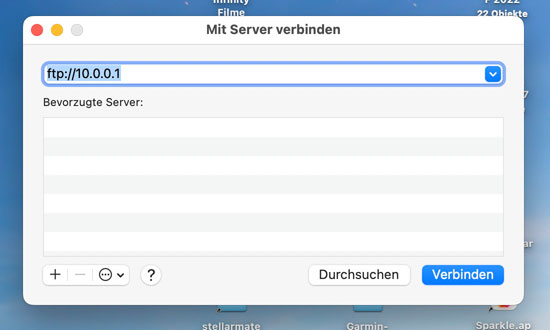
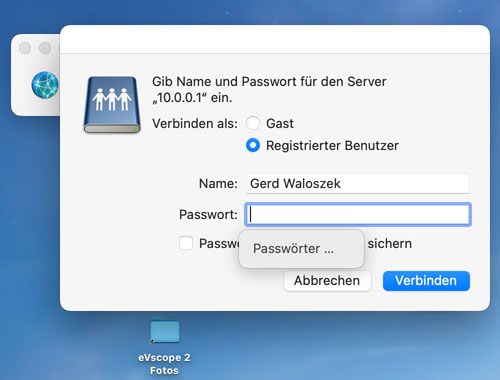
| (1) In the Finder menu select "Connect to Server...): | (2) Select the server and click "Connect": | (3) Enter name and password (not necessary) and connect the computer to the Server (Vespera): | ||
|
|
|
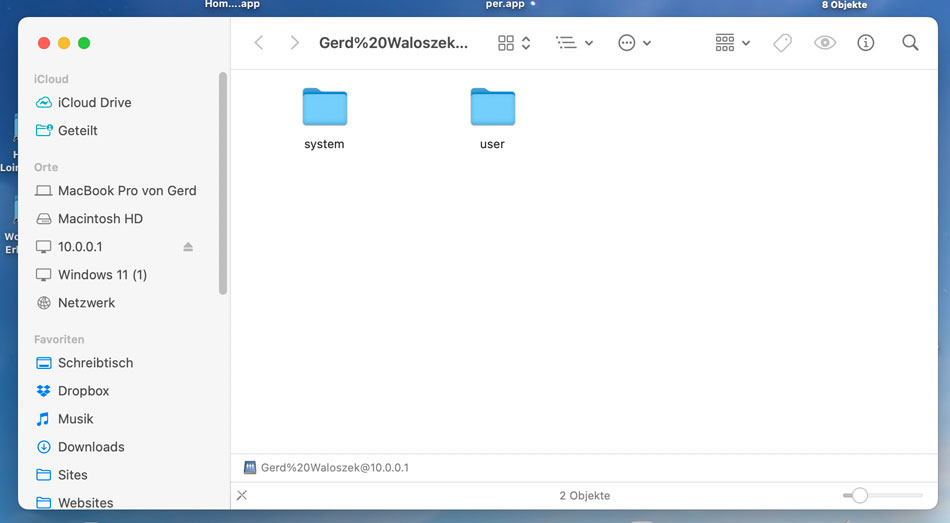
(4) The server directory appears in a new window:
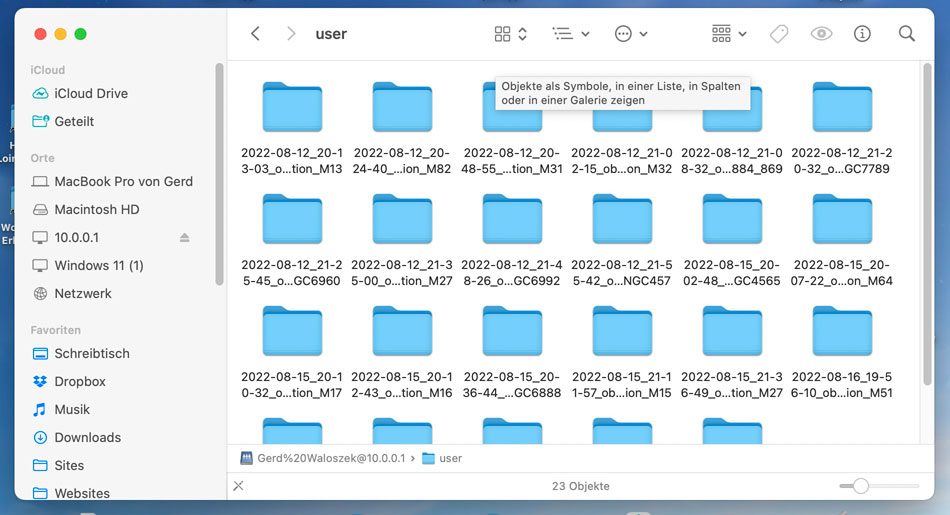
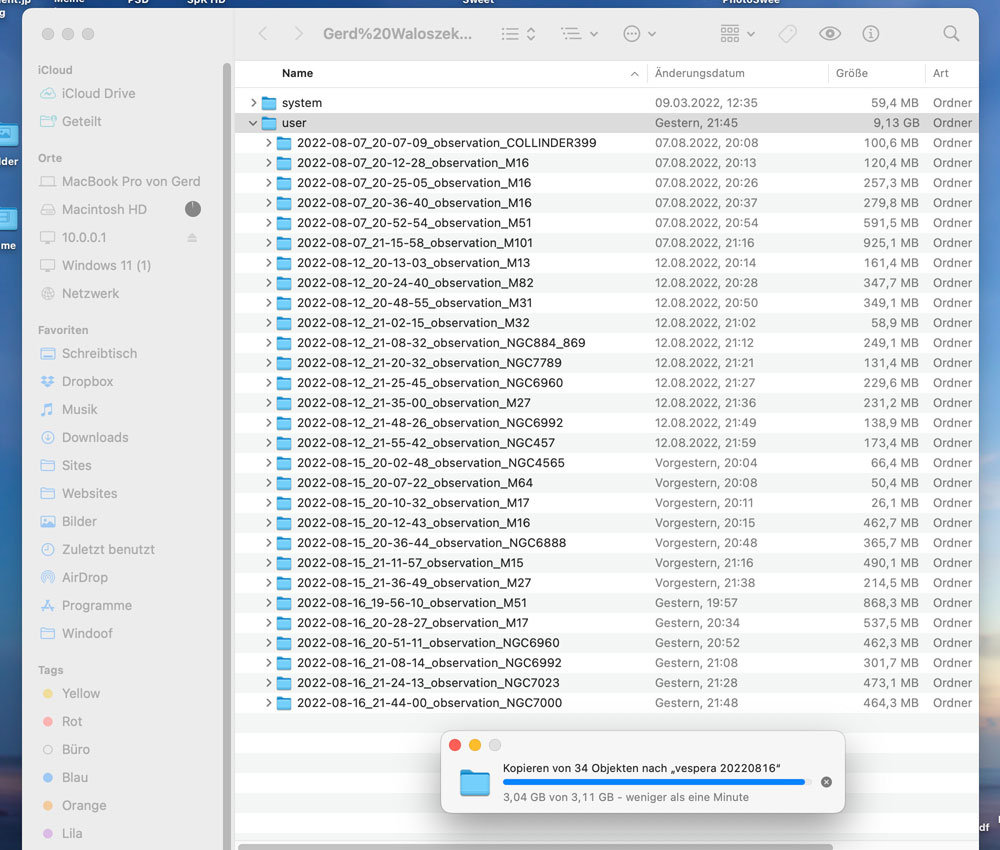
(5) View of the folder "user", which contains the observations:
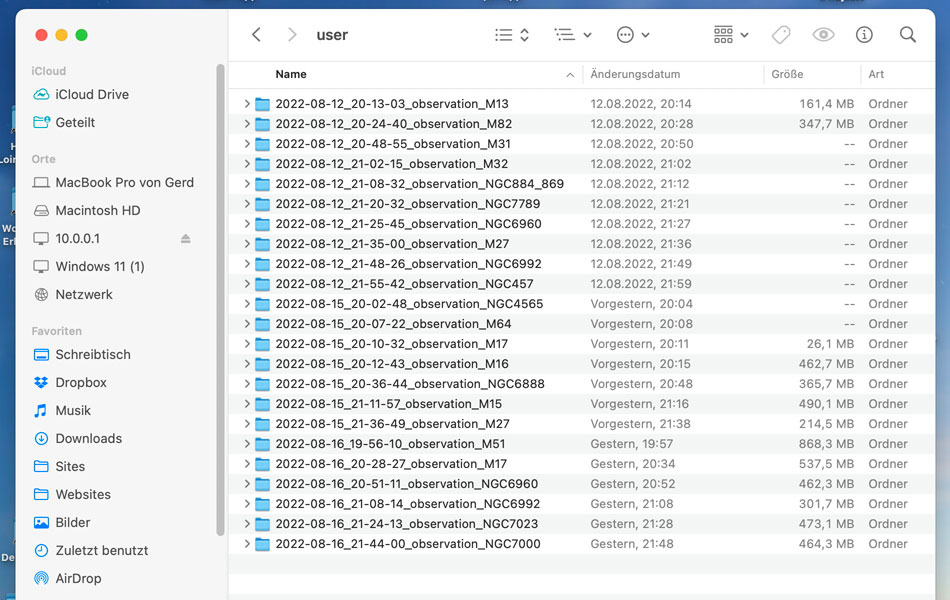
(6) Here, I switched to the presentation in list format, which is clearer for me:
(7) Copying the data takes some time (and there were also problems with WiFi interruptions during the transfer):
Appendix: Deleting Data on the SD Card
If you save observation data automatically, you also automatically fill the SD card of the Vespera, on which users have a little more than 10 GB available for their own data. Diligent hobby astronomers can surely manage to fill the card with observation data in one night. From what I know so far, users have to make sure that there is enough space for user data. However, the Singularity app will issue a warning before it gets to that point (about 500 MB is reserved). In the following, I describe with the help of screenshots how to proceed in order to delete folders (and thus data) on the Vespera SD card (deleting is, according to my experience and in contrast to the tutorial in the Singularity app, not possible if you are connected to a computer via FTP).
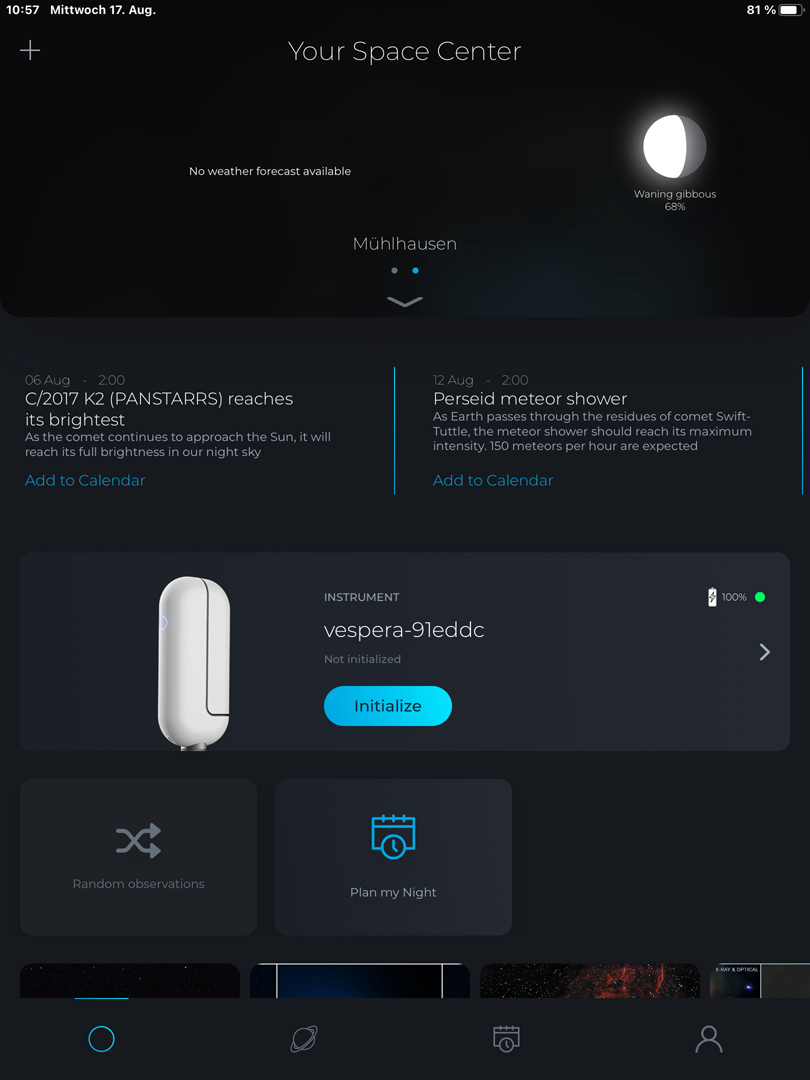
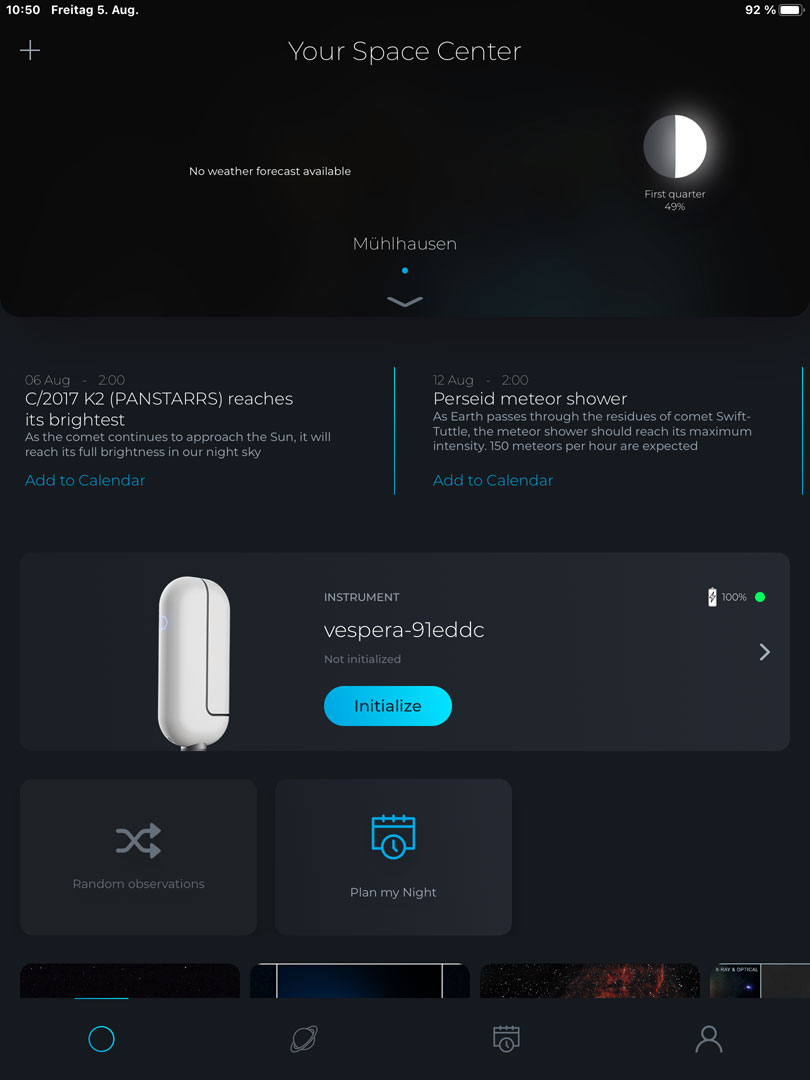
If you click on the right arrow at "Instrument" on the start screen (called "Your Space Center"), ... |
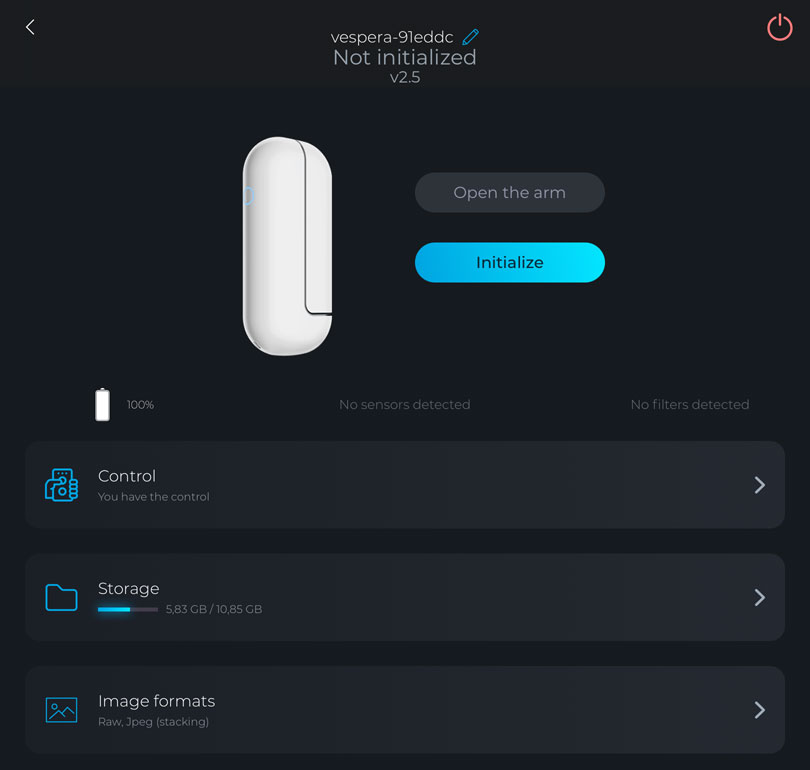
... the following overview screen appears: |
|
 |
 |
|
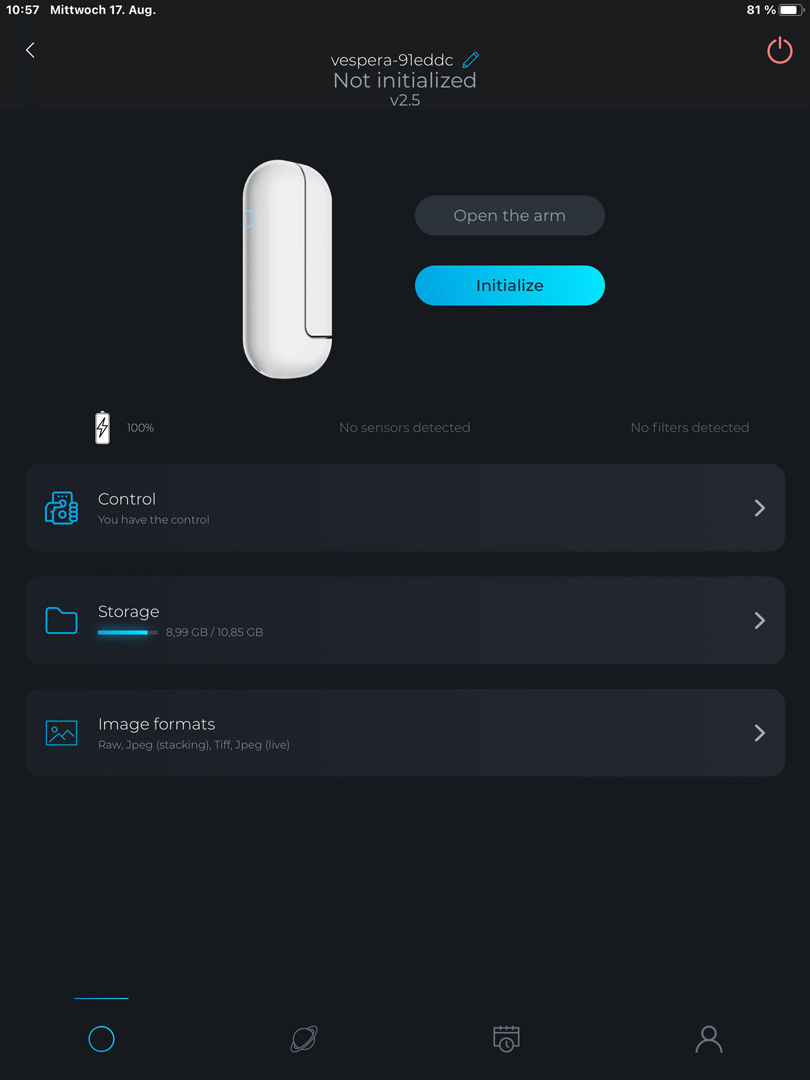
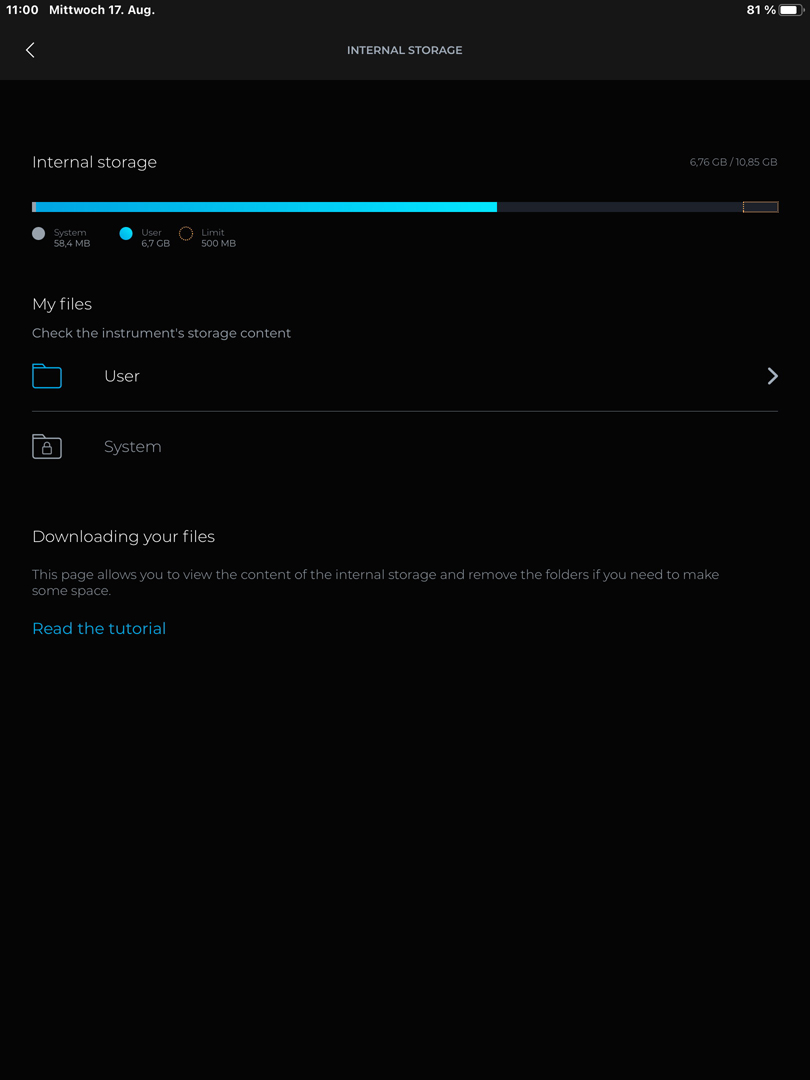
In order to delete observation folders, it is necessary to click on the right arrow at "Storage" and get to the following screen, which shows how much Vespera's memory card is filled with data: |
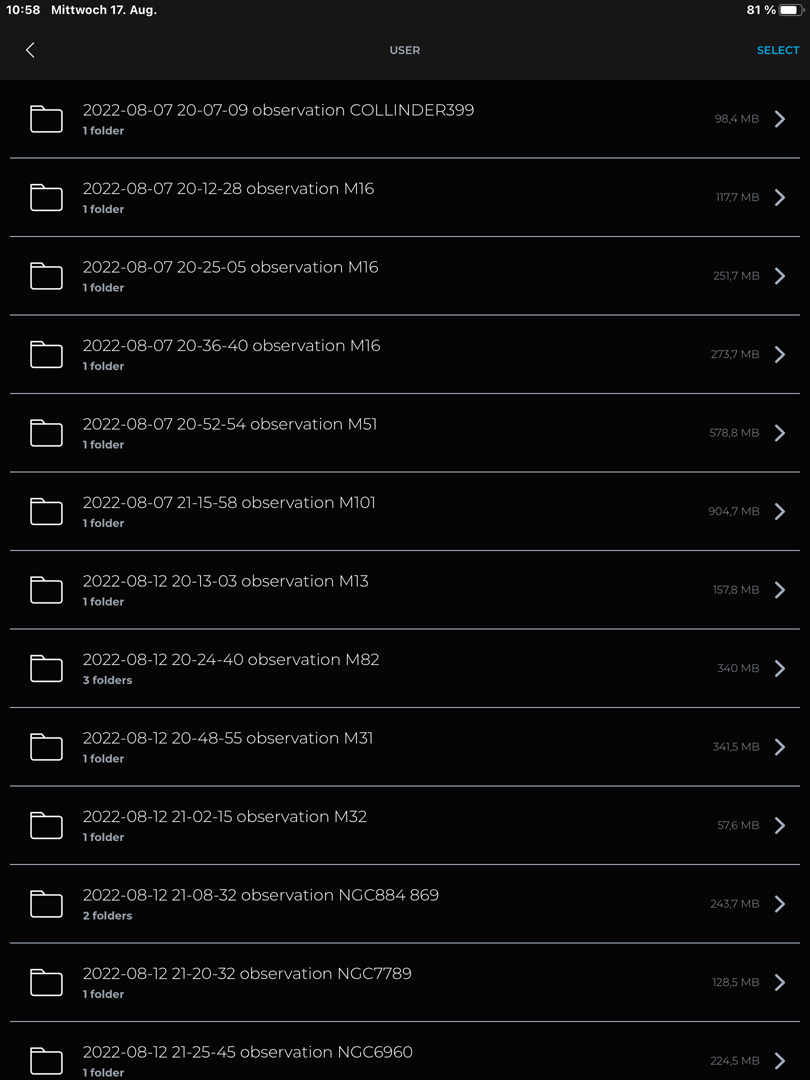
Click on the arrow to the right of "User" to get an overview of the observation folders. Clicking on "Select"... |
|
|
 |
|
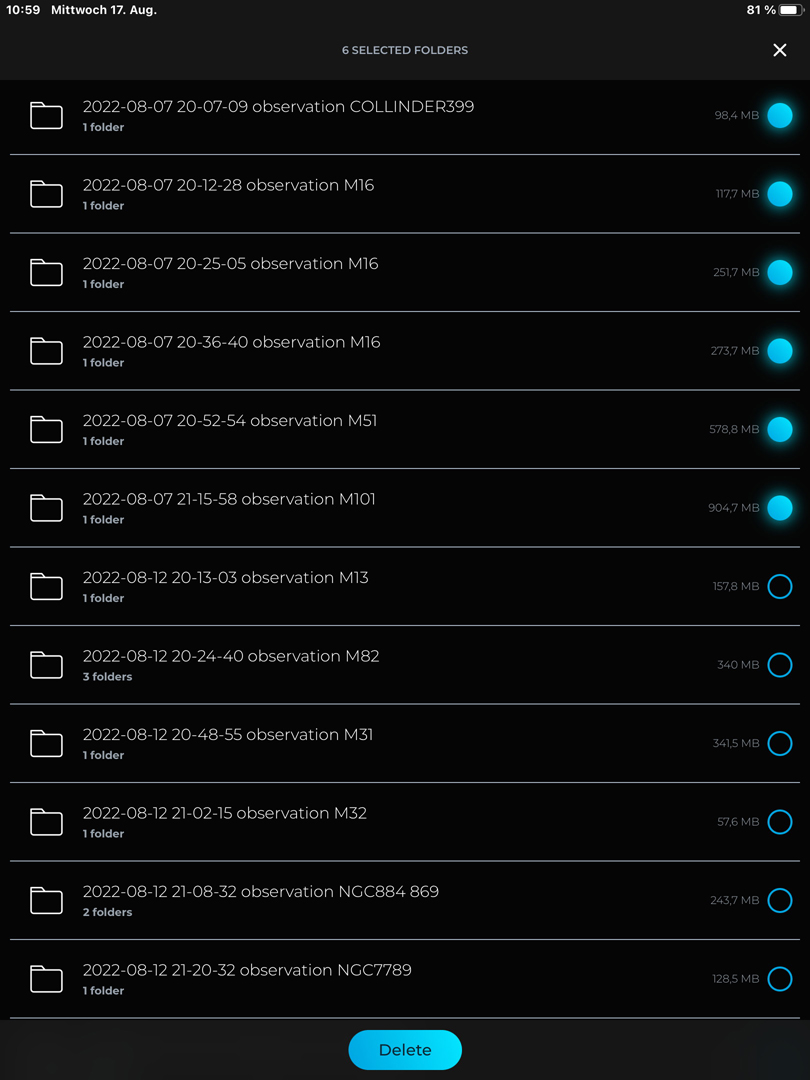
...leads you to this screen where you can select the folders to be deleted: |
Here, I selected the six oldest folders for deletion: |
|
 |
 |
|
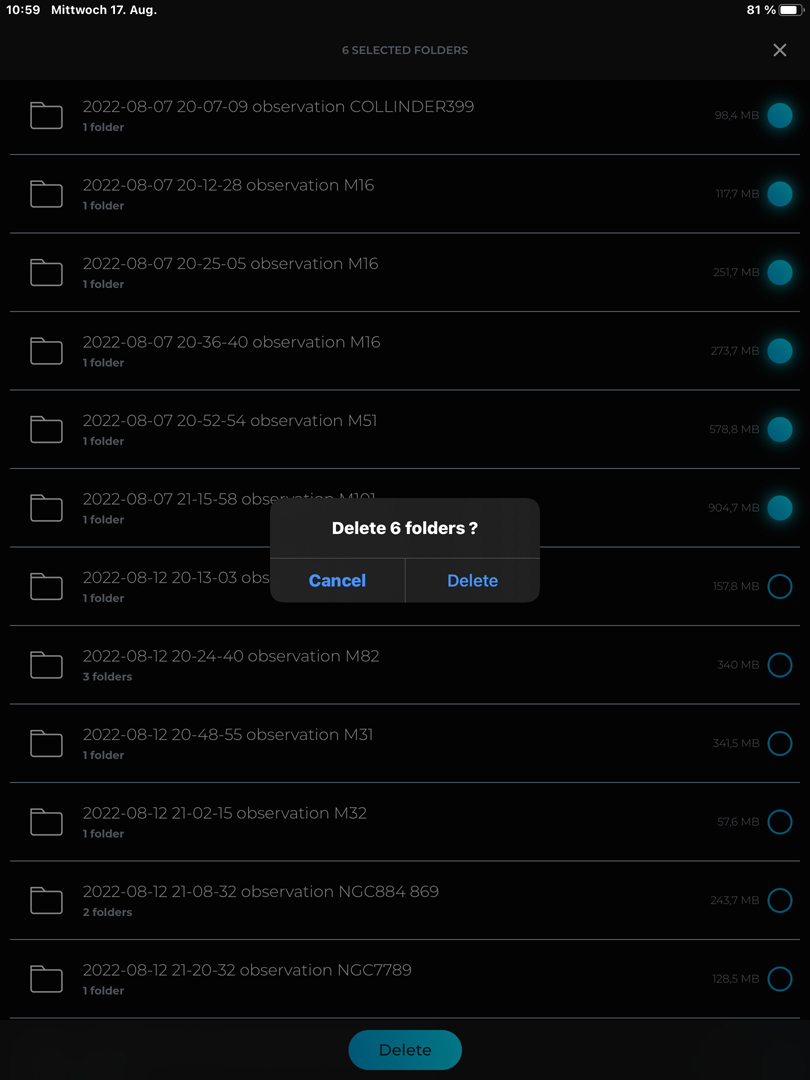
After pressing the "Delete" button, a confirmation prompt appears. If you click "Delete" in the dialog... |
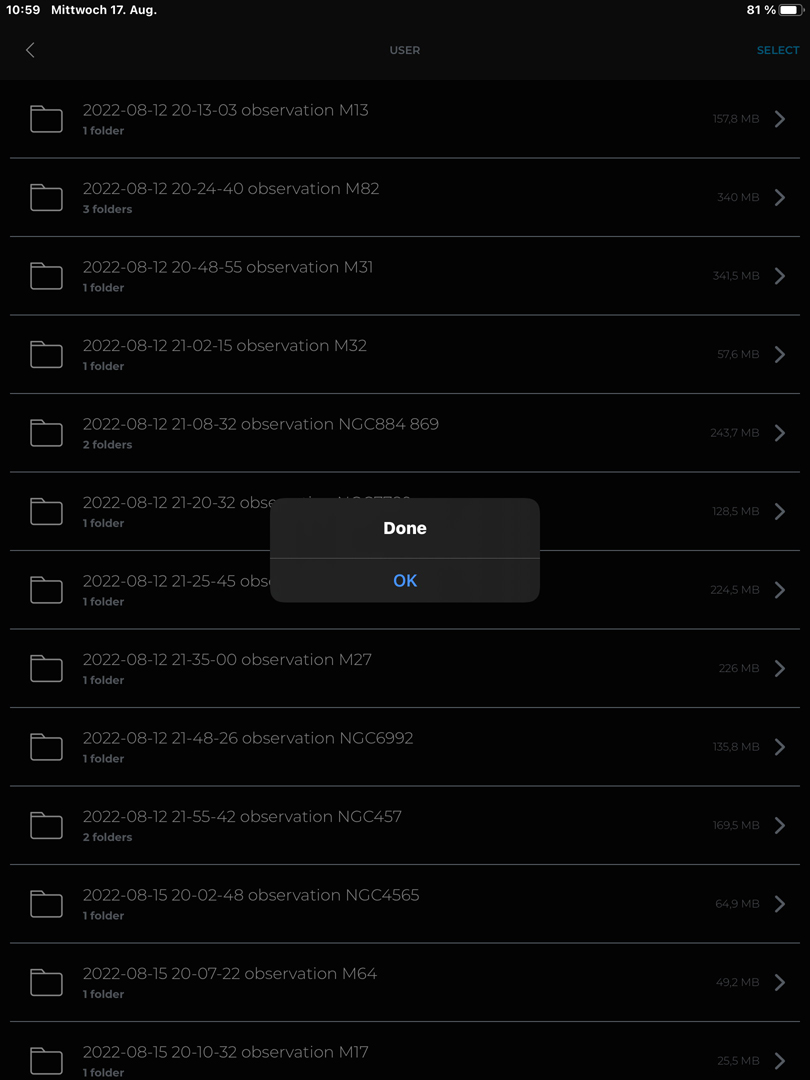
... another (in my eyes superfluous) confirmation dialog appears, which has to be acknowledged: |
|
 |
 |
|
On the overview of the internal memory, you now get the new memory status: |
If you go back one more step (arrow to the left), you get the "summary" state of the memory card; from here you can return to the start screen ("Your Space Center") (arrow to the left). |
|
 |
 |
Appendix: Enabling and Disabling of the Saving of Different File Types (Singularity App)
If you click on the right arrow at "Instrument" on the start screen (called "Your Space Center"), ... |
... the following screen appears. To turn the saving of image formats on or off, click the right arrow at "Image formats"... |
|
 |
 |
|
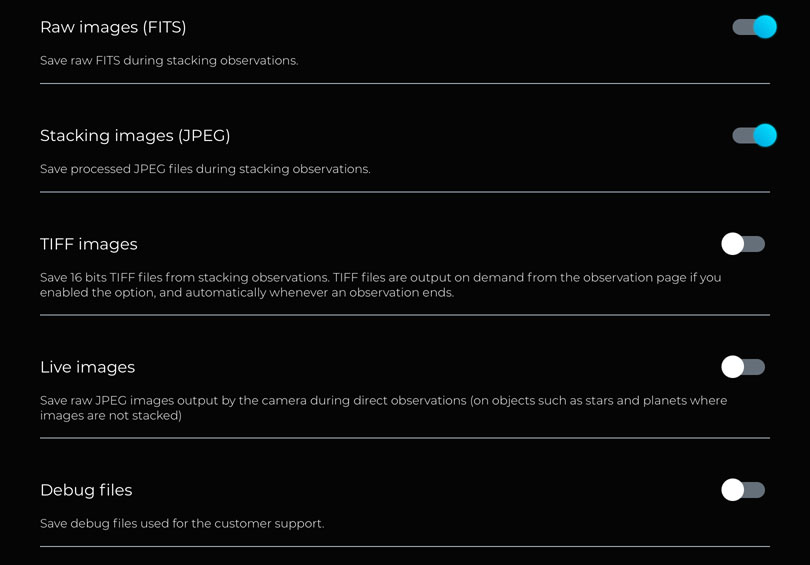
... and get to the following screen, on which the saving of the different file types can be switched on and off: |
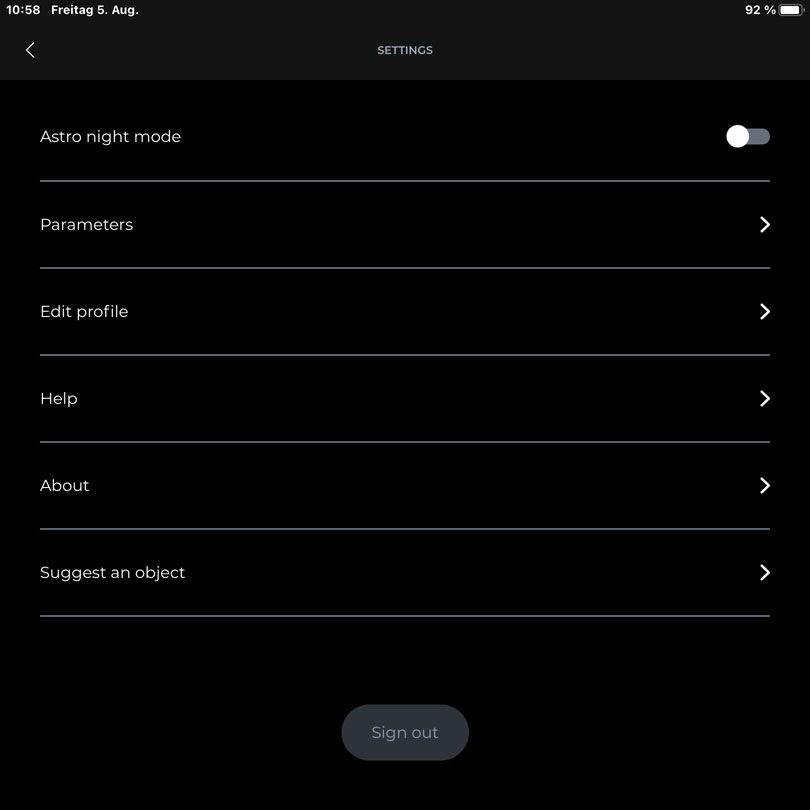
However, TIFF files must be "double activated". To do this, go to the "Settings" in the "User" screen (click on the 3 dots at the top right): |
|
 |
 |
|
You get this screen on which you click the right arrow at "Parameters": |
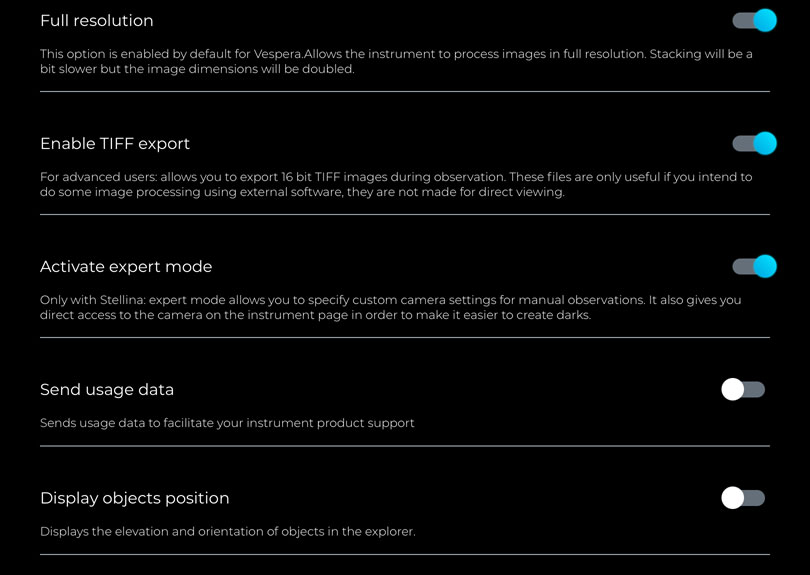
Finally, you get the following screen, which also allows you to enable the "manual" export of TIFF files: |
|
 |
 |
|
made by |
| 11.06.2024 |