Astronomy | GXR · GR · RX100 M1 · RX100 M4 · RX10 M3/4 · TZ202 · X Vario · M240 · General | Photos | Conf. Places | Calendars | Art
Sony RX100 M1: Configuration
Introduction: Overview of What Can Be Configured | The Configuration Options in Detail | How We Use the Configuration Options | Further Useful Settings | Conclusions | Links and Books | Appendix: A Demonstration of the Settings Screens
On this page, I describe how you can configure the Sony RX100 M1. I demonstrate the basic configuration options for this camera, but I cannot guarantee that my list of configuration options is complete... I also describe our configuration choices.
Also note that there are further settings that are only listed described here; some of them will be described elsewhere (for example, support for manual focusing).
Note: I got somewhat crazy about how to write the Sony terminology. Books and manuals differ in many ways. I will write names (on buttons, in menus, etc.) in upper case and italic (or example: the Focus Tracking function, in short, Focus Tracking) and most other things in lower case (even though Sony writes "Control Ring" - but control wheel...). Please note that I am not a native speaker and that there will be many errors...
Introduction: Overview of What Can Be Configured (or Configures the Camera...)
In the following, I will describe the options that the Sony RX100 M1 offers for configuration. Configuration means in this case that you can configure certain camera controls (dials, levers, buttons) to behave in different ways, for example, to allow you to set different things (for example, to set exposure, focus, or dynamic range).
Buttons that set variants or modes of a certain function will, on the other hand, not be regarded as configurable here (for example, the flash button that cycles through different flash modes). But some entities may be "borderline cases"...
Note that I might also have chosen to simply list all the menus and their options, but then I would have just replicated the camera manual.
Overview of the RX100 M1 Controls
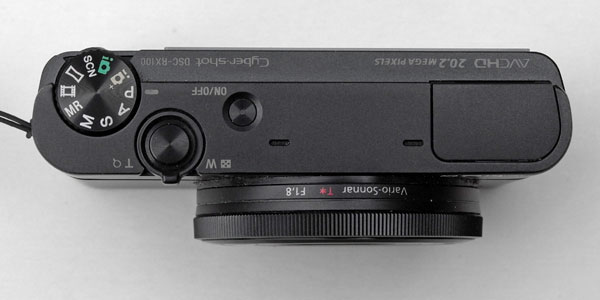 |
Top view (from left to right to bottom)
|
|
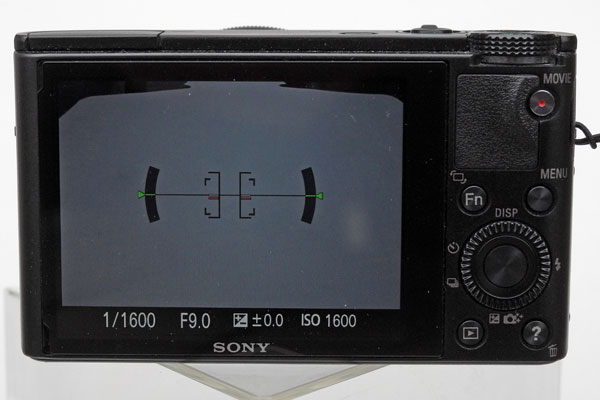 |
Rear view (from top to bottom)
|
(C) Configurable (more or less...)
The Configuration Options in Detail
| Control | Sub-Control | Text/Symbols | Options | Default | Our Settings |
| Control Ring | Standard: Performs one function that is specific to the selected shooting mode (e.g. P: program shift, A: aperture, S: shutter speed) Can be set in the Custom menu Control Ring to one of the following functions:
The following options always have priority:
|
Standard | Standard | ||
| Fn Button |
|
Fn | Offers seven slots, which can be assigned in the Custom menu Function Menu Set. to one of the following functions:
Press the left and right buttons of the control wheel to scroll through the seven slots. Turn the control ring/wheel to change the settings. Press the center button to confirm the settings and exit the Fn button screen. Review: Image rotation |
1: Exposure Compensation |
1: ISO |
| Control Wheel | Top button | DISP | In the Custom menu DISP Button (Monitor) you can define, which screen types are shown (in cyclic order):
|
unknown | Display All Info., No Displ. Info., Level |
| Left button | Self-timer, Drive Mode | Can be assigned in the Custom menu Func. of Left Button to one of the following functions:
|
Self-timer, Drive Mode | AF/MF Control Toggle* | |
| Right button | Flash (Mode) | Can be assigned in the Custom menu Func. of Right Button to one of the following functions:
|
Flash Mode | AEL Toggle* | |
| Bottom button | Exposure Compensation, Creativity Style | Depends on the selected mode:
|
Depends on the selected mode | Exposure Compensation | |
| Center button | SET (no text) | Can be assigned in the Custom menu Func. of Center Button to one of the following functions:
In the Standard setting, the center button activates focus tracking - or the movement of the flexible spot if this focus mode is activated. If the focus magnifier is active, the center button toggles between magnifications. Also used to set (confirm) values. |
Standard | Standard (function depends on setting of the Autofocus Area: Center = Focus Tracking, Flexible Spot = Move AF Area) | |
| Wheel | Used to select values by turning the control wheel clockwise or counter-clockwise. | n.a. | n.a. |
*) I put the original functions into the Fn menu.
Note that many of the controls perform additional tasks such as moving the AF area, switching between functions, etc. Moreover, half-pressing the shutter button cancels playback and magnifications modes and exits menus and help screens.
In the table above, I also list our current configuration, but do not take that information too seriously. Our assignments may change over time and according to our changing needs and habits - and I may forget to update our assignments here...
How We Use the Configuration Options
Above, I more or less describe the "mechanics" of the configuration options for the Sony RX100 M1. For ways of using them, I would like to point you to some books and places on the Web where this topic is dealt with (see links below).
Nevertheless, I will also describe some "configuration versions" that we went through. The basic idea behind these versions was to use the configuration options so that we can achieve certain functionalities more easily. I describe this "journey" in the following.
Control Wheel Buttons
Version 1: Left (or Right)/Center Button - Activate Manual Focus and Focus Magnification Easily
First, I considered how we can access manual focusing more easily, that is, without having to use the menu system (or the Fn menu) to set focusing to manual (MF). Here, the AF/MF Toggle function comes to our rescue: The left (or right) button of the control wheel can be assigned to the AF/MF Toggle function so that you can easily switch between AF and MF modes (note that this "MF" is a temporary state that differs in some respects from setting Focus Mode to MF).
The Center button can also be assigned to the Focus Magnifier function so that you can activate magnification manually without having to turn the control ring to focus (see below).
Note: I assigned the overwritten default function of the control wheel buttons (Self-timer/Drive Mode or Flash Mode, depending on whether you use the left or right button for the AF/MF Toggle function) to a position in the Fn menu (see table above).
What is the Benefit of this Assignment?
Assigning the AF/MF Toggle function to a configurable button makes it easy to set the camera to manual focus (and back to AF again - AF-S to be precise). While you can enable Manual Focus Assist (magnification, via Control ring) and Focus Peaking (via Fn menu only), it is often disturbing for me that I can activate magnification only by turning the control ring. Often, however, I just want to set MF to the minimum focus distance and do not want to turn the control ring to activate magnification (usually, I forget in which direction I have to turn it...). I therefore prefer to activate magnification using a button. This means that I have to use the Focus Magnification function instead of the Manual Focus Assist function (you can also leave the Manual Focus Assist function on...), which is a little more complex but also offers more options.
With this assignment, I can easily switch to manual focus, turn magnification on as needed (and peaking if enabled), and adjust the focus with or without magnification.
Version 2: Left/Right Button - Having AE Lock/AF Lock and Manual Focus Support
While the above button assignment is useful for manual focusing, I was also looking for ways of locking exposure and distance easily, because my wife initially had problems with half-pressing the shutter release button. Moreover, this locks both functions simultaneously, and you may want to lock only one of them. I found out that such a wish can easily be fulfilled and is even compatible with the assignments of version 1, meaning that you get the lock functions as well as manual focus support: You can configure the left and right buttons of the control wheel to achieve something like AE lock (AEL) and AF lock (AFL) and still use the center button for Focus Magnification. I explain this in the following.
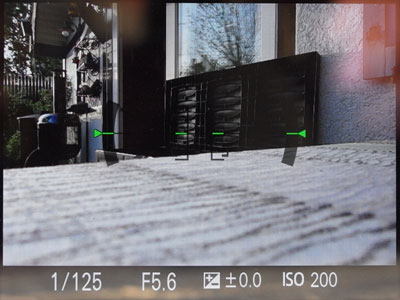
AE lock is easy because there is already such a function available: AEL toggle. You simply have to assign it to a configurable button for easier access. In our case, I assigned this function to the right button of the control wheel.
 |
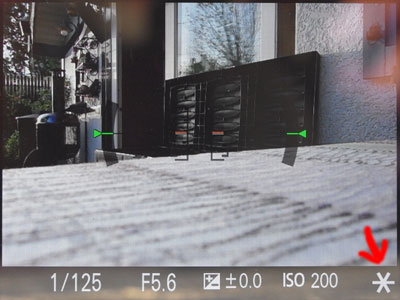 |
Figures: AE lock is indicated at the bottom right of the screen by an asterisk (right); it is a toggle function (left: AE lock not activated).
AF lock, however, is not directly available as a function, and you need a work-around to simulate this functionality. In the end, this work-around is even more powerful than a simple AFL function. The work-around is provided by the AF/MF Control Toggle function, which does what its name says. The important trick, however, is that when you switch from AF to MF, the camera sets MF to the distance (or focus) that AF had set before. Thus, if you toggle from AF to MF you effectively lock the focus - as long as you do not change the focus manually. The latter might even be an option if you think that the focus needs some improvement (for example, if you are not quite sure, whether AF really set the focus to infinity; regrettably, the RX100 M1 does not show a distance scale when focusing manually, as the M4 does...). That's why I wrote that the work-around is even more powerful than a simple AFL function.
Thus, all you need to make the AF/MF Control Toggle function easily accessible is to assign it to another configurable button. And as described for version 1 above, I use the left button of the control wheel for this purpose. Of course, you can reverse the arrangement (that is, exchange the functions that you assigned to the left and right buttons).
You can still use the center button for Focus Magnification so that you have all options of version 1 with these assignments, plus the AF and AE lock functions. Thus, version 2 can be regarded as an extension of version 1 (which came to me as a surprise initially...).
Note: I assigned the overwritten default functions of the control wheel buttons (Self-timer/Drive Mode and Flash Mode) to positions in the Fn menu (see table above).
What is the Benefit of this Assignment?
The AF/MF Control Toggle function serves two functions here: (1) toggling between AF and MF and (2) locking the focus. The AEL toggle just does what its name says. With this assignment, you never need to half-press the shutter button to lock exposure or focus, which is somewhat "finicky." But you can also lock one of the two first and then the second by half-pressing the shutter button. Often, however, you need to lock just one of the two, anyway. In any case, this assignment provides a lot of functionality and also allows you to use the center button for the Focus Magnifier function for easier manual focusing.
Note: I found out that it does not matter which of the three functions is assigned to which of the three buttons...
Versions 3a and 3b: Center Button on Standard as Support for the Flexible Spot or for Focus Tracking
If you want to use autofocus with the Flexible Spot autofocus area for setting the focus point precisely (for example for close-up and macro shots), you are, however, in trouble with the above-mentioned assignments, because it is cumbersome to enter the state for moving the flexible spot with them (it is possible, but it requires calling the Fn menu...). The same applies to the case that you want to use Focus Tracking in AF mode. If you can do without the manual Focus Magnifier function on the center button (you can still use the control ring for manual focusing, which activates focus magnification automatically), you can set the center button to Standard, which I call "version 3" of my assignments. In this case, I found the following two further assignments quite useful:
- Version 3a (Flexible Spot): Set the Autofocus Area to Flexible Spot in order to be able to move the autofocus spot area, and use the center button to enter end leave the state, in which you can move the Flexible Spot. This works well for me when shooting close-ups and macros using AF on the M1 (on the M4, this issue can be avoided, because there is one more button available that can be customized).
- Version 3b (Focus Tracking): Set the Autofocus Area to Multi or Center and use the center button to initiate Focus Tracking. As I found out, this can also be useful for close-up shots when you want to use AF and alleviate somewhat the movements of the target or your own movements. See page Close-Ups with Focus Tracking for more information on this topic.
Thus, these options give preference to using autofocus, whereas version 2 gives preference to using manual focus. The AEL and AFL functions are implemented as in version 2.
Note: At the moment, we use the version 3b assignments with Autofocus Area set to Center, so that the center button activates the default function of Focus Tracking. Whenever we want to use the flexible spot, we set Autofocus Area to Flexible Spot.
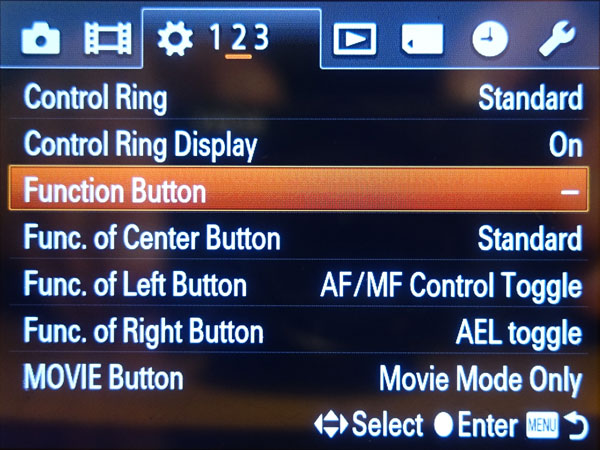
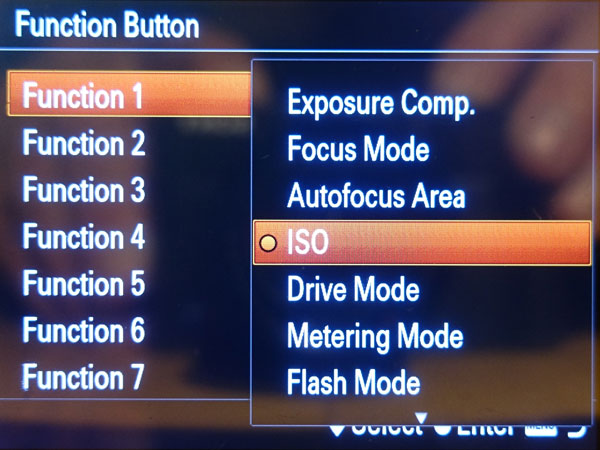
Configuration of the Fn Button
The Fn button offers seven slots, which can be assigned in the Custom menu, item Function Menu Set. quite a number of functions, including Not set.
 |
 |
 |
||
The Function Menu Set. menu item in the Custom menu (page 2) allows you to assign 7 function to the Fn menu slots. |
The assignment is done on one page. The first slot is selected. |
Assignment for the first slot. The menu starts at the current selection. |
And here is how the Fn button menu looks:
 |
 |
 |
||
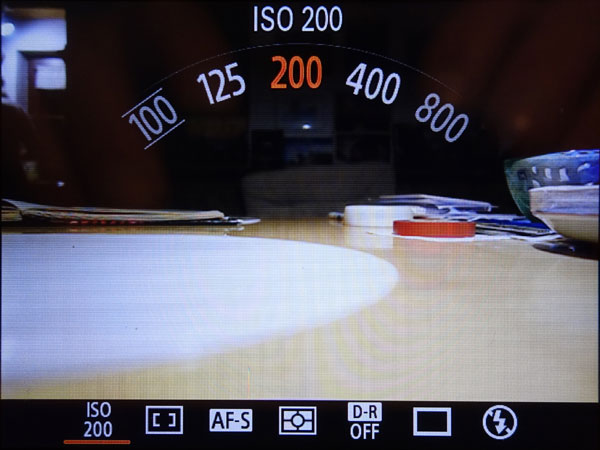
Fn button menu, ISO selected. The settings are displayed immediately |
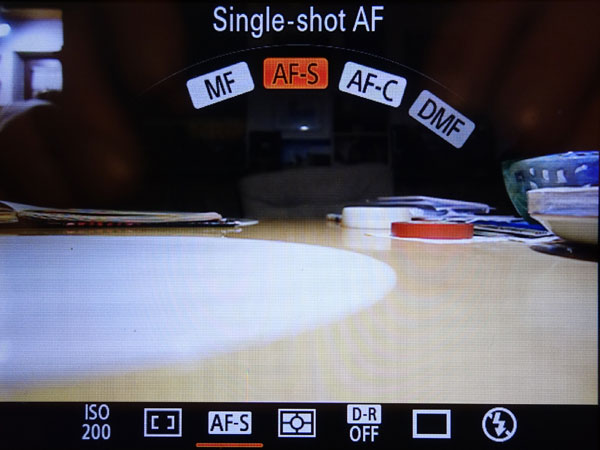
Fn button menu, Focus Mode selected |
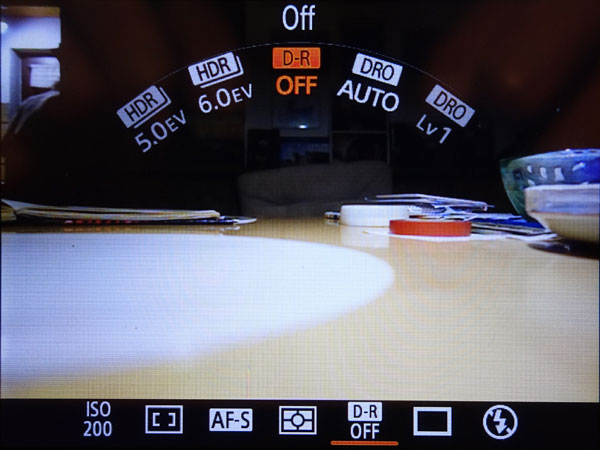
Fn button menu, DRO/HDR Auto selected |
The Fn button cycles you through the slots and leaves the menu after the last slot. The left and right buttons do the same, but without exiting the menu. The control wheel (or the control ring) moves you through the options.
Above, I listed the following "personal" assignment of functions to the Fn button menu slots:
- ISO
- AF Field
- Focus Mode
- Metering Mode
- DRO/Auto HDR
- Drive Mode/Self-timer
- Flash Mode
This is the current state, and it will take some time before we really know, which functions we use often and should therefore be added to the Fn button menu. And the positions are also preliminary.
Configuration of the Control Ring
We set the control ring simply to Standard so that it performs the standard functions. When manual focus (MF) is active, the control ring is used for focusing.
Further Useful Settings
In addition to the settings of the buttons and rings there are some further settings, which determine the behavior of the camera and are quite useful for me. Some of them can be done by assigning a function to a buttons or to the Fn menu, other only by going into the menu system. In the following, I provide a table of those settings that I find important for me; they all reside in the Custom menu (see the screens in the appendix).
| Name | Page | My Value | Comment |
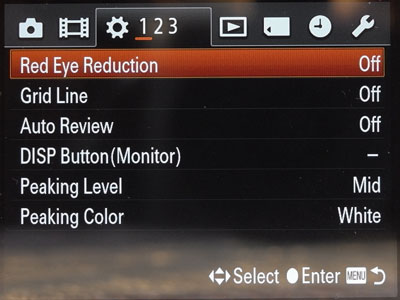
| Grid Line | 1 | Rule of 3rds Grid | Helps my wife aligning objects |
| Auto Review | 1 | Off | My wife does not like Auto Review |
| Peaking Level | 1 | Mid | As a start... |
| Peaking Color | 1 | Yellow | As a start... |
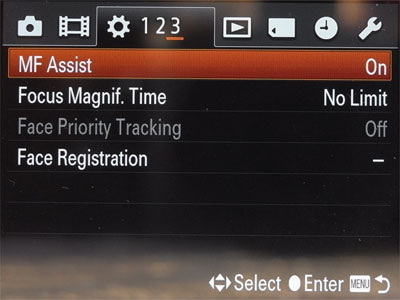
| MF Assist | 1 | On | Magnifies as soon as you turn the focus ring; we find this helpful most of the time |
| Focus Magnif. Time | 1 | No Limit | A matter of taste... |
On this camera, the Shooting menu controls the Zoom types (this is different on the RX100 M4 and the RX10 M3):
| Name | Page | My Value | Comment |
| Clear Image Zoom | 4 | On | Can help in some situations where my wife needs more focal length than 100 mm equiv. |
| Digital Zoom | 4 | Off | The quality is too low... |
Conclusions
The Sony RX100 M1 looks like a highly customizable camera. At a closer look, however, I felt more constrained than with, for example, the Ricoh cameras. The options look fairly complex at first sight, and the minor differences between some options makes configuration also a little bit confusing. Nevertheless, I found out that it is possible to overcome some limitations of the camera by using the configuration options, which is good news, after all. At the moment, we use the assignment that I describe above as version 3b.
Links and Books
- Martin Vieten (2014). Das Sony RX100 & RX100 II Handbuch. dpunkt.verlag GmbH (ISBN-10: 3864902134, ISBN-13: 978-3864902130) (German)
- Alexander S. White (2012). Photographer’s Guide to the Sony DSC-RX100. White Knight Press, Henrico, Virginia (ISBN: 978-1-937986-08-7, paperback)
Appendix: A Demonstration of the Settings Screens...
In the following, I show sample settings screens that you will find in the camera's Custom menu:
 |
 |
 |
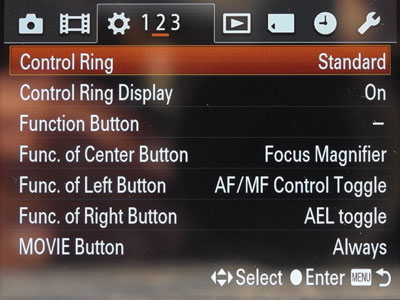
Note that on screen 2 you can see the assignments that I describe above (left, center, and right button on the control wheel); the settings on screen 1 shown here are not our settings!
|
made by |
| 03.03.2020 |